Sargent & Greenleaf Electronic Safe Lock Series S&G 6121 Operation
Open the original PDF document
View PDFModel 6121 Motorized Electronic Combination Lock
Operating Instructions
The Sargent & Greenleaf Model 6121 combines ease of operation with security. Its advanced electronic circuit design makes it easy to operate and easy to change codes. Follow these instructions carefully to get the best possible performance from your lock.
INTRODUCTION
- The Sargent & Greenleaf Model 6121 Motorized Electronic Combination Lock is shipped from the factory with a factory master code only. It is 1 2 3 4 5 6 #. This code is used to open the lock and set or change all codes. If the safe maker or your dealer sets a new master code , he will advise you of the change. You should set the lock to your own, unique master code immediately.
- The Model 6121 will always open on the master code . At your discretion, it can also be set to accept a supervisor code and up to seven different user codes . The master code is designated as code #1, the supervisor code as code #2, and the user codes (if set) are designated by user I.D. number 3, 4, 5, 6, 7, 8, and 9. The supervisor code and the user codes do not exist until they are programmed into the lock.
- Each time a button is pressed and the lock accepts the input, it emits a "chirp," and the LED on the keypad lights momentarily.
- All codes must contain six digits or six letters. Any digit or letter can be used as many times as you want in a code. For instance, the following codes, while not recommended, are acceptable and will operate the lock:
5 5 5 5 5 5 # OR J J J J J J #
- All codes end with #. This signals the lock that you have finished entering all digits of the code.
- If you pause more than 10 seconds between pressing buttons when entering a code, the lock will assume you do not want to continue, and it will reset itself to the original code. To open the lock, begin the code entry sequence from the first step.
- If you realize you have pressed an incorrect button when entering a code, press*or simply pause ten seconds or more, then begin entering your code again.
- If four incorrect codes are entered in a row, the Model 6121 lock will shut down for a period of up to fifteen minutes. This is a security feature. Do not press any buttons on the keypad for at least fifteen minutes, then enter a valid master, supervisor, or user code to operate the lock.

Sargent & Greenleaf, Inc.
One Security Drive, Nicholasville, Kentucky 40356 Phone (800) 826-7652 FAX (800) 634-4843
Sargent & Greenleaf S.A.
9, chemin du Croset, 1024 Ecublens, Switzerland Phone 41-21-691-9583 FAX 41-21-691-5349
TO OPEN THE LOCK . . .
Press the code digits or letters in order, followed by #. The lock bolt will retract for six seconds, allowing you time to operate the safe handle and open the door. Do not put any pressure on the safe handle until after the code has been entered . The Model 6121 will lock automatically when the safe door is closed and the handle is turned to the locked position.
IN CASE OF TROUBLE
If your lock should fail to open when a valid code is entered, check for the following:
- 1. The boltwork of a safe can, under certain conditions, place pressure on the side of the lock's bolt. This is often caused by something inside the safe pressing against the door or by something caught between the safe door and its frame. When this occurs, the lock will not operate properly. To relieve side pressure on the lock bolt, move the safe's handle to the fully locked position, then re-enter a working code. The lock should open.
- 2. If the lock "chirps" when keys are pressed, but it will not open, the batteries may be drained to the point that they will not operate the lock's motor. Follow the battery replacement procedure in this manual.
- 3. If the lock makes no sound when any of the keys are pressed, dead batteries are likely to be the cause. Follow the battery replacement procedure in this manual.
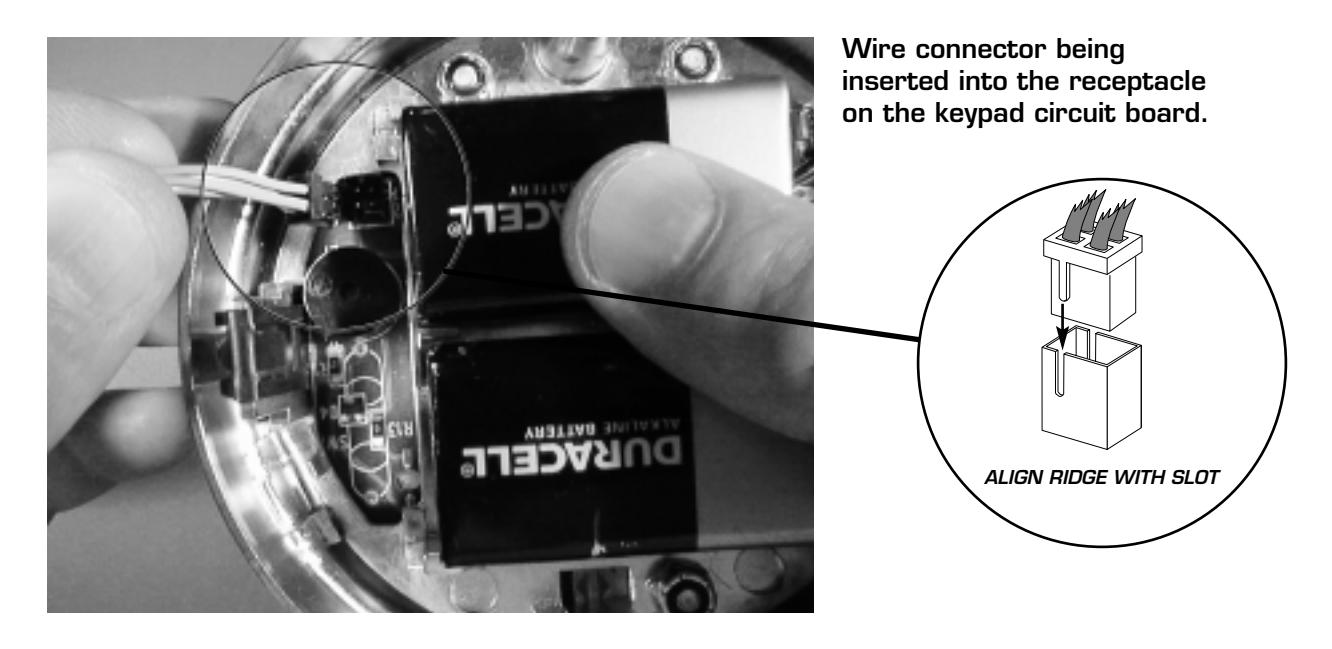
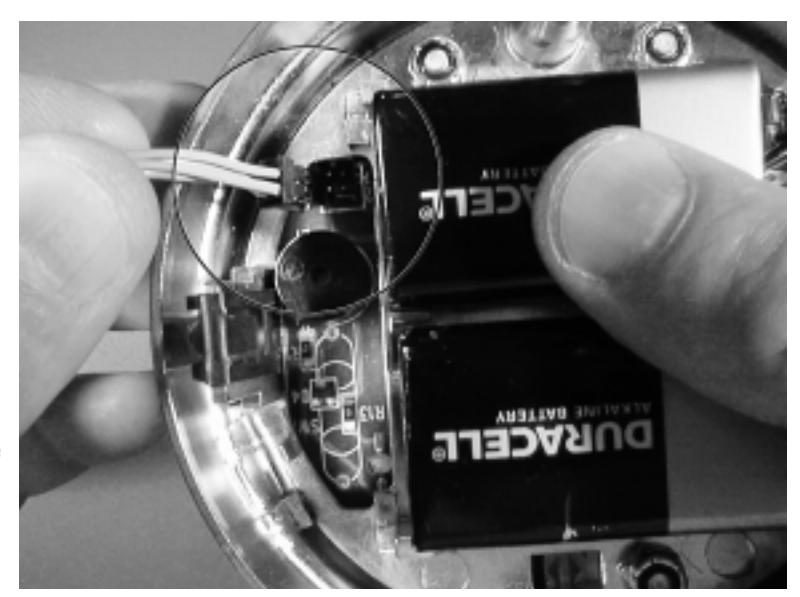
- 4. If the lock makes no sound when any of the keys are pressed, but the batteries have been checked and found to be good, a loose keypad connector may be the cause. Pull the keypad away from the base as described in the battery changing procedure. Check to make sure the wire connector is firmly seated into its receptacle on the keypad circuit board. The connector is designed so that it will only slide into the receptacle when aligned correctly.
If all of the preceding remedies have been exhausted and the lock still does not open, contact a qualified safe technician in your area for professional service.
ABOUT CHANGING CODES...
All code changing procedures begin by pressing (the same as ), followed by the existing six-digit master code and . Immediately after you press , the lock emits five distinct chirps, indicating that it is ready for a code change. If the lock emits a series of closely spaced chirps (almost a continuous tone) you have made a mistake and must start again.
To Change the Master Code (code #1) . . .
NOTE—ONLY THE MASTER CODE CAN BE USED TO CHANGE THE MASTER CODE. THE MASTER CODE CANNOT BE DELETED.
Press S G [____] # 1 [____] # [____] # [____] # [____] # [____] # [____] # [____]
After the final # is pressed, the lock emits three distinct chirps to indicate the new master code has been accepted. If a long series of closely spaced chirps (almost a continuous tone) sounds, the new master code has not been accepted—the old code has been retained.
To Change the Supervisor Code (code #2) . . .
Note—Either the Master Code or the Supervisor Code can be used to change or delete the Supervisor Code.
Press S G [____] # 2 [____] # [___] # [___] # [___] #
After the final # is pressed, the lock emits three distinct chirps to indicate the new supervisor code has been accepted. If a long series of closely spaced chirps (almost a continuous tone) sounds, the new supervisor code has not been accepted. If a supervisor code was present in the lock before the changing procedure began, it remains until a successful change is completed.
TO ENTER OR CHANGE A USER CODE (CODES #3-#9) . . .
Note—Either the Master Code or the Supervisor Code can be used to set, change. Or delete User Codes.
Press S G (_____) # (user I.D. 3 through 9) (_____) # (_____) # (_____) # (_____) #
After the final # is pressed, the lock emits three distinct chirps to indicate the new user code has been accepted. If a long series of closely spaced chirps (almost a continuous tone) sounds, the new code has not been accepted. Any existing user code remains.
For instance, to enable User Code #4 to open the lock with a code of 4 4 6 6 3 3, you would use the following procedure.
Press S G (_____) # 4 446633# 446633#
The same procedure would change any existing #4 USER CODE to 4-4-6-6-3-3.
TO DELETE THE SUPERVISOR CODE OR A USER CODE . . .
You may find that a particular code which you have enabled is no longer needed. It is a good security policy to remove any unneeded codes. To do so, follow this procedure.
Press S G * (_____) # (user I.D. 2 through 9) * # # master code to delete the supervisor or any user code or— supervisor code to delete any user code
After the final # is pressed, the lock will emit three distinct chirps to indicate the user code has been deleted. If a long series of closely spaced chirps (almost a continuous tone) sounds, the code has not been deleted.
TO USE THE TIME DELAY . . .
The Sargent & Greenleaf Model 6121 Electronic Combination Lock has a built in time delay feature that you can turn on and off by following the programming steps on this page. The time delay can be set from 0 to 27 minutes in three minute increments. When the time delay feature is enabled, your lock will function as follows:
After you enter a valid opening code, the lock will "chirp" three times. It will not open.
The lock will "chirp" once every ten seconds during the delay period, and it will not accept any keypad input during the delay period.
The lock will "chirp" ten times at the end of the delay period.
The lock will "chirp" once every 1.5 seconds for two minutes. You must enter a valid operating code during this time. The lock will open. Instead of entering a valid code, you can use the keypad procedure given below to turn the time delay off, or set it to a different delay time. This is the only period during which you can change the time delay.
Use of the time delay feature will decrease your battery life by approximately 50%. Battery life will vary depending on the length of the time delay. For instance, batteries will last longer with the time delay set to 3 minutes than with the delay set to 27 minutes.
A time delay is typically used in situations where there is threat of armed robbery. Statistically, an armed robber will not linger more than a minute or two at a crime scene. The longer he stays, the greater his risk of being caught. A time delay lock enforces a waiting period which is beyond the control of either robber or victim. Whenever a safe is secured with a time delay device, a sign should be posted on the door of the container to indicate the presence of the device. Suggested wording is:
"THIS EQUIPMENT IS PROTECTED AGAINST HOLD UP AND ROBBERY BY TIME DELAY LOCK."
A self adhesive label is available from Sargent & Greenleaf distributors or your local safe and lock retailer. The S&G part number for the label is 0000-636-152000.
| To Set a Time Delay | Button | Time Delay |
|---|---|---|
| The time delay value can be 3, 6, 9, 12, 15, 18, 21, 24, or 27 minutes. Time delays are equal to three times the |
1
2 |
3 minutes
6 |
| value of the key you use to program the delay (see table at right). | 3 |
9
12 |
| To deactivate the time delay, set its value to O minutes. |
5
6 |
15
18 |
| Press S G * ( ) # O * ( _ ) # ( _ ) # ( _ ) # ( _ ) # ( _ ) * ( _ ) * ( _ ) * ( _ ) * ( _ ) * ( _ ) * ( _ ) * ( _ ) * ( _ ) * ( _ ) * ( _ ) * ( _ ) * ( _ ) * ( _ ) * ( _ ) * ( _ ) * ( _ ) * ( _ ) * ( _ ) * ( _ ) * ( _ ) * ( _ ) * ( _ ) * ( _ ) * ( _ ) * ( _ ) * ( _ ) * ( _ ) * ( _ ) * ( _ ) * ( _ ) * ( _ ) * ( _ ) * ( _ ) * ( _ ) * ( _ ) * ( _ ) * ( _ ) * ( _ ) * ( _ ) * ( _ ) * ( _ ) * ( _ ) * ( _ ) * ( _ ) * ( _ ) * ( _ ) * ( _ ) * ( _ ) * ( _ ) * ( _ ) * ( _ ) * ( _ ) * ( _ ) * ( _ ) * ( _ ) * ( _ ) * ( _ ) * ( _ ) * ( _ ) * ( _ ) * ( _ ) * ( _ ) * ( _ ) * ( _ ) * ( _ ) * ( _ ) * ( _ ) * ( _ ) * ( _ ) * ( _ ) * ( _ ) * ( _ ) * ( _ ) * ( _ ) * ( _ ) * ( _ ) * ( _ ) * ( _ ) * ( _ ) * ( _ ) * ( _ ) * ( _ ) * ( _ ) * ( _ ) * ( _ ) * ( _ ) * ( _ ) * ( _ ) * ( _ ) * ( _ ) * ( _ ) * ( _ ) * ( _ ) * ( _ ) * ( _ ) * ( _ ) * ( _ ) * ( _ ) * ( _ ) * ( _ ) * ( _ ) * ( _ ) * ( _ ) * ( _ ) * ( _ ) * ( _ ) * ( _ ) * ( _ ) * ( _ ) * ( _ ) * ( _ ) * ( _ ) * ( _ ) * ( _ ) * ( _ ) * ( _ ) * ( _ ) * ( _ ) * ( _ ) * ( _ ) * ( _ ) * ( _ ) * ( _ ) * ( _ ) * ( _ ) * ( _ ) * ( _ ) * ( _ ) * ( _ ) * ( _ ) * ( _ ) * ( _ ) * ( _ ) * ( _ ) * ( _ ) * ( _ ) * ( _ ) * ( _ ) * ( _ ) * ( _ ) * ( _ ) * ( _ ) * ( _ ) * ( _ ) * ( _ ) * ( _ ) * ( _ ) * ( _ ) * ( _ ) * ( _ ) * ( _ ) * ( _ ) * ( _ ) * ( _ ) * ( _ ) * ( _ ) * ( _ ) * ( _ ) * ( _ ) * ( _ ) * ( _ ) * ( _ ) * ( _ ) * ( _ ) * ( _ ) * ( _ ) * ( _ ) * ( _ ) * ( _ ) * ( _ ) * ( _ ) * ( _ ) * ( _ ) * ( _ ) * ( _ ) * ( _ ) * ( _ ) * ( _ ) * ( _ ) * ( _ ) * ( _ ) * ( _ ) * ( _ ) * ( _ ) * ( _ ) * ( _ ) * ( _ ) * ( _ ) * ( _ ) * ( _ ) * ( _ ) * ( _ ) * ( _ ) * ( _ ) * ( _ ) * ( _ ) * |
7
8 9 |
21
24 27 |
After the final # is pressed, the lock emits three distinct chirps to indicate the time delay value has been accepted. If a long series of closely spaced chirps (almost a continuous tone) sounds, the new time delay value has not been accepted—the old time delay value has been retained.
For instance, if you want to set the time delay to fifteen minutes, use the following procedure.
Press S G ( _____ ) # 0 5 # 5 #
To turn the time delay off, use the following procedure during the two-minute opening window.
Press
LOW BATTERY CONDITION
The Model 6121 lock uses two 9-volt alkaline batteries. We recommend Duracell®. If the batteries in your lock need to be replaced, the lock will emit noticeably higher pitched chirps whenever a key is pressed. This will continue until the batteries are replaced. Once the Model 6121 indicates the need for new batteries, it will continue to open several more times on the old ones.
Note: A low battery simulator is built into the Model 6121 so you can familiarize yourself with how the lock sounds under a low battery condition. To activate the low battery simulator, depress the key for approximately three seconds, until the lock emits three chirps. Immediately enter your code. Each time you press a key, the chirp will sound distinctly different than it does during normal operation. Approximately two seconds after you enter the code and open the lock, the Model 6121 will revert to normal operation.
BATTERY REPLACEMENT PROCEDURE
The Model 6121 will NOT forget your code(s) during battery change. The circuitry is designed to hold this information for extended periods of time even if there are no batteries installed.
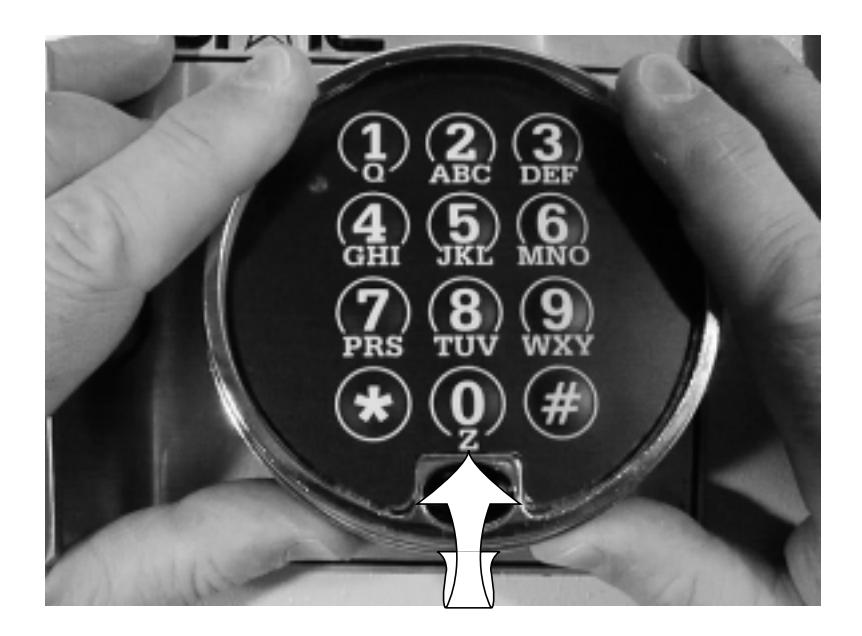
STEP 1—Remove the keypad from its mounting base. This can be done by pulling the top of the keypad housing away from the base at the top. Grip the keypad housing as shown in the photograph for best results. Support the keypad housing so that the wires which are attached to its circuit board are not pulled or stressed. Do not let the keypad hang from its wires.
STEP 2—Turn the keypad over and remove both batteries. This is best done by grasping the bottom of a battery and pulling it gently away from the keypad circuit board. Do not use any type of tool to pry a battery from its holder.
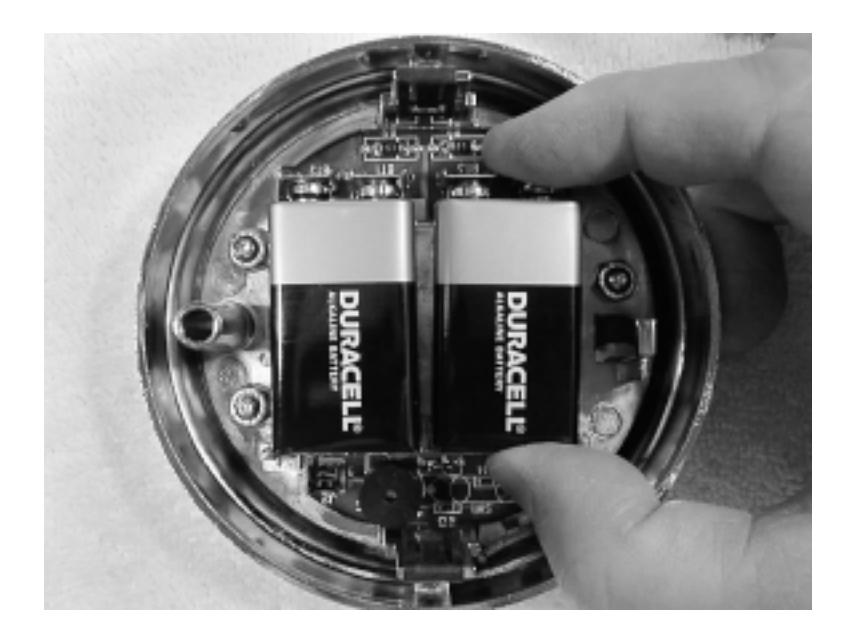
STEP 3—Install new batteries by pushing them directly into the battery connectors attached to the keypad circuit board. It's important to support the connectors so they will not become bent during battery insertion. The connectors are designed to make it very difficult to install a battery incorrectly. Pay close attention to battery polarity so as not to damage a connector by forcing a battery into it backwards.
(continued on next page)
Step 4 —Hold the keypad housing close to the mounting base while you coil excess wire inside the housing. Position the wire away from the three spring clips that hold the keypad housing to the mounting base.
Step 5 —Align the spring clips with the receptacles in the base. Using steady pressure, push the keypad housing back onto its mounting base. Don't allow any wire(s) to be damaged by contact with the spring clips. The keypad housing will snap into place on the base.
Step 6 —Check the master code and all user codes at least three times with the safe door open . Close the safe door only after the lock has been thoroughly checked for proper operation.
Note: The 6121 will operate with just one 9-volt alkaline battery attached to either connector. This is only recommended under emergency conditions when a second replacement battery is not available. Using a single battery will not harm the lock in any way.
SECURITY ADVISORY
If your lock is used many times a day (50 or more openings daily), it is advisable to use as many different keys as possible in your code number. Avoid using a key more than once whenever possible. Check the keypad frequently for visible wear which might indicate which keys are being pressed for code entry. Change the code to use different keys when wear is evident. If necessary, have a qualified service technician replace the keypad.

Sargent & Greenleaf, Inc.
One Security Drive, Nicholasville, Kentucky 40356 Phone (859) 885-9411 FAX (859) 887-2057
Sargent & Greenleaf S.A.
9, chemin du Croset, 1024 Ecublens, Switzerland Phone 41-21-691-9583 FAX 41-21-691-5349