SL310 Installation Instructions English
Open the original PDF document
View PDFINSTALLATION INSTRUCTIONS Swing Clear Pin & Barrel Continuous Hinge SL310

PRODUCT MUST BE INSTALLED ACCORDING TO ALL APPLICABLE BUILDING AND LIFE SAFETY CODES
All holes in door and frame must be drilled correctly and fasteners properly installed. Failure to use fasteners supplied by Select Products Limited will void UL or WHI fire rated listing.
Important Warranty Information:
The following actions will void any warranty, expressed or implied:
- Failure to install the hinge according to the manufacturer's specifications and requirements. (for more information, visit selecthingerequirements.com)
- Use of fasteners other than those supplied with the hinge.
- Unauthorized field modifications, including alteration of the original finish or painting the hinge.
1. Frame Preparation
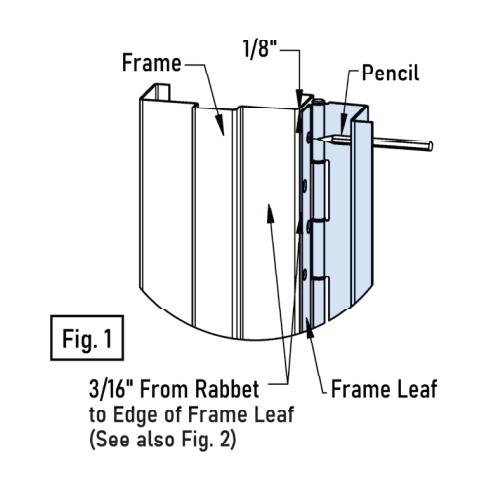
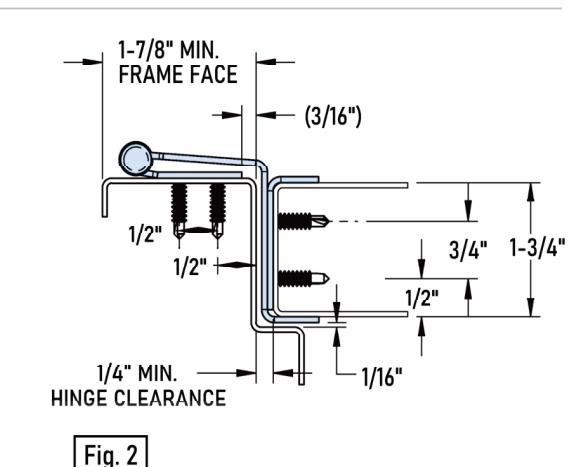
- A. Place hinge frame leaf on frame face. Position top of hinge 1/8" maximum below header. Place hinge firmly against face of frame. Position frame leaf edge 3/16" from rabbet as shown in (Fig. 1 & 2).
- B. Mark top and bottom two holes with hinge held firmly in place. Remove hinge. A center punch can help center hole so that fasteners will enter straight. Prepare to drill frame.
- C. Drill Holes:
Wood Frame: Drill holes using a 5/32" drill bit.
Hollow Metal Frame: Drill holes using a #16 drill bit. If hollow metal frame is reinforced, thread all holes with #12-24 tap.
D. Install hinge with four screws:
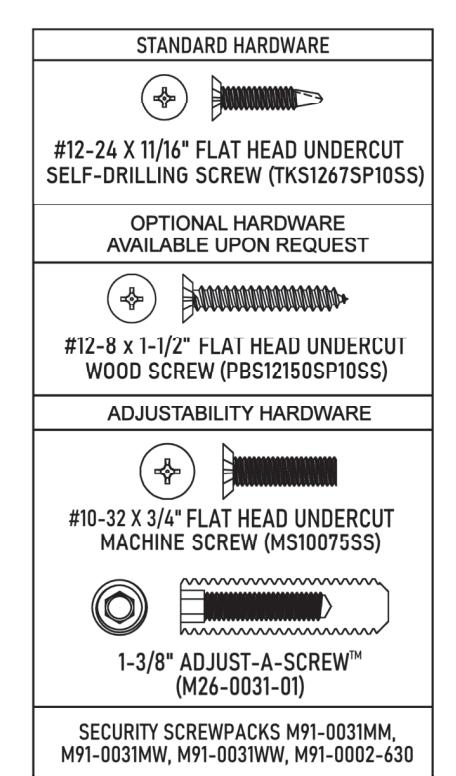
Wood: Attach hinge using #12-8 x 1-1/2" Flat Head Undercut Wood Screws
Hollow Metal: Attach hinge using #12-24 x 11/16" Flat Head Undercut Self-Drilling Screws
E. Mark remaining mounting holes, remove hinge and repeat step C.
Do not install hinge to frame at this time.
2. Door Preparation
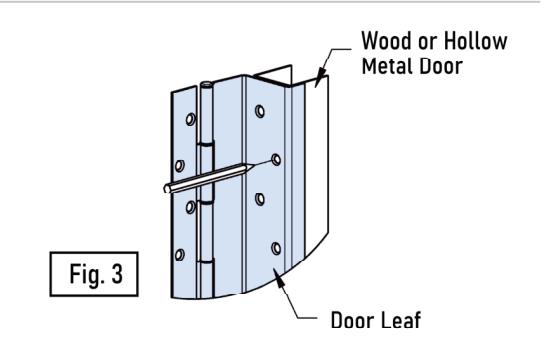
- A. Place hinge door leaf on edge of door. Position top of hinge flush with top of door (Fig 3).
- B. Mark and center punch each hole on door with hinge held firmly in place. Remove hinge from door and prepare to drill door.
- C. Drilling Doors:
Non Adjustable Hinge
Wood Doors: Drill all holes using a 5/32" drill bit.
Hollow Metal Doors: Drill all holes using a #16 drill bit. If hollow metal door is reinforced, thread all holes with 12-24 tap.
Adjustable Hinge (If using Adjust-A-Screw™)
Wood Doors:
- Drill all holes using a 5/32" drill bit then enlarge holes to 5/16" with a minimum depth of 13/8".
- 2. Insert Adjust-A-Screws into every hole.
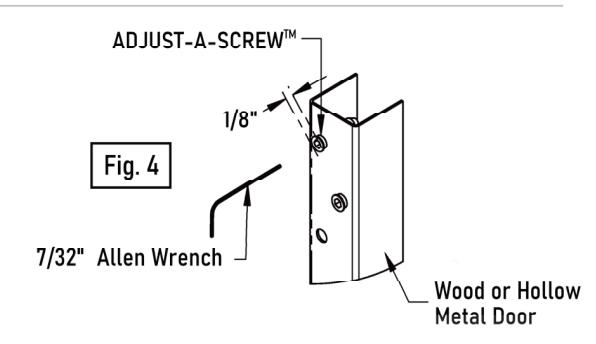
- 3. Place a 7/32" Allen wrench in opening of Adjust-A-Screw and turn Adjust-A-Screw into hole while keeping screw properly aligned (Fig 4).
- Drive all Adjust-A-Screws in until approximately 1/8" from edge of door. (Adjust-A-Screw will self-tap)
Hollow Metal Doors:
- 1. Drill all holes using a #16 drill bit then enlarge holes with a 5/16" drill bit.
- 2. Thread all holes with 3/8-16 tap.
- 3. Insert Adjust-A-Screws into every hole.
- 4. Place a 7/32" Allen wrench in opening of Adjust-A-Screw and turn Adjust-A-Screw into hole while keeping screw properly aligned (Fig 4).
- 5. Drive all Adjust-A-Screws in until approximately 1/8" from edge of door.
Note: It is not necessary to tap holes in wood doors since Adjust-A-Screws cut their own threads. Do not be concerned with a tight fit. Adjust-A-Screws are designed for a tight friction fit in tapped holes so they will not turn when attachment screw is being tightened. If Adjust-A-Screw turns too freely, apply Loctite™ to threads during installation.
3. Hinge Installation
A. Attaching hinge to door:
Peel backing from two sided tape located on top and bottom of hinge guard. Stick guard to edge of door.
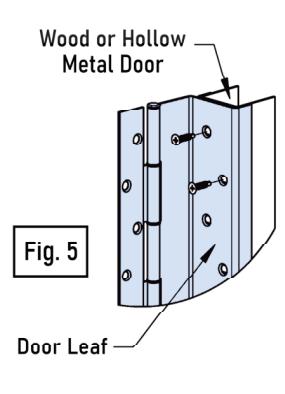
Non Adjustable Hinge (Fig 5)
Wood: Attach hinge using #12-8 x 1-1/2" Flat Head Undercut Wood Screws
Hollow Metal: Attach hinge using #12-24 11/16" Flat Head Undercut Self-Drilling Screws
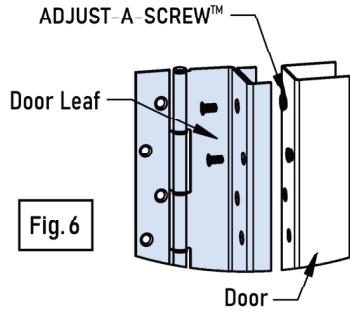
Adjustable Hinge (Fig 6)
Wood & Hollow Metal: Attach hinge using #10-32 x 3/4" Flat Head Undercut Machine Screws
Install top & bottom four screws first, then close door to check alignment. See Special Note below.
Special Note: If door is properly aligned, install and tighten remaining screws. If door requires alignment for proper fit, make this adjustment with four screws installed without removing door. Remove one screw and insert Allen wrench through hole into Adjust-A-Screw (Fig 6). Turn Adjust-A-Screw in direction desired for adjustment. One full turn of Allen wrench is equal to 1/16". Reinstall screw. Adjust remaining screws in same manner. Close door to verify door is aligned properly in opening. The balance of Adjust-A-Screw should be adjusted in same manner until all are resting firmly against inside face of hinge. Then install and tighten remaining machine screws. Be sure adjustable angle is pressed firmly against face of door as screws are tightened.
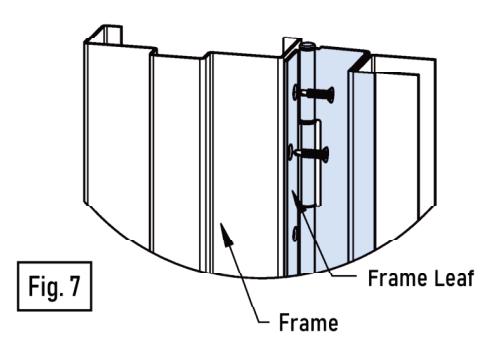
B. Attaching hinge to frame (Fig 7):
Wood: Attach hinge using #12-8 x 1-1/2" Flat Head Undercut Wood Screws
Hollow Metal: Attach hinge using " Flat Head Undercut Self-Drilling Screws
Model SL310 Standard "Non-Adjustable" application clearances Total Under-Sizing Required Clearance (A) Single Door | Pair of Doors 1/4" 7/16" 11/16" +1/16" Frame +1/16" Frame Irregularity Irregularity Model SL310 Standard "Adjustable" application clearances Total Under-Sizing Required Clearance (A) Pair of Doors Single Door 1/4" 9/16" 15/16" 1/8" (A) + 1/8"(A) + 1/8"(A) + 1/8"+1/16" Frame +1/16" Frame Irregularity Irregularity NOTE: Proper door reinforcement is required for adjustable feature.

3258 Stadium Park Way Kalamazoo, MI 49009 PH: 800-423-1174 Fax: 800-423-7107 www.select-hinges.com