LCN 2210 Series Installation Instructions 107151
Open the original PDF document
View PDF



Door Closers Installation Instructions
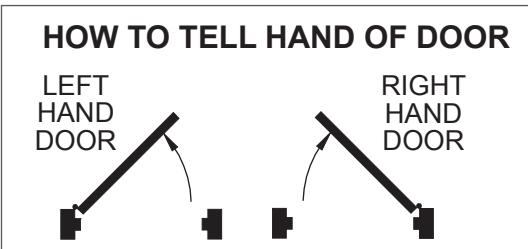
- 1a Make sure hand of closer matches hand of door. Remove finish plates. Hand of closer is printed on the mounting plate label. Hand of closer cannot be reversed. See diagram above to determine hand of door.
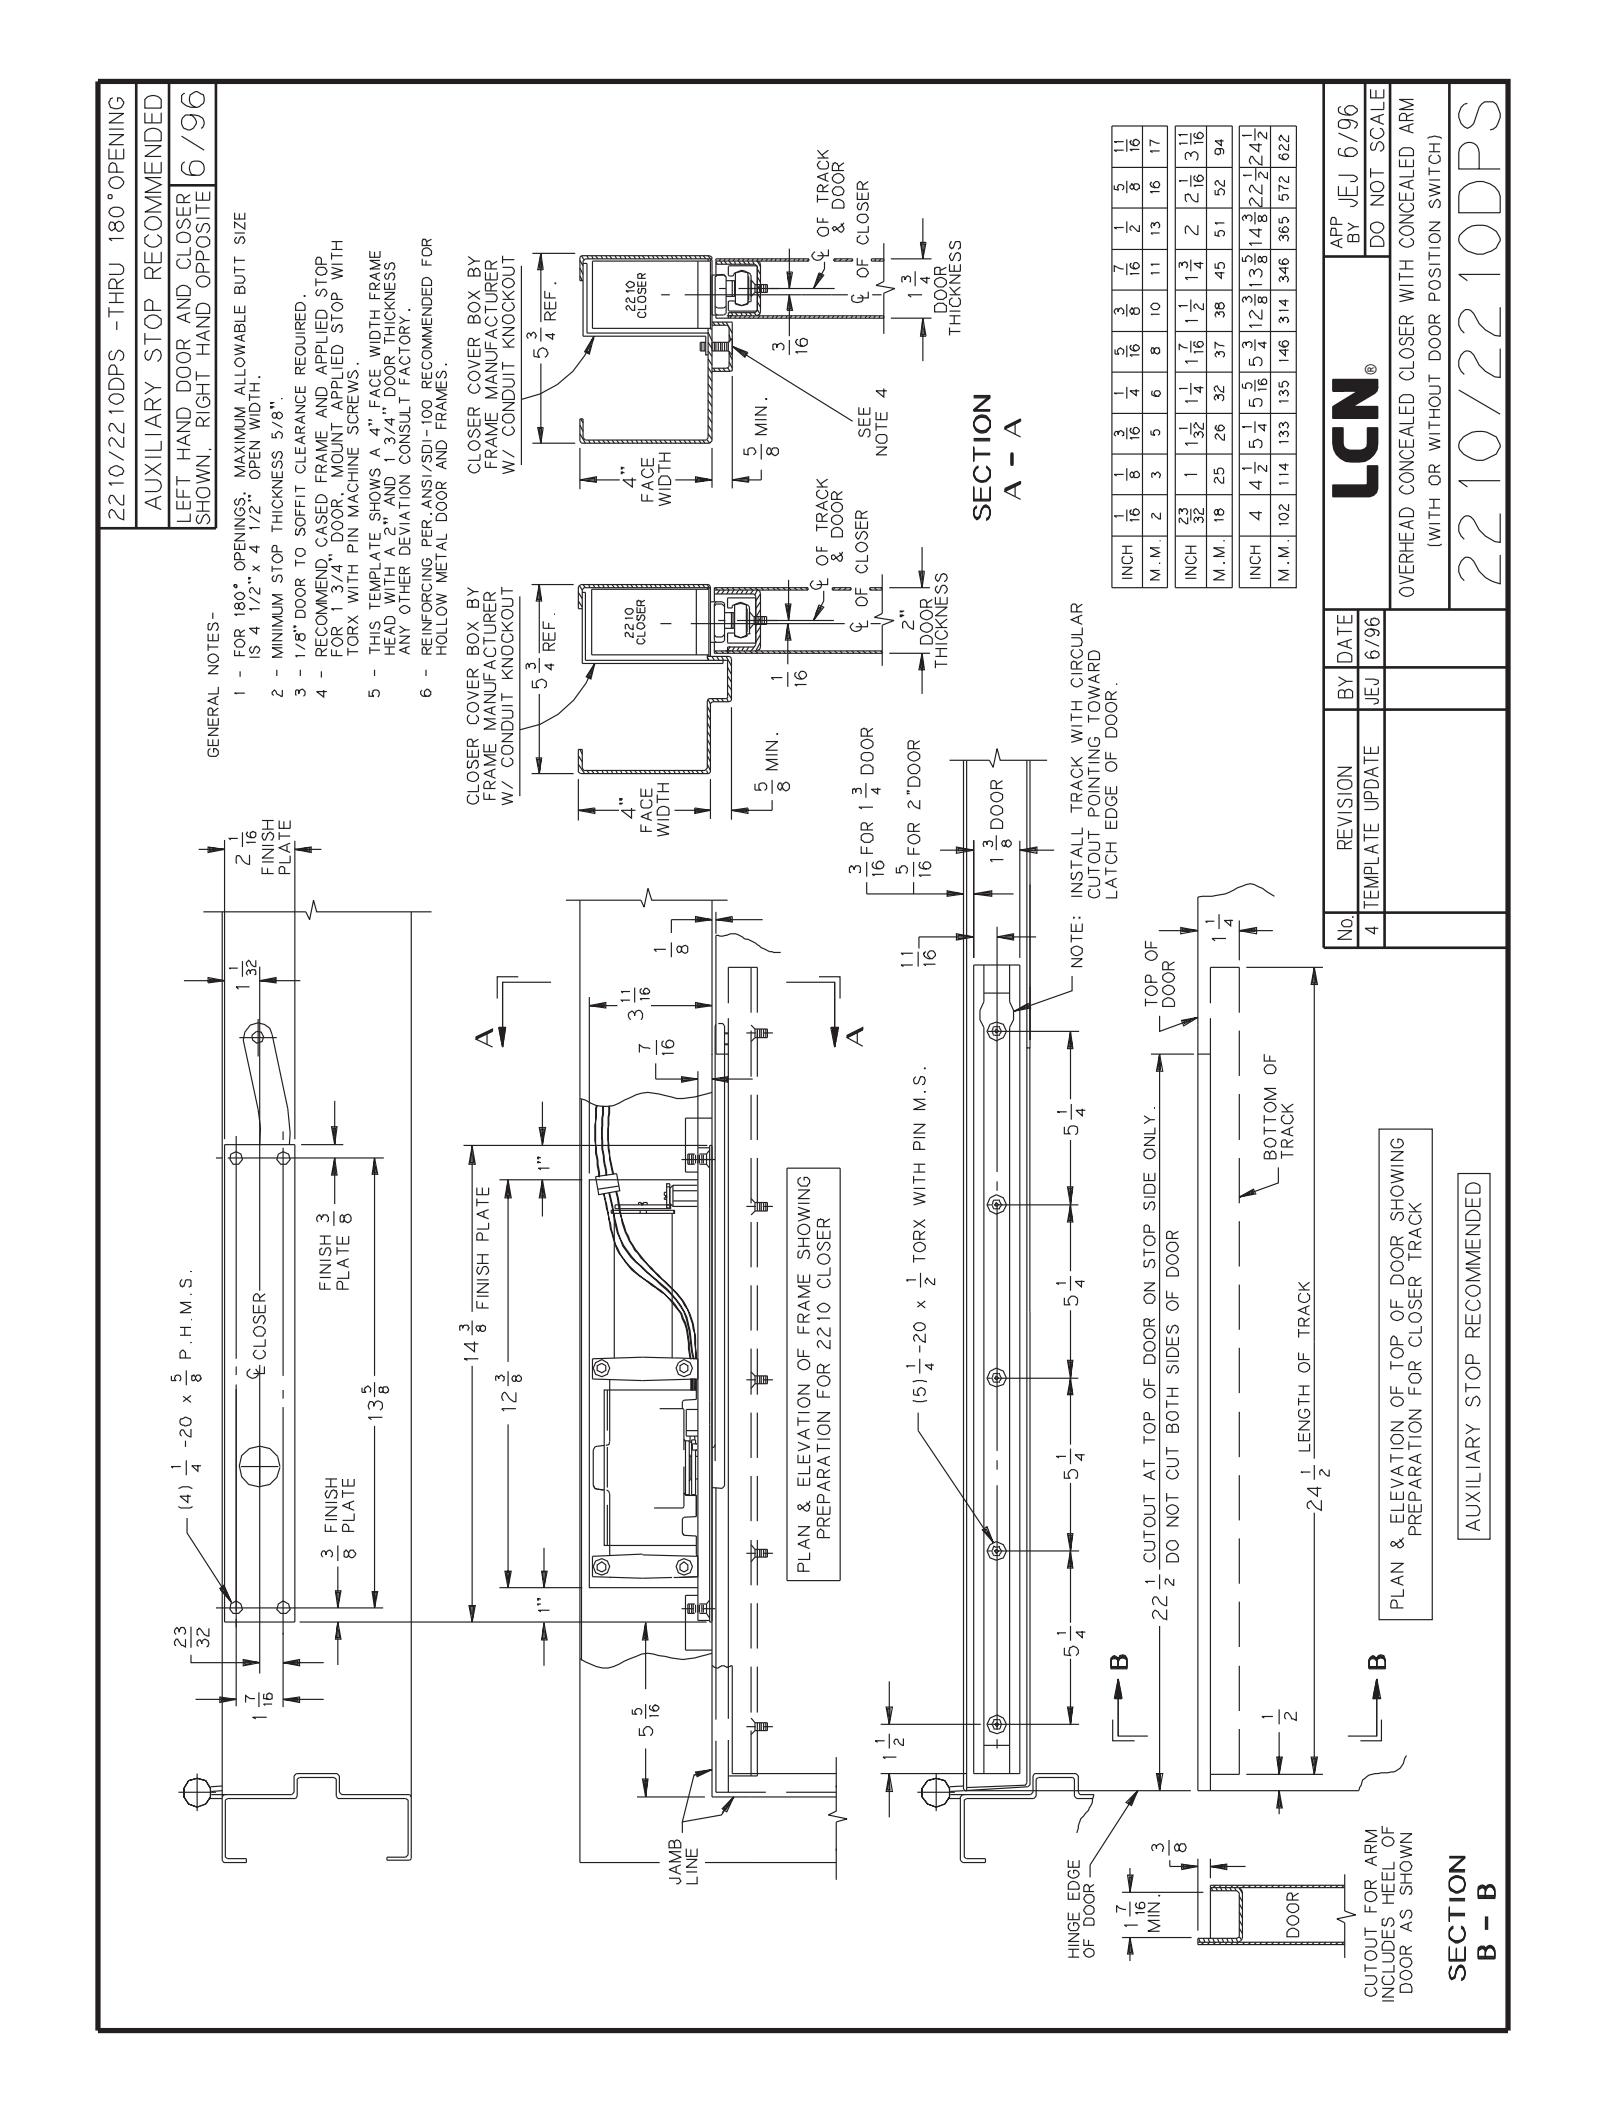
- 1b Prepare and mortise door & frame per template on pg. 4
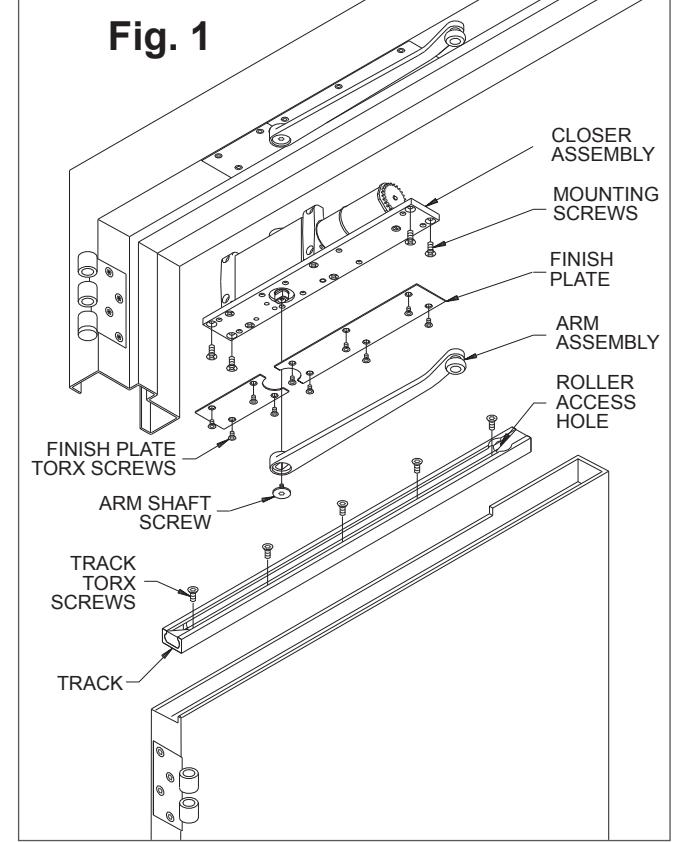
- 1c Install closer in prepared headframe, as shown in Fig. 1, with spring tube pointing away from hinge. Fasten mounting plate to jamb with 1/4 20 x 5/8 PHMS provided.
- Install track in door. Roller access hole must be toward latch edge of door, as shown in Fig. 1. Fasten with 1/4 20 x 1/2 TORX MS provided.
- 1e Connect arm assembly to track by placing plastic roller at end of arm into the roller access hole in track. See Fig. 1. Let arm assembly rest on top of installed track.
-
1f To attach arm to closer:
- a. Open door out of working area.
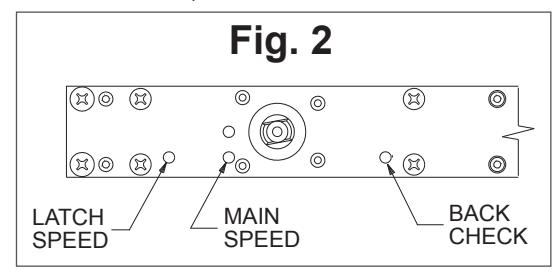
- b. With a 3/32" hex wrench, turn latch & main speed regulating screws all the way in (clockwise). See Fig. 2. DO NOT FORCE SCREWS.
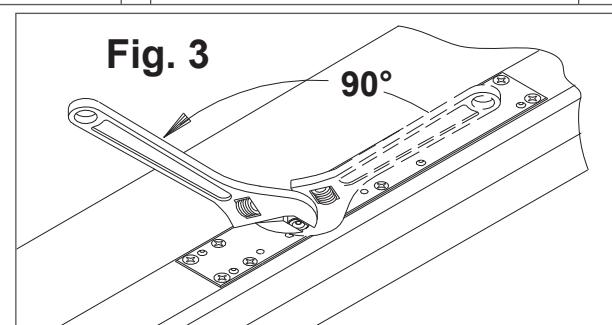
- c. Using an adjustable wrench, rotate door closer shaft approximately 90°. See Fig. 3. (R.H. clockwise / L.H. counterclockwise).
Customer Service 1-877-671-7011 www.allegion.com/us

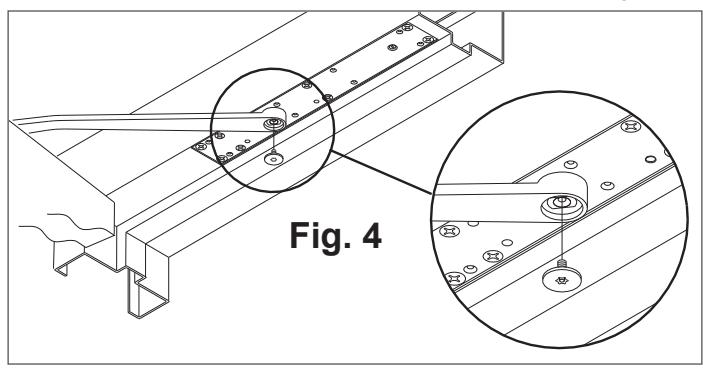
d. With closer shaft now stationary, move the end of the arm to shaft of closer. Slowly move door so hole in arm lines up correctly with closer shaft. Push arm up into position and insert arm shaft screw, as shown in Fig. 4.
1g TO REGULATE CLOSING SPEED & BACKCHECK:
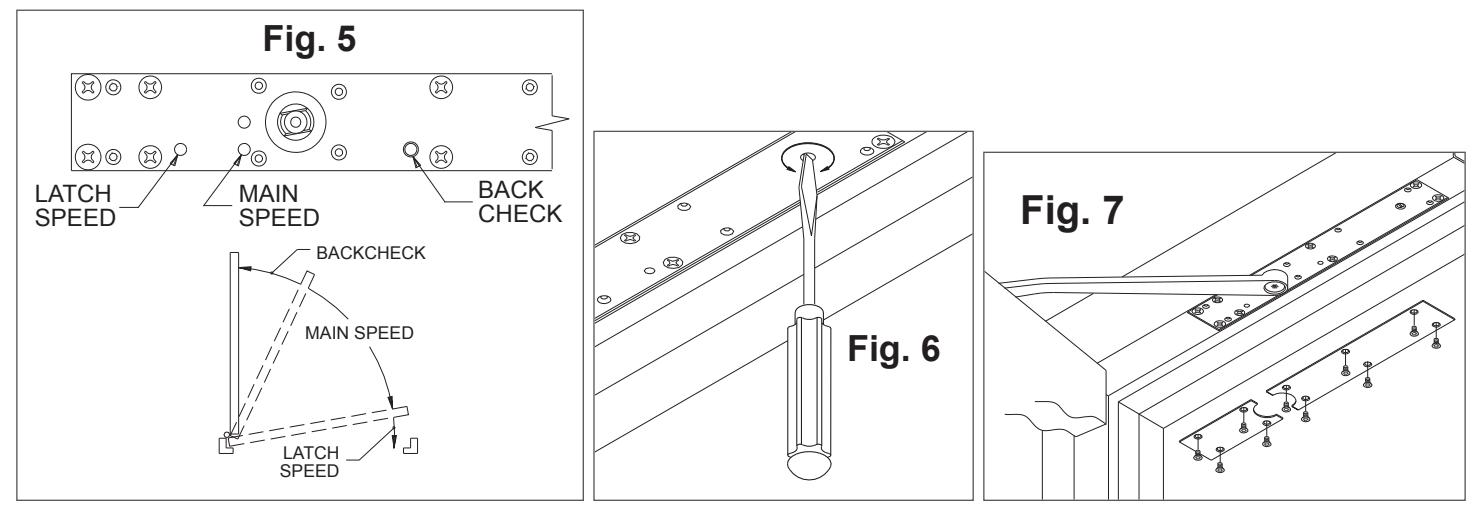
See Fig. 5 below. Use a 3/32" hex wrench to re-adjust MAIN & LATCH speed screws (closed in step 7A). Turn both MAIN & LATCH speed screws 2 full turns counterclockwise. Open door and observe closing cycle. A normal closing time from a 90° position is 5 to 7 seconds, equally divided between MAIN & LATCH speeds. If further adjustment is required, turn regulating screws clockwise to SLOW door speed / counterclockwise to INCREASE door speed. BACKCHECK is a feature that slows the speed of door at approximately 70°. To INCREASE force turn BACKCHECK screw clockwise. To REDUCE force turn BACKCHECK screw counterclockwise. Do not use an abrupt BACKCHECK setting, nor expect closer to act as a door stop!
1h CLOSING POWER ADJUSTMENT:
Depending on width of door, the 2210 has been ordered as one of three sizes: 2213, 2214 or 2215. Determine closer size from either label on box or UL label on mounting plate. Adjustment can be made with a flat head screwdriver (see Fig. 6). Adjustment range for each size is as follows:
- 2213: Closer is shipped at minimum closing power. If MORE closing Power is required, turn adjusting screw counterclockwise, but not more than 36 full turns. Do not turn adjusting screw clockwise.
- 2214: If MORE power is required, turn adjusting screw counterclockwise, but not more than 18 full turns. If LESS power is required, turn adjusting screw clockwise, but not more than 18 full turns. Do not turn adjusting screw more than 18 full turns in either direction.
- 2215: Closer is shipped at maximum closing power. If LESS power required, turn adjusting screw clockwise, but not more than 36 full turns. Do not turn adjusting screw counterclockwise.
- 1i Once proper operation has been verified, secure finish plates with No. 10-24 x 3/8" Torx security screws, as shown in Fig. 7.
BEGINNING SHEET
| Additional Notes: | |
|---|---|
| 1. None | |
| Revision History | Revision Description: | ||||||||||
|---|---|---|---|---|---|---|---|---|---|---|---|
| F | G | Н | J | К | L | F > Revised artwork | > Revised artwork | ||||
| XXXXX | ] | ||||||||||
| Material | Edited By | Approved By | EC Number | Release Date | |||||||
| White Paper | D. Myers | M. Sasso | xxxxx | 03-13-14 | |||||||
|
Title 2210 Series Instruction Sheet | ||||||||||
|
3. tolerar
4. printed |
Creation Date
11-15-08 |
Number 27297 |
Revision
F |
||||||||
| o. urawir | 5. drawings not to scale |
Created By
N/A |
Activity
3899 Hancock Expwy |
||||||||
| Software: InDesign CS6 | Security, CO 80911 | © Allegion 2014 | |||||||||