Corbin Russwin SN200 and S210 Series with MP9800 Series Multi-Point Locks Installation Instructions_FM564
Open the original PDF document
View PDFInstallation Instructions

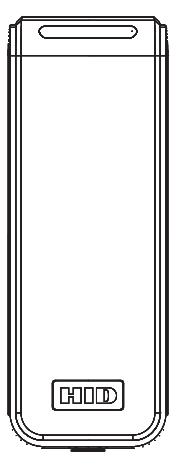

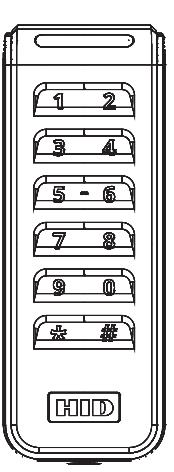
Series SN200 Wiegand SN210 OSDP
MP9800 Series Multi-Point Lock Integrated Wired With and Without MELR Option
Attention Installer:
Please read these instructions carefully to prevent missing important steps. Improper installations may result in damage to the lock and void the factory warranty. The accuracy of the door preparation is critical for proper functioning and security of this lock. Misalignment can cause premature wear and a lessening of security.
For Technical Assistance call Corbin Russwin at 1-800-810-WIRE (9473)

Table of Contents
| 1) Regulatory Compliance | 3 |
|---|---|
|
2) Warning
|
3 |
|
3) Specifications
|
4 |
| 4) Wiring Diagrams | 5 |
| 5) Product Illustrations | 9 |
| 6) Installation Instructions | 12 |
| 7) Concealed Door Position Switch | 18 |
| 8) Operational Check | 19 |
SN200/210 Integrated Wired
With and Without MELR Option (Electric Latch Retraction)

1) Regulatory Compliance
Warning: Changes or modifications to this unit not expressly approved by the party responsible for compliance could void the user's authority to operate the equipment.
FCC:
This equipment has been tested and found to comply with the limits for a Class B digital device, pursuant to Part 15 of the FCC Rules. These limits are designed to provide reasonable protection against harmful interference in a residential installation. This equipment generates, uses, and can radiate radio frequency energy and, if not installed and used in accordance with the instructions, may cause harmful interference to radio communications. However, there is no guarantee that interference will not occur in a particular installation. If this equipment does cause harmful interference to radio or television reception, which can be determined by turning the equipment off and on, the user is encouraged to try to correct the interference by one or more of the following measures:
- Reorient or relocate the receiving antenna.
- Increase the separation between the equipment and receiver.
- Connect the equipment into an outlet on a circuit different from that to which the receiver is connected.
- Consult the dealer or an experienced radio/TV technician for help.
Industry Canada:
This Class B digital apparatus meets all requirements of the Canadian Interference Causing Equipment Regulations. Operation is subject to the following two conditions: (1) this device may not cause harmful interference, and (2) this device must accept any interference received, including interference that may cause undesired operation.
Cet appareillage numérique de la classe B répond à toutes les exigences de l'interférence canadienne causant des règlements d'équipement. L'opération est sujette aux deux conditions suivantes: (1) ce dispositif peut ne pas causer l'interférence nocive, et (2) ce dispositif doit accepter n'importe quelle interférence reçue, y compris l'interférence qui peut causer l'opération peu désirée.
This equipment complies with FCC radiation exposure limits set forth for an uncontrolled environment. This equipment should be installed and operated with minimum distance 20cm between the radiator and your body. This transmitter must not be co-located or operating in conjunction with any other antenna or transmitter.
Cet équipement est conforme aux limites d'exposition aux radiations de la FCC définies pour un environnement non contrôlé. Cet équipement doit être installé et utilisé à une distance minimale de 20 cm entre le radiateur et votre corps. Cet émetteur ne doit pas être co-localisé ou fonctionner en conjonction avec une autre antenne ou un autre émetteur.
Under Industry Canada regulations, this radio transmitter may only operate using an antenna of a type and maximum (or lesser) gain approved for the transmitter by Industry Canada. To reduce potential radio interference to other users, the antenna type and its gain should be so chosen that the equivalent isotropically radiated power (e.i.r.p.) is not more than that necessary for successful communication.
Conformément à la réglementation d'Industrie Canada, le présent émetteur radio peut fonctionner avec une antenne d'un type et d'un gain maximal (ou inférieur) approuvé pour l'émetteur par Industrie Canada. Dans le but de réduire les risques de brouillage radioélectrique à l'intention des autres utilisateurs, il faut choisir le type d'antenne et son gain de sorte que la puissance isotrope rayonnée équivalente (p.i.r.e.) ne dépasse pas l'intensité nécessaire à l'établissement d'une communication satisfaisante.
2) Warning

This product can expose you to lead which is known to the state of California to cause cancer and birth defects or other reproductive harm. For more information go to: www.P65warnings.ca.gov.
Ce produit peut vous exposer au plomb qui, dans l'état de la Californie, est reconnu pour causer le cancer, des anomalies congénitales ou d'autres prob- lèmes de reproduction.
Pour plus d'informations, visitez: www.P65warnings.ca.gov.

Any retrofit or other field modification to a fire rated opening can potentially impact the fire rating of the opening, and Corbin Russwin makes no representations or warranties concerning what such impact may be in any specific situation. When retrofitting any portion of an existing fire rated opening, or specifying and installing a new fire-rated opening, please consult with a code specialist or local code official (Authority Having Jurisdiction) to ensure compliance with all applicable codes and ratings.

To avoid possible damage from electrostatic discharge (ESD), some basic precautions should be used when handling electronic components:
- Minimize build-up of static by touching and/or maintaining contact with unpainted metal surfaces such as door hinges, latches, and mounting plates especially when mounting electronic components such as readers and controllers onto the door.
- Leave components (reader and controller) protected in their respective anti-static bags until ready for installation
- Do not touch pins, leads or solder connections on the circuit boards
*WARNING: The system shall not be installed in the fail-secure mode unless permitted by the local authority having jurisdiction and shall not interfere with the operation of Listed panic hardware.
SN200/210 Integrated Wired With and Without MELR Option (Electric Latch Retraction)

3) Specifications
- UL Listed* UL 294 Indoor Use
- CUL Listed S319: Class 1
- ANSI/BHMA A156.25 Listed Grade 1 Compliant
*UL294, S319, & BHMA A156.25 not applicable to SN200 with Non-UL294 Configuration option
• UL 294 Access Control Ratings:
| Destructive Attack | Level 1 |
|---|---|
| Line Security | Level 1 |
| Endurance | Level 4 |
| Standby Power | Level 1 |
UL testing was conducted on product powered by UL Listed model 9001GR/AC injector; manufactured by Microsemi Corp.
Electrical Specifications 12/24VDC System
| 12\ | / | 24V | ′ | |
|---|---|---|---|---|
| Average | Peak | Average | Peak | |
| Reader** | 75mA | 250mA | n/a | n/a |
| Actuator | 15mA | 500mA | 15mA | 500mA |
** Maximum AVG - RMS current draw during continuous card reads Not evaluated by UL.
Peak - highest instantaneous current draw during RF communication
The reader requires 12VDC for power, while the lock accepts either 12 or 24VDC.
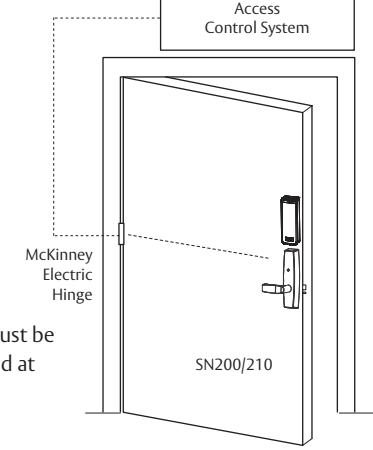
Wire from EAC Panel to door must be shielded with a drain terminated at EAC Panel controller
OSDP <sup>†</sup> and Wiegand Wire Specifications
|
Total
One-Way |
Wire Gauge Chart 12VDC Load Current @ 12VDC | ||||||||
|---|---|---|---|---|---|---|---|---|---|
|
Length of
Wire Run (ft) |
1/4A | 1/2A | 3/4A | 1A | 1-1/4A | 1-1/2A | 2A | 3A | |
| 100 | 20 | 18 | 16 | 14 | 14 | 12 | 12 | 10 | |
| 150 | 18 | 16 | 14 | 12 | 12 | 12 | 10 | _ | |
| 200 | 16 | 14 | 12 | 12 | 10 | 10 | - | _ | |
| 250 | 16 | 14 | 12 | 10 | 10 | 10 | _ | _ | |
| 300 | 16 | 12 | 12 | 10 | 10 | _ | _ | _ | |
| 400 | 14 | 12 | 10 | _ | _ | _ | _ | _ | |
| 500 | 14 | 10 | 10 | _ | _ | - | _ | _ | |
| 750 | 12 | 10 | - | _ | _ | 1 | _ | _ | |
| 1,000 | 10 | _ | _ | _ | _ | _ | _ | _ | |
| 1,500 | 10 | _ | _ | _ | _ | _ | _ | _ | |
|
Total
One-Way |
Wir | e Ga | uge C | hart | 24V[ | C Load | Current @ | ) 24VDC |
|---|---|---|---|---|---|---|---|---|
|
Length of
Wire Run (ft) |
1/4A | 1/2A | 3/4A | 1A | 1-1/4A | 1-1/2A | 2A | 3A |
| 100 | 24 | 20 | 18 | 18 | 16 | 16 | 14 | 12 |
| 150 | 22 | 18 | 16 | 16 | 14 | 14 | 12 | 10 |
| 200 | 20 | 18 | 16 | 14 | 14 | 12 | 12 | 10 |
| 250 | 18 | 16 | 14 | 14 | 12 | 12 | 12 | 10 |
| 300 | 18 | 16 | 14 | 12 | 12 | 12 | 10 | _ |
| 400 | 18 | 14 | 12 | 12 | 10 | 10 | _ | _ |
| 500 | 16 | 14 | 12 | 10 | 10 | - | - | _ |
| 750 | 14 | 12 | 10 | 10 | _ | ١ | - | _ |
| 1,000 | 14 | 10 | 10 | _ | _ | _ | _ | _ |
| 1,500 | 12 | 10 | _ | _ | _ | _ | _ | _ |
<sup>†</sup>Recommended wire specifications for OSDP: Four (4) conductor twisted pair overall shield such as UL approved, Belden 3107A or equivalent is recommended to remain fully TIA-485 compliant at maximum supported baud rates and cable distances. Belden 82842, Liberty Wire & Cable 24-29_P485-WHT, West Penn Wire D254852, and CAT6 cable have been found to be suitable in typical applications and installations, including lower baud rates and cabling distances.
This product is not intended for outside wiring as covered by Article 800 in the National Electrical Code, NFPA 70.
Wiring methods shall be in accordance with the National Electrical Code (ANSI/NFPA70), CSA 22.1, Canadian Electrical Code (CEC), Part I, Safety Standard for Electrical Installations, local codes and the authorities having jurisdiction.
Both reader and actuator current must be taken into account when determining wire length and gauge. OSDP installations may be more limited due to fewer cable options.
For OSDP cable lengths greater than 200 ft (61 m) or EMF interference, install resistor across RS-485 termination ends.
SN200/210 Integrated Wired With and Without MELR Option (Fle
With and Without MELR Option (Electric Latch Retraction)

4) Wiring Diagrams
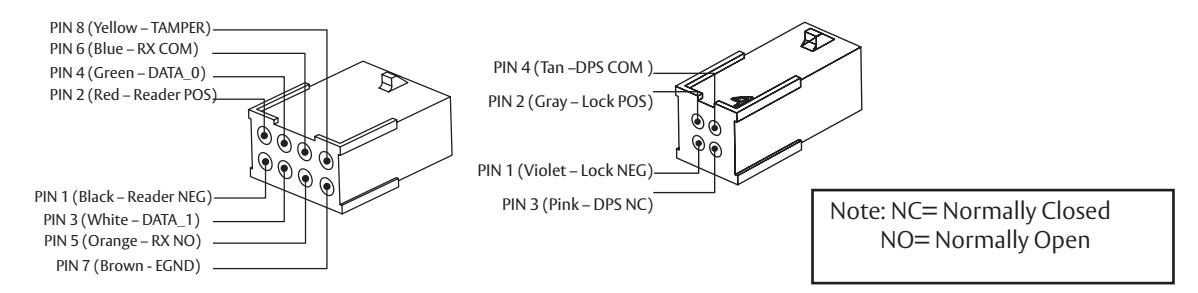
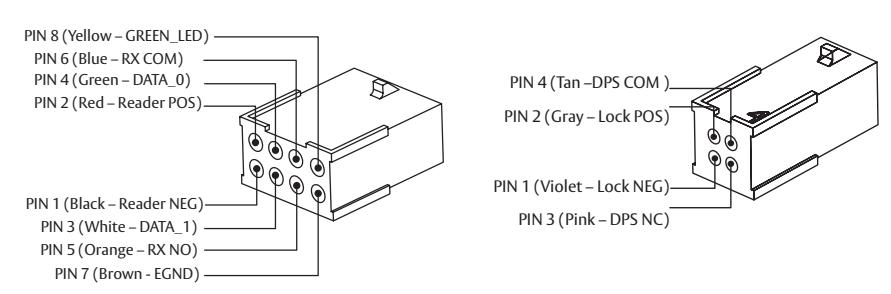
| Product | 8 PIN CONNECTOR | 4 PIN CON | NECTOR | |||||||||
|---|---|---|---|---|---|---|---|---|---|---|---|---|
| 1-Black | 2-Red | 3-White | 4-Green | 5-Orange | 6-Blue | 7-Brown | 8-Yellow | 1-Violet | 2-Gray | 3-Pink | 4-Tan | |
| CECC CONTROL | 2/2101 | . 51 | 15 | |||||||||
| AC | CESS CONTROL | DEVICES: SN20 | J/210 Lockse | t, ElectroLyn | x wire Colo | r / Function assignn | nents | |||||
|
12VDC
(Reader) |
Commur
Typ |
RX | RX | EGND | Function* |
12/24
(LOCK) |
DPS | DPS | ||||
| SN200 (UL294) | WIEGAND | WIEGAND | TAMPER | |||||||||
| SN200 | NEG | POS | DATA_1 | DATA_0 | NO | СОМ | EGND | GREEN LED | NEG | POS | NC | СОМ |
| SN210 |
OSDP
RS-485B |
OSDP
RS-485A |
n/a | |||||||||
* Diagrams on following pages
If your lock is configured with End of Line Resistors, reference instruction sheet FM406 for the wiring of RX & DPS outputs.
Wiegand Operation Mode:
- Red LED 'ON' when powered.
- Presenting a compatible credential causes LED to briefly turn green and then return to red state.
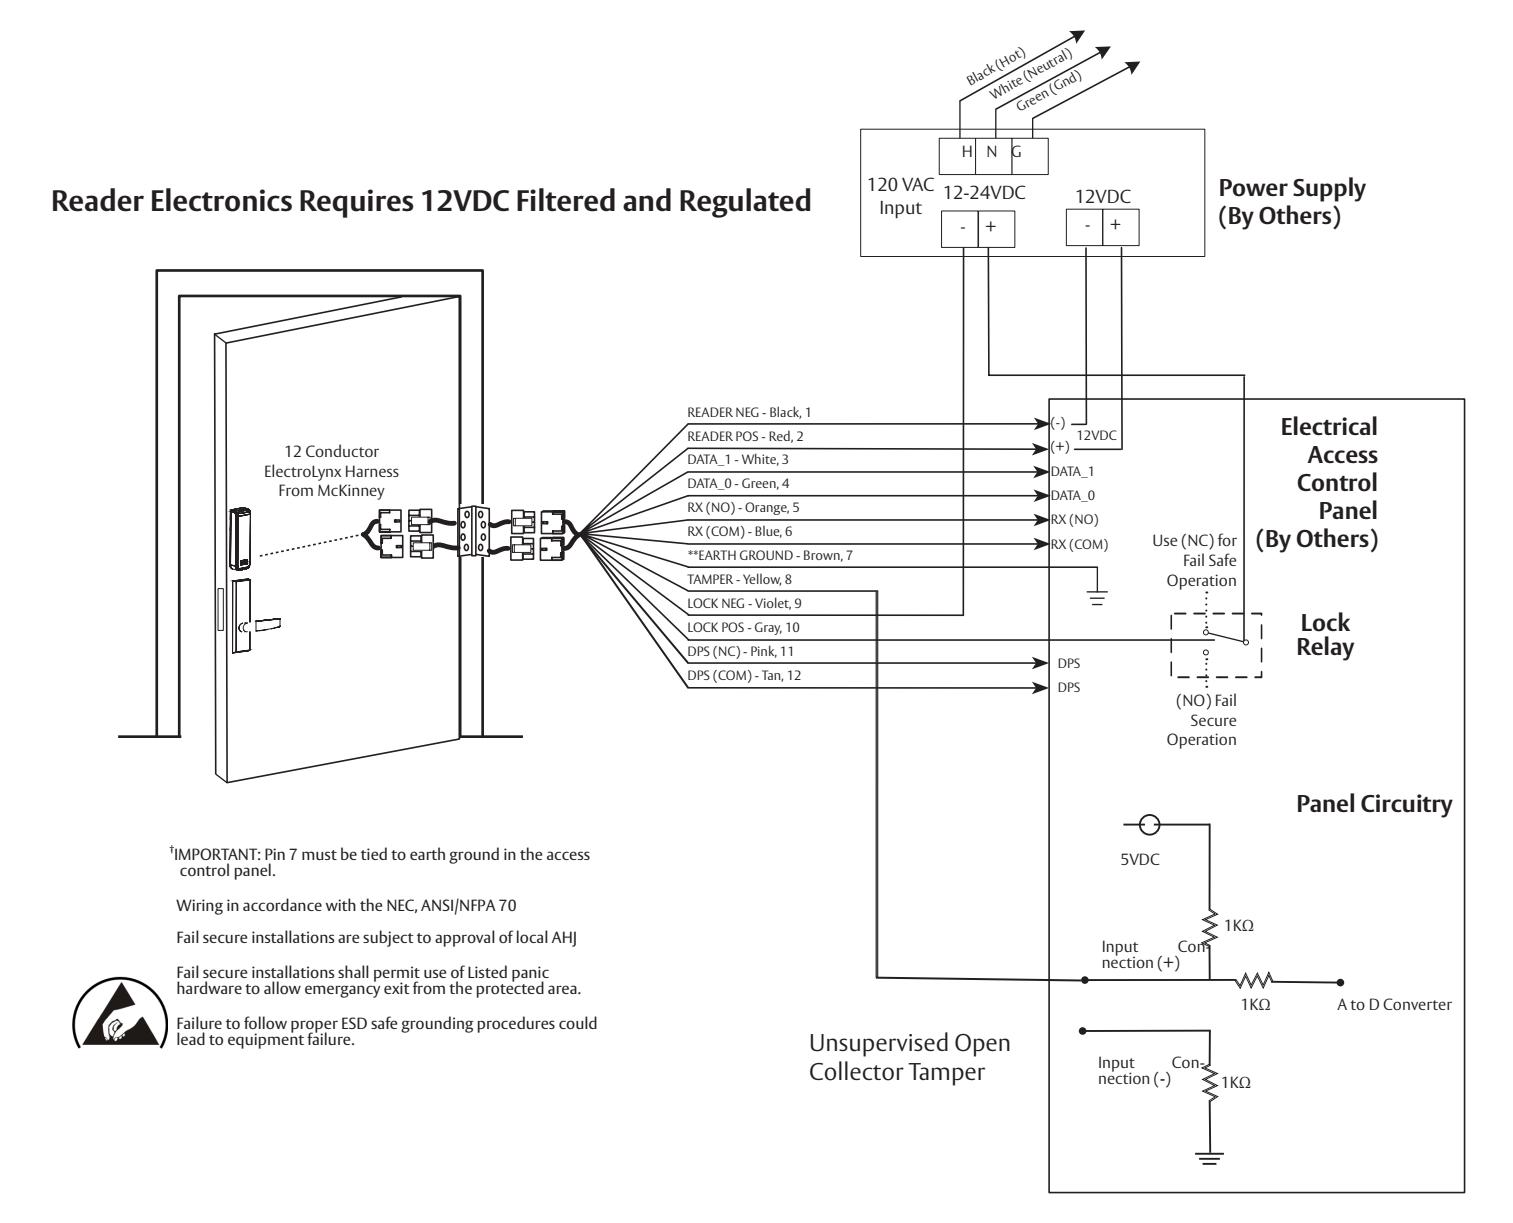
UL294 / TAMPER Configuration:
- Connect Yellow TAMPER wire from ElectroLynx cable to desired EAC panel control line. Reference Diagram #1.
- As appropriate, use the configuration card to activate desired mode on reader.
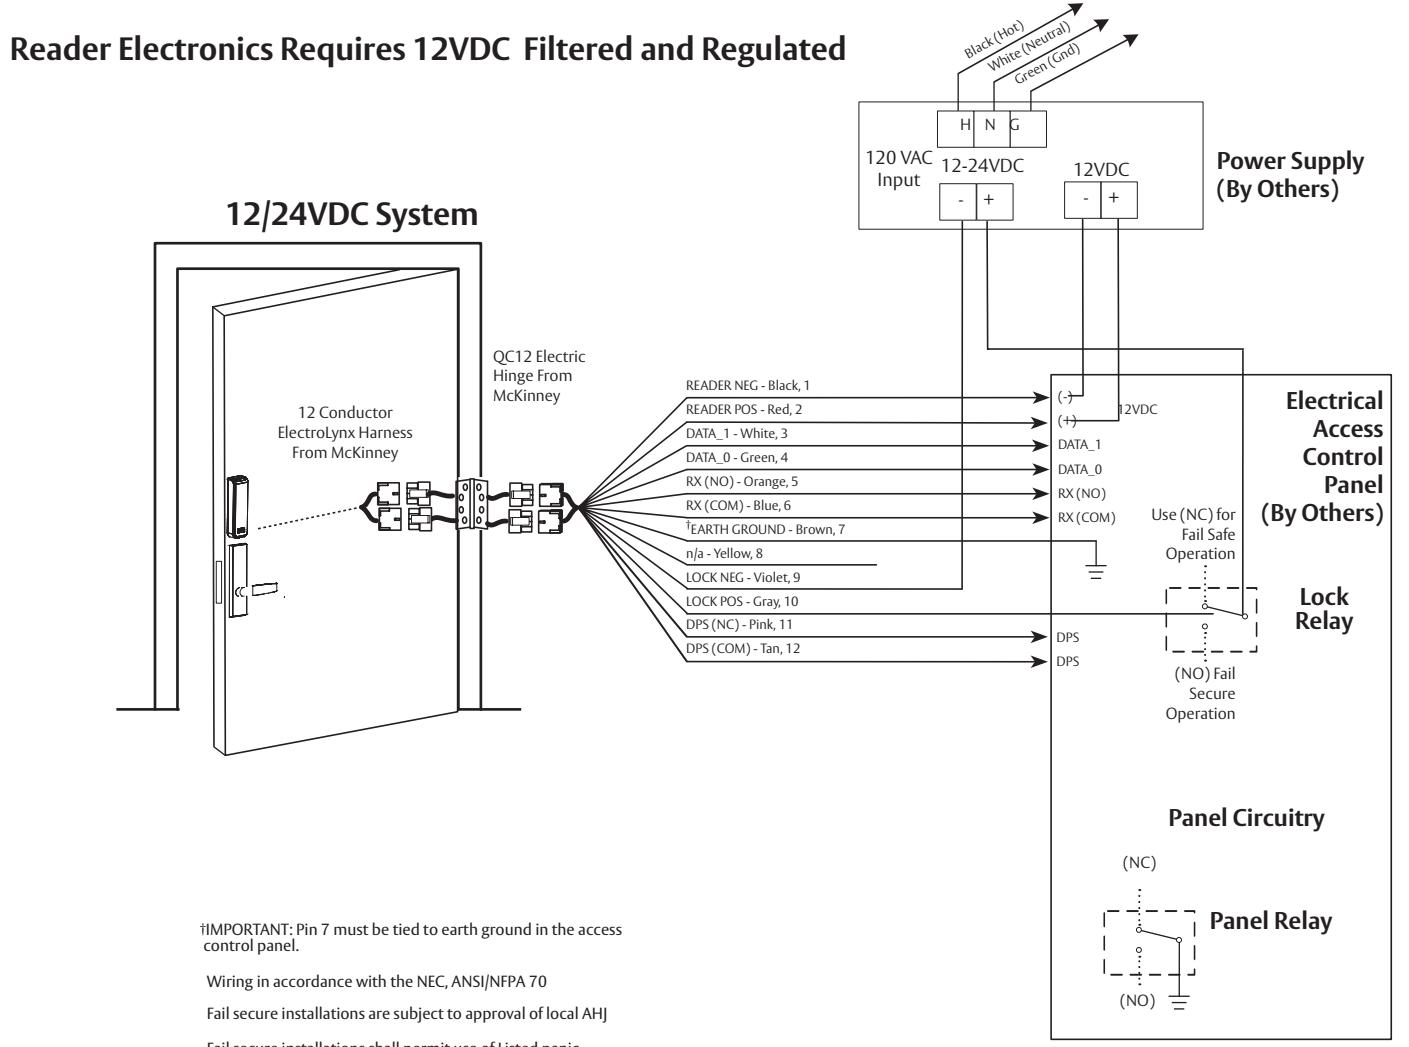
Non-UL294 Configuration:
• Connect GREEN_LED input to switch controlled by panel. Shorting GREEN_LED to READER_NEG (Black) with panel switch will override reader LED to keep it green.
SN200/210 Integrated Wired With and Without MELR Option (Electric Latch Retraction)

4) Wiring Diagrams (Continued)
SN200 Wiegand UL294/TAMPER Configuration Application Diagram #1
Tamper will trigger when reader is removed from door and tamper wiring is connected at the panel.
12/24VDC System
| 12\ | / | 24\ | ′ | |
|---|---|---|---|---|
| Average | Peak | Average | Peak | |
| Reader* | 75mA | 250mA | n/a | n/a |
| Actuator (ET) 15mA | 500mA | 15mA | 500mA | |
* Maximum AVG - RMS current draw during continuous card reads Not evaluated by UL.
Peak - highest instantaneous current draw during RF communication
SN200/210 Integrated Wired With and Without MELR Option (Electric Latch Retraction)

4) Wiring Diagrams (Continued)
SN200 Wiegand Non-UL294 Configuration Application Diagram #2
| 12\ | / | 24\ | ' | |
|---|---|---|---|---|
| Average | Peak | Average | Peak | |
| Reader* | 75mA | 250mA | n/a | n/a |
| Actuator (ET) | 15mA | 500mA | 15mA | 500mA |
* Maximum AVG - RMS current draw during continuous card reads Not evaluated by UL
Peak - highest instantaneous current draw during RF communication

Fail secure installations shall permit use of Listed panic hardware to allow emergancy exit from the protected area.
Failure to follow proper ESD safe grounding procedures could lead to equipment failure.
SN200/210 Integrated Wired With and Without MELR Option (Electric Latch Retraction)

4) Wiring Diagrams (Continued)
SN210 OSDP (MELR) Application Diagram #3 (12/24VDC System)
| 12\ | / | 2 | 24V | |
|---|---|---|---|---|
| Average | Peak | Average | Peak | |
| Reader* | 75mA | 250mA | n/a | n/a |
| MELR | n/a | n/a |
250mA
dogged |
1A inrush
600mA during retraction |
** Maximum AVG - RMS current draw during continuous card reads Not evaluated by UL
Peak - highest instantaneous current draw during RF communication
OSDP Operation Mode*:
*LED/Sounder control and Tamper status communicated over OSDP serial protocol
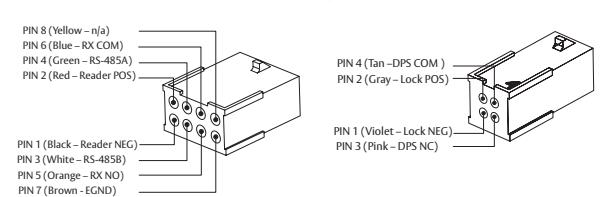
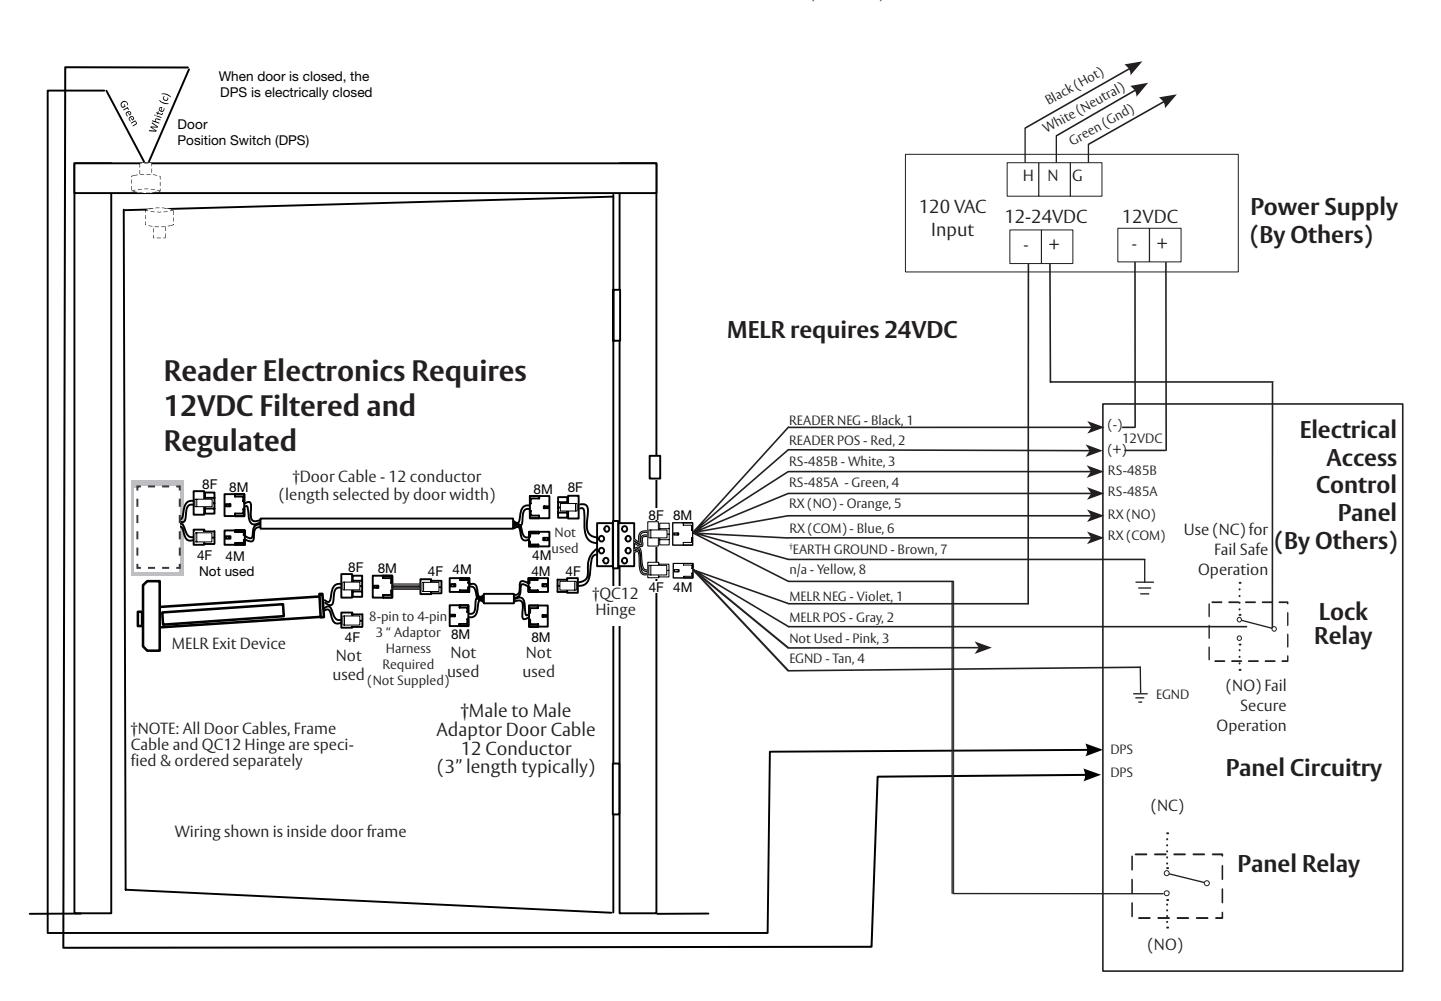
†IMPORTANT: Pin 7 must be tied to earth ground in the access control panel.
Wiring in accordance with the NEC, ANSI/NFPA 70 Fail secure installations are subject to approval of local AHJ

Fail secure installations shall permit use of Listed panic hardware to allow emergancy exit from the protected area.
Failure to follow proper ESD safe grounding procedures could lead to equipment failure.

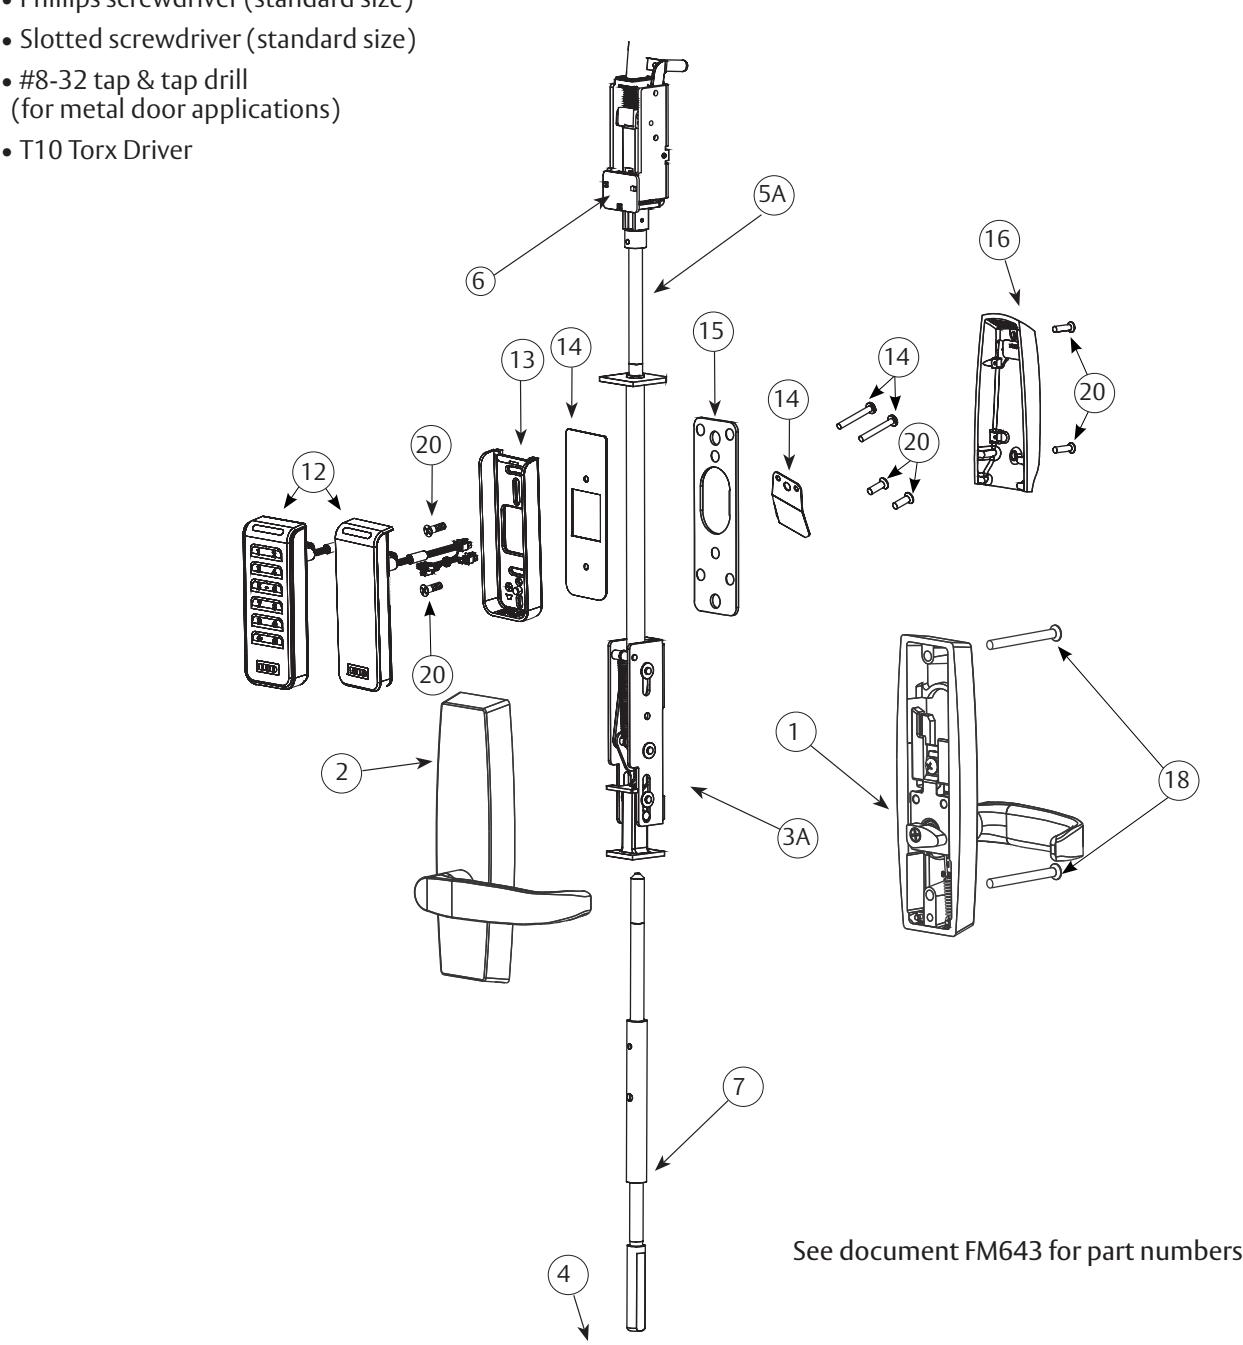
5) Product Illustrations
SN200/210 MP9800 Series
Tools Required
• Phillips screwdriver (standard size)

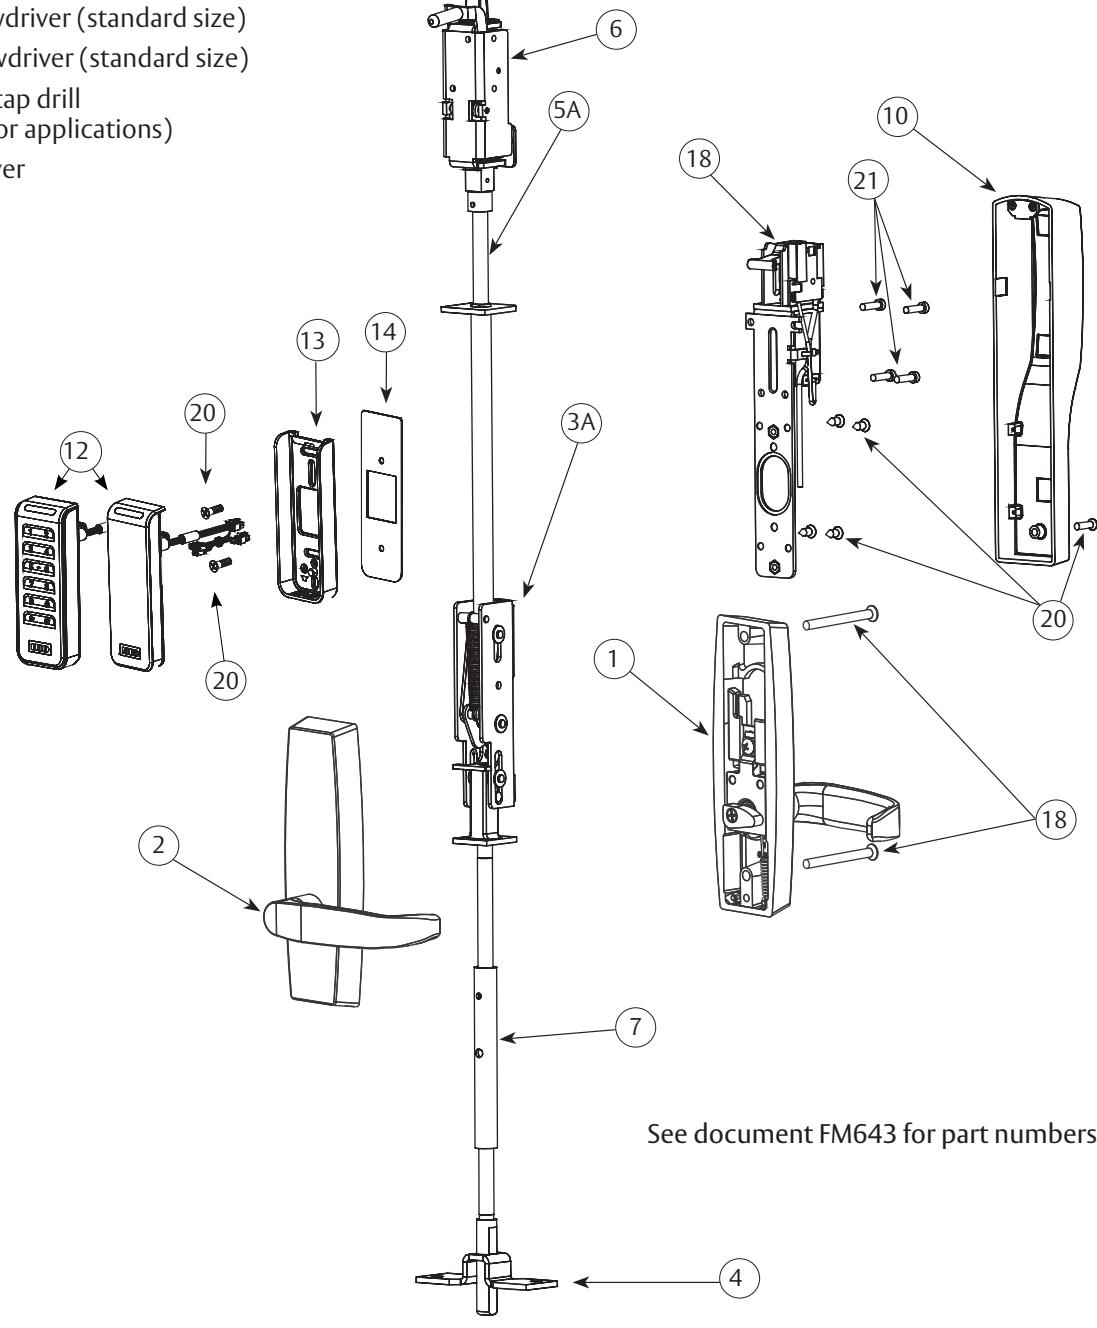
5) Product Illustrations (Continued)
SN200/210 MP9800 Series
Tools Required
- Phillips screwdriver (standard size)
- Slotted screwdriver (standard size)
- #8-32 tap & tap drill (for metal door applications)
- T10 Torx Driver

5) Product Illustrations (Continued)
| ITEM | Description | Req. |
|---|---|---|
| 1 | WD/MD/AD Inside Trim Assembly | 1 |
| 2 | Outside Trim Assembly | 1 |
| 3A | MD/AD Inner Chassis Assembly | 1 |
| 3B | WD Inner Chassis Assembly (Not shown) | 1 |
| 4 | Bottom Case | 1 |
| 5A | MD/AD Top Rod and Bolt Assembly | 1 |
| 5B | WD Top Rod and Bolt Assembly (Not shown) | 1 |
| 6 | Top Case Assembly | 1 |
| 7 | Bottom Rod and Bolt Assembly | 1 |
| 8 | Plate (Not shown) | 2 |
| 9 | WD Top Case Bracket (Not shown) | 1 |
| 10 | I/S MELR Escutcheon Assembly | 1 |
| 11 | Strike Pack (not shown) | 1 |
| 12 | Reader & Harness Assembly | 1 |
| 13 | Signo Reader Back Plate | 1 |
| 14 | Fire Plate Packet | 1 |
| 15 | I/S Mounting Plate | 1 |
| 16 | I/S Escutcheon | 1 |
| 17 | MELR Assembly | 1 |
| 18 | MD/AD Screw Pack | 1 |
| 19 | WD Screw Pack (not shown) | 1 |
| 20 | Screw Pack, SE Series | 1 |
| 21 | MELR Mounting Hardware | 1 |
| 22 | WD Mounting Hardware (shown as Item 22) (not shown) | 1 |
| 23 | #3 - 48 x 1/8" Pan head Machine Screw (not shown) | 4 |
See document FM643 for part numbers

6) Installation Instructions
1 Door Preparation
A. Verify Hand and Bevel of Door
- Check hand of door. The Multi-Point lock may be handed.
- Door should be fitted and hung
- Verify box label for size of the Multi-Point lock, function and hand
- Change hand (if necessary)
B. Door Preparation
Prepare door according to appropriate template. If necessary, refer to www.corbinrusswin.com .
- Metal door (MD/AD) FM438
- Template: T31242
- Wood door (WD) FM436
- Template: T31243
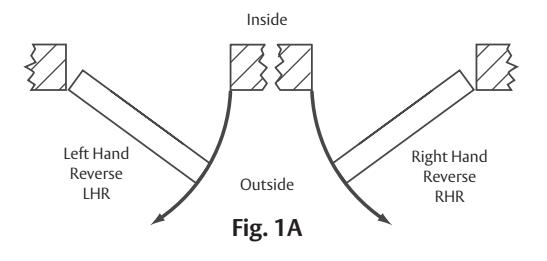
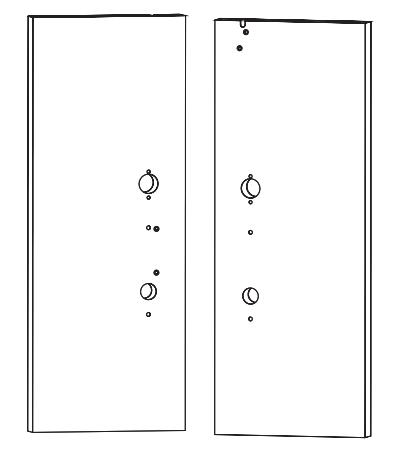
Fig. 1B Metal Door Shown
2 Rod and Inner Case Installation
- 1. Refer to instruction sheet FM438 for rod and inner case installation on metal doors.
- 2. Refer to instruction sheet FM436 for rod and inner case installation on wood doors.
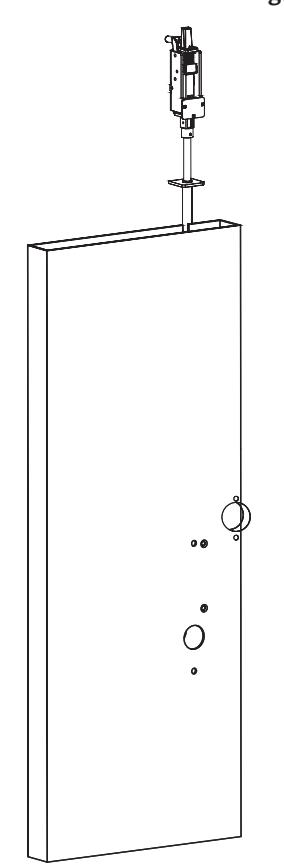
Fig. 2

3 Install Outside Trim and Inside Trim
A. Outside Trim
- 1. For exterior applications, use ET gasket to seal ET escutcheon and outside door surface (Fig. 3a).
- 2. Feed wire through the through hole and attach the outside exit trim to the door.
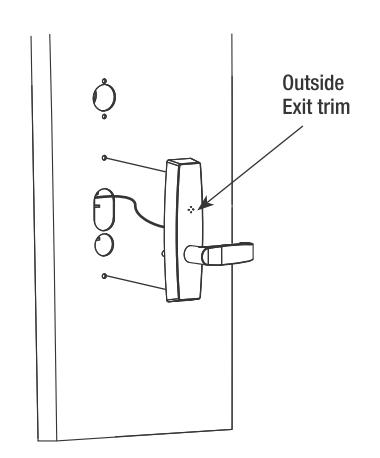
Fig. 3a
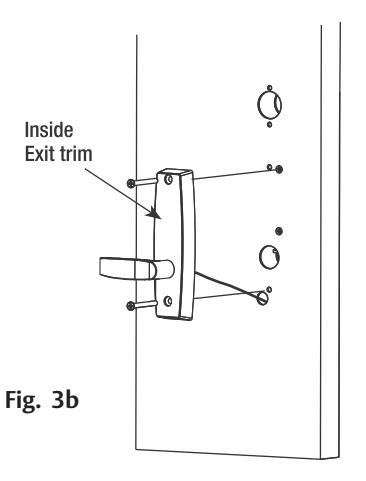
B. Inside Trim
- 1. Position ET carefully onto the inside door surface the inside of the door. Be careful not to pinch wire harness.
- 2. Mount inside trim lever using (2) # 1/4" -20 x 3" Philips oval head machine screws. (Fig. 3b).
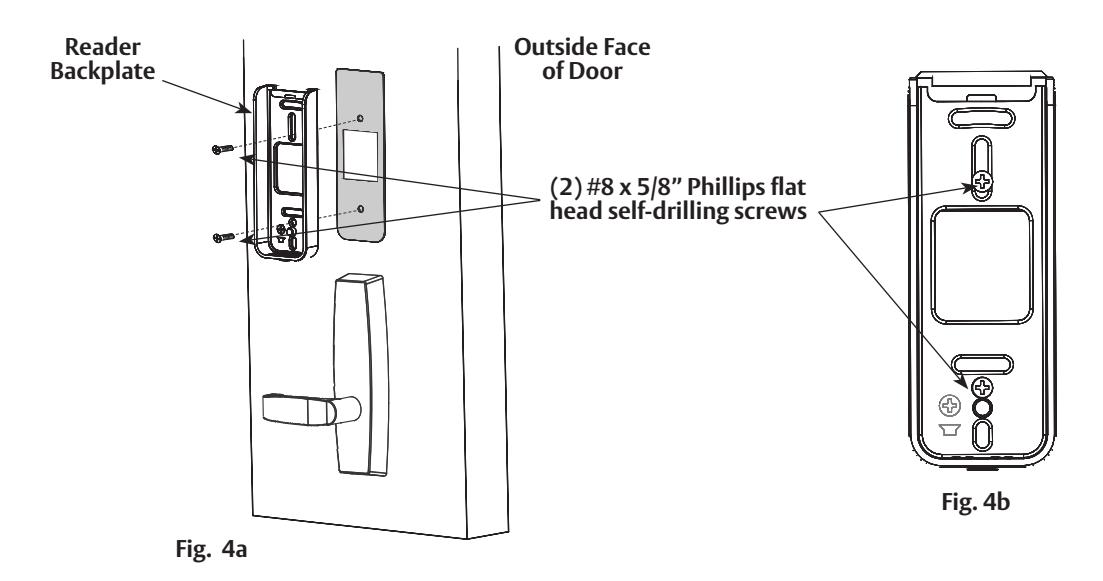
4 Install Reader Backplate and (Optional*) Fire Shield
For fire-rated doors only, install reader backplate and fire shield to door using two (2) #8-18 x 5/8" Phillips flat head self-drilling screws (Fig. 4a, b).

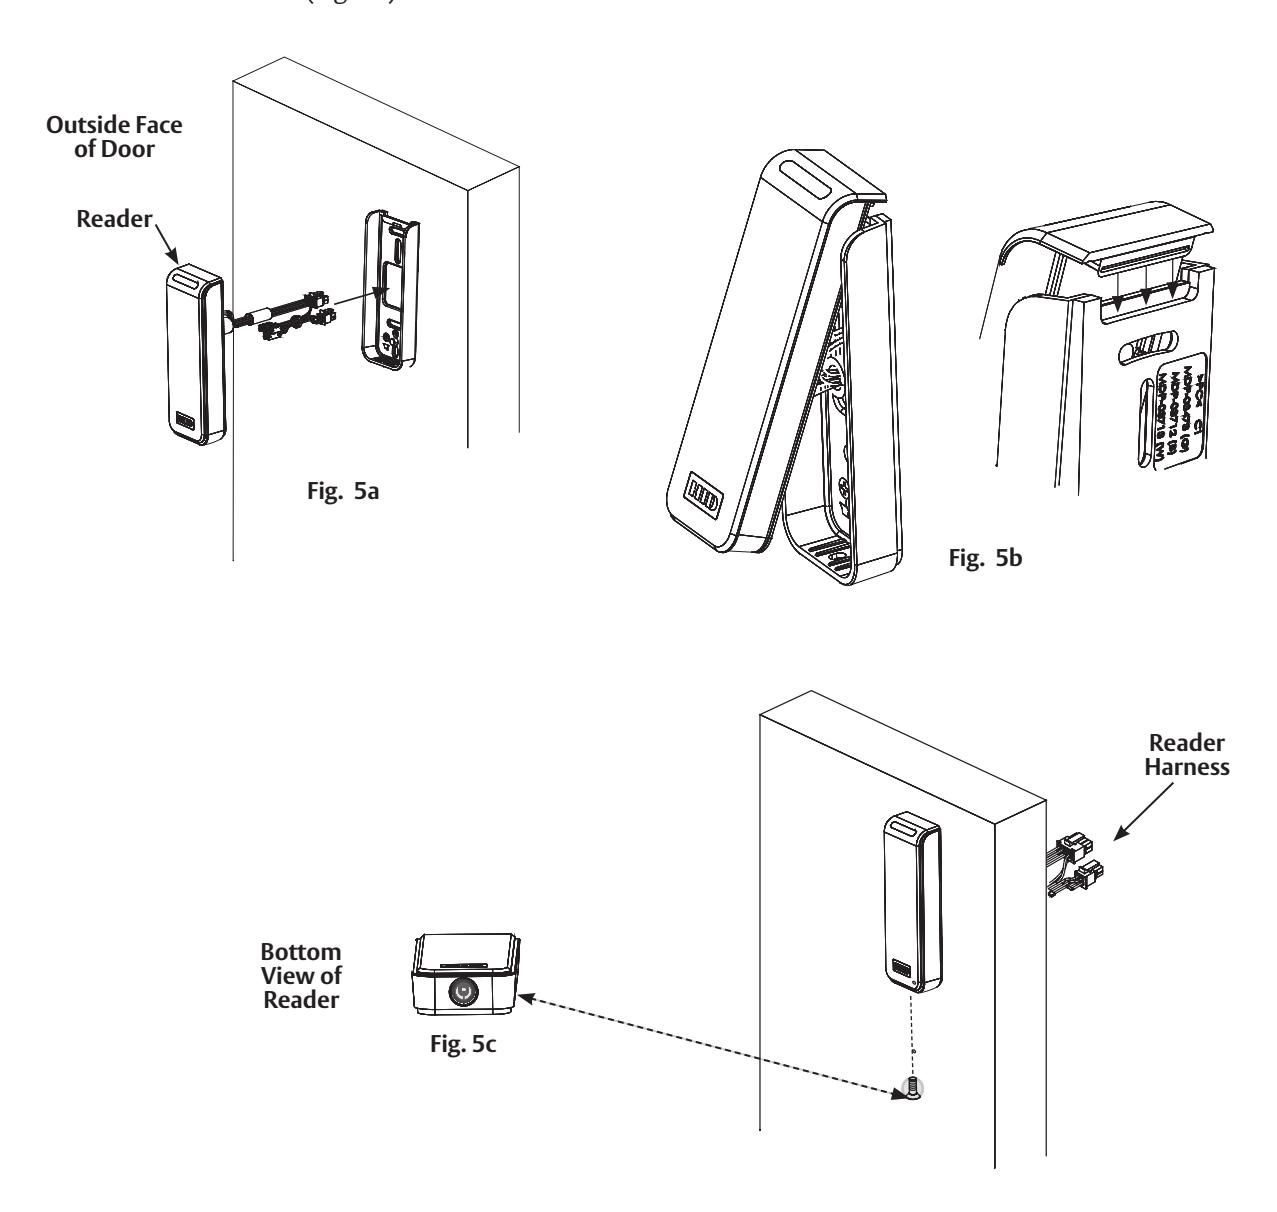
5 Install SN200/210 Reader

Observe precautions for handling electrostatic sensitive devices. !
- 1. Hook the top of the reader on the top of the mounting plate.
- 2. Align the bottom of the reader with the bottom of the mounting plate.
- 3. Secure the reader to the mounting plate using the supplied 6-32 x 3/8" T10 security Torx machine screw (Fig. 5c).

6A Inside Mounting Plate and Wire Connections (Non-MELR)
- 1. Attach mounting plate using (2) #8 x 1/2" self-drilingl screws (Fig. 6a).
- 2. Connect 6- and 2-pin connectors from device to 6- and 2-pin connectors on reader harness (Fig. 6b, c).
- 3. Connect ElectroLynx 4- and 8-pin connectors from the door harness to (black) 4- and 8-pin connectors of the SN200/210 harness (Fig. 6d).
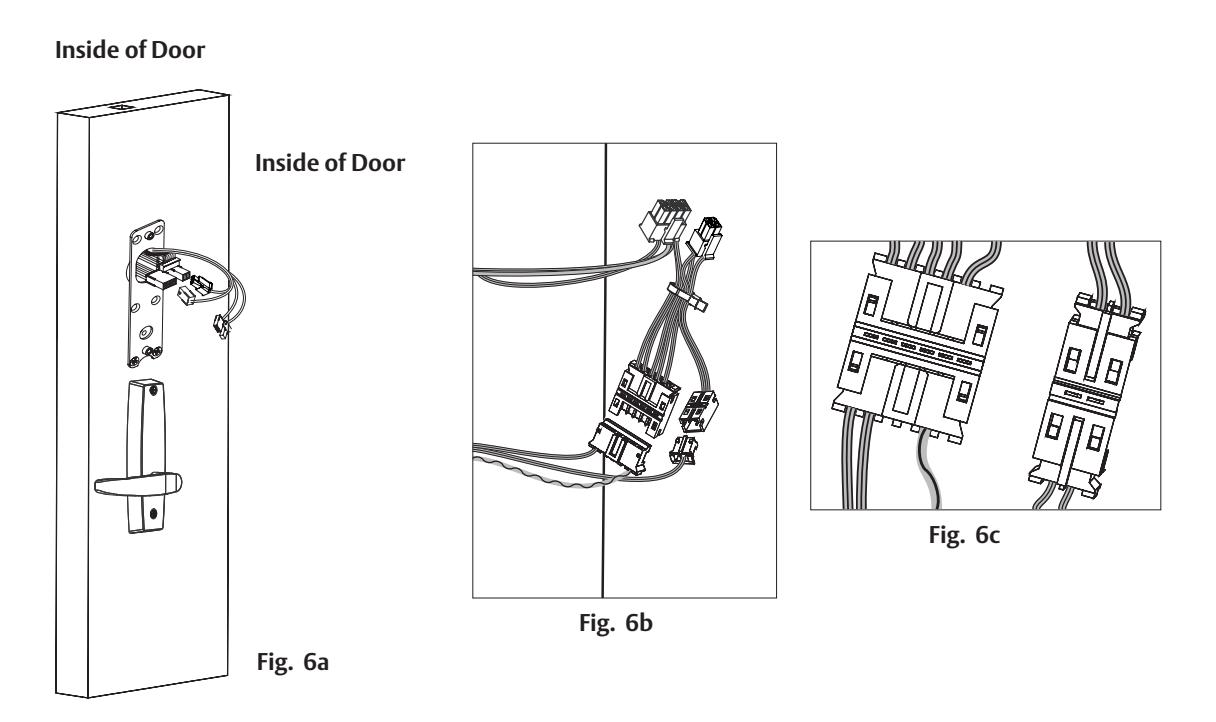
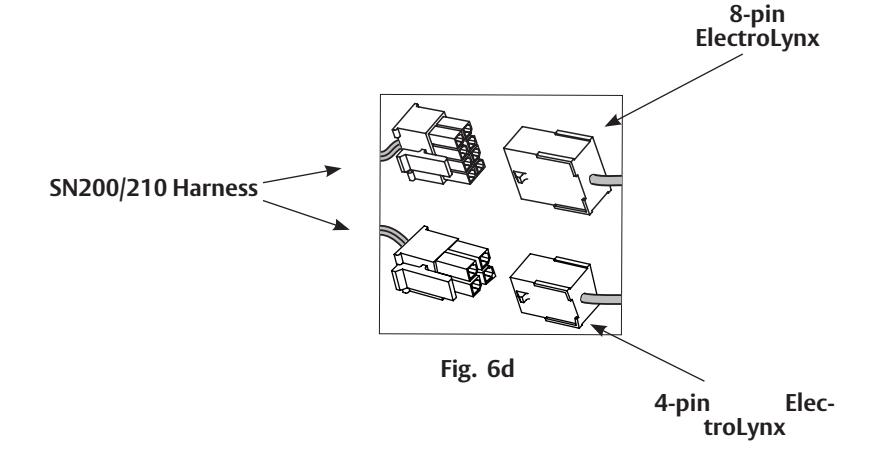
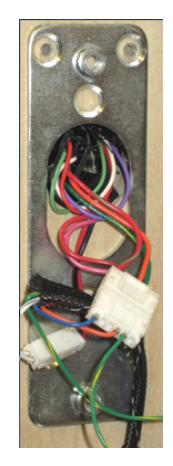
Fig. 6e
NOTE: Neatly fold excess wires into remaining space to prevent pinching wires when mounting inside escutcheon (Fig. 6e).

6B Inside Mounting Plate and Wire Connections (MELR)
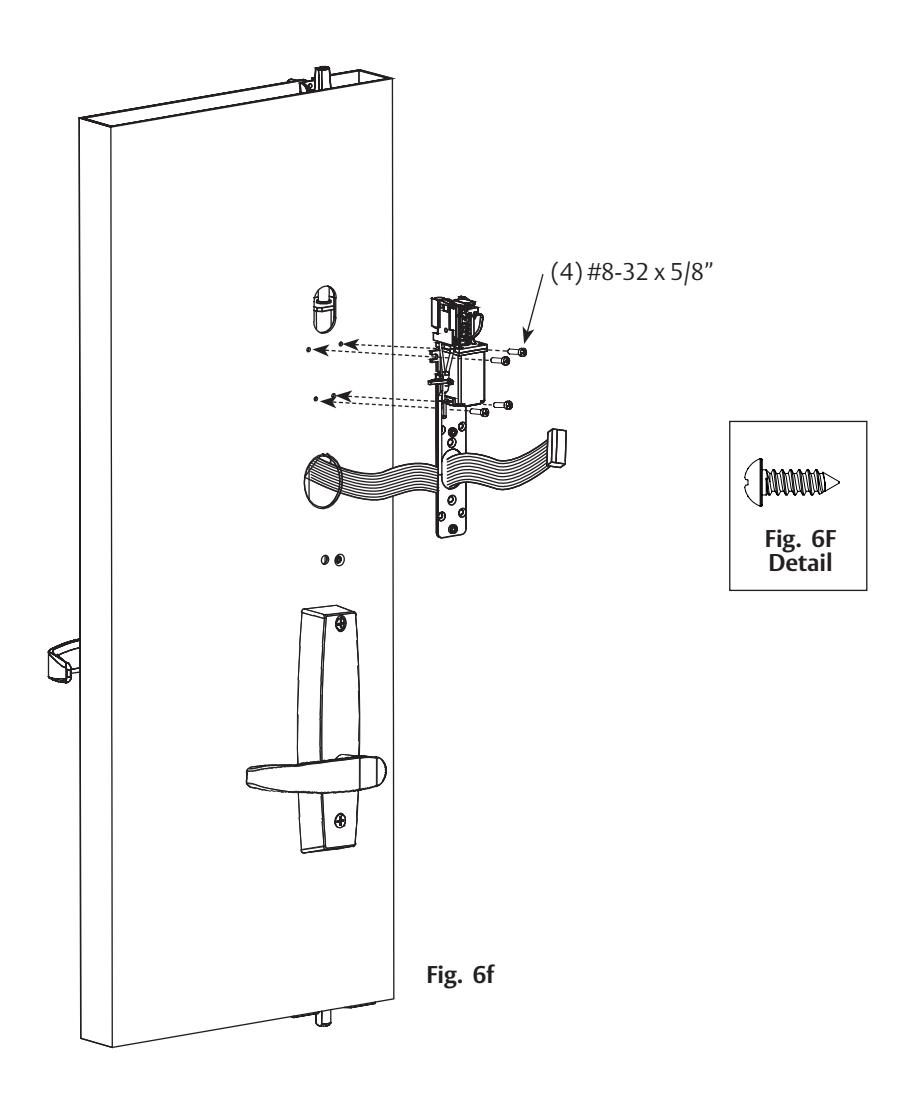
- 1. Install the upper left mounting screw, #8 32 x 5/8 Fillister for metal door or #8 x 5/8 self-drilling Fillister for wood doors (Figure 6f). Note: Leave the screw loose enough to slide the MELR assembly on.
- 2. Snake the wire through opening in MELR assembly.
- 3. Slide the mounting clip of the MELR assembly underneath the installed screw and tighten it to secure the assembly in place. Note: Be careful not to pinch or disconnect the wire located in that area.
- 4. Install the remaining three (3) mounting screws: 8-32 x 5/8 Fillister for metal doors or #8 x 5/8 self-tapping Fillister for wood doors.
- 5. Connect 6- and 2-pin connectors from device to 6- and 2-pin connectors on reader harness (Fig. 6b, c in previous step).
- 6. Connect ElectroLynx 4- and 8-pin connectors from the door harness to (black) 4- and 8-pin connectors of the SN200/210 harness (Fig. 6d in previous step).

7 Fire Plate Installation and Earth Ground Connection
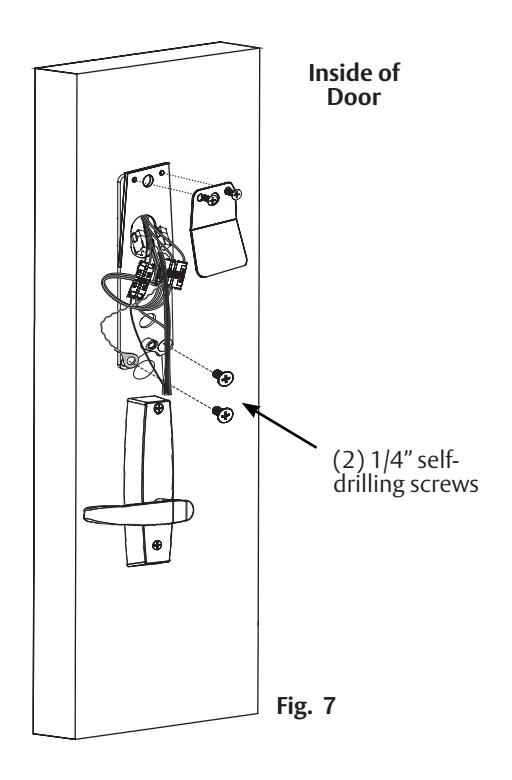
- 1. Install two (2) #8 x 1/2" self-drill screws in the bottom-most pair of holes in the mounting plate (Fig. 7). Feed lower left screw through green/yellow ground wire ring terminal. Ensure that green/yellow wire points toward top of door in order to avoid interference with escutcheon.
- 2. Fasten plate with two #8 x 1 1/4" Phillips pan head self-drilling screws. Note: For non-fire rated doors, omit fire plate.
8A Position Inside Escutcheon & Wires (Non-MELR)
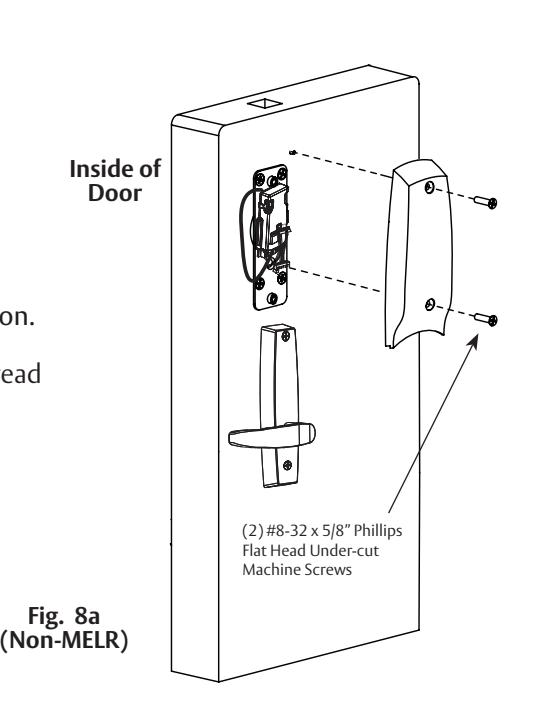
- 1. Carefully and neatly fold lock body wires onto themselves. ElectroLynx connectors should be positioned side-by-side under the fire block plate. Device connectors should be positioned side-by-side on top of the ElectroLynx connectors.
- 2. Position inside escutcheon in order to ensure wires are not pinched. Adjust wires as necessary to ensure they are clear of rear escutcheon. Seat inside escutcheon against door.
Note: Be sure to cover, but not pinch wires when mounting escutcheon.
3. Insert two (2) #8-32 x 5/8" Phillips flat head escutcheon screws and thread into mounting plate.

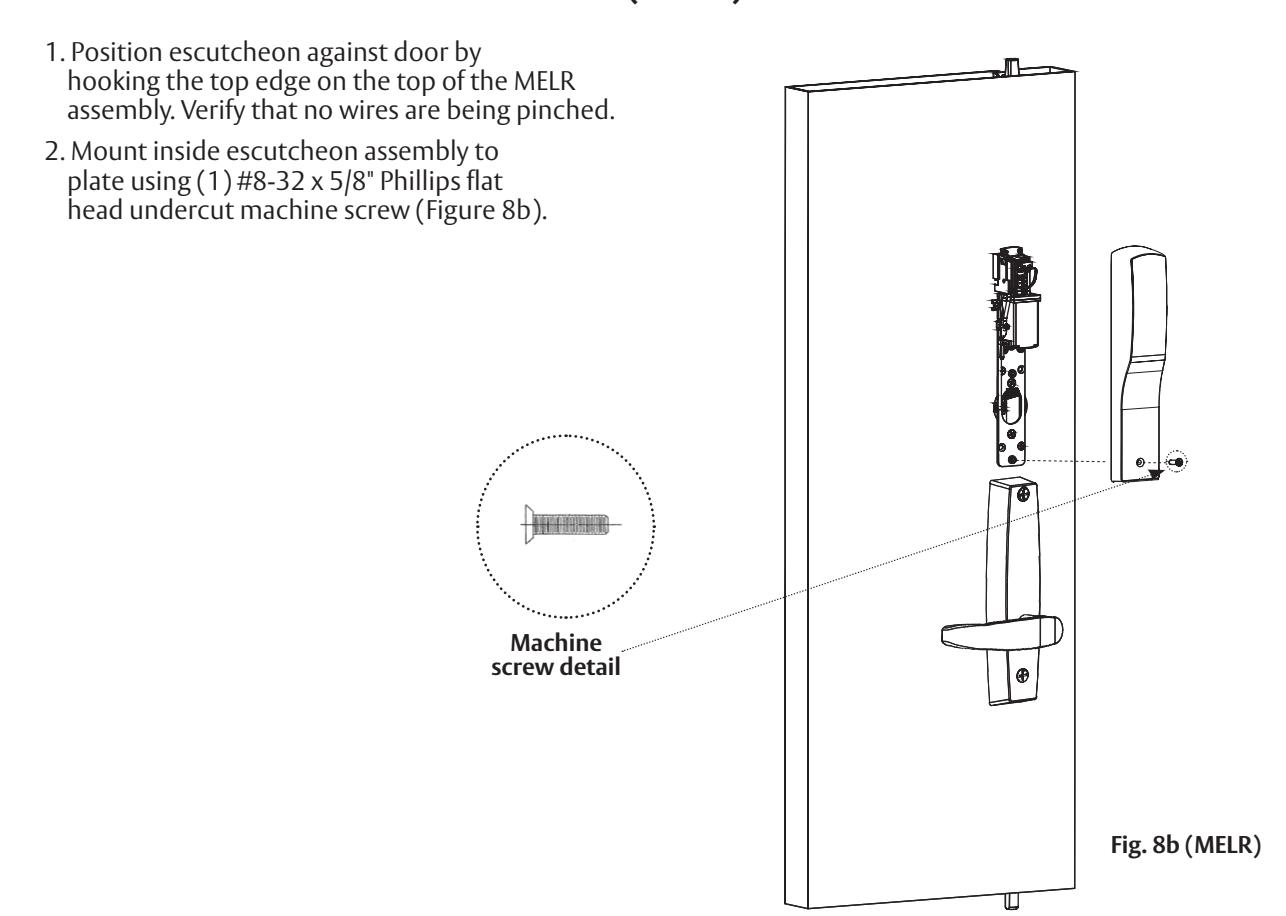
8B Position Inside Escutcheon & Wires (MELR)
7) Concealed Door Position Switch Instructions
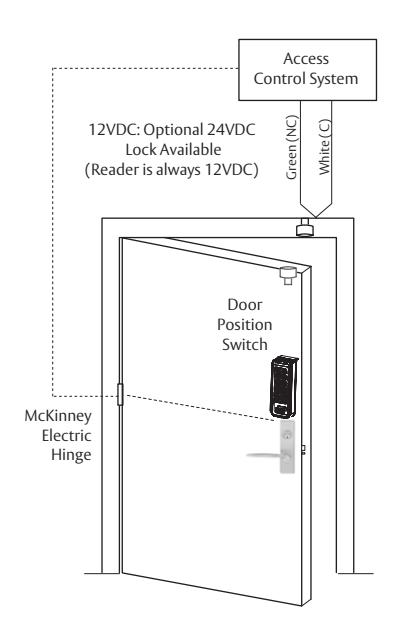
- 1. Concealed Door Position Switch Model 708F989 is included with this product. System integrator shall determine use and installation location.
- 2. Drill a 1" Diameter Hole for both the Magnet and the Switch. Both holes shall be 1" Deep and for the Switch (if needed) drill a 1/4" hole for the wires.
- 3. Connect the common wire of the switch to the common input terminal of the EAC.
- 4. Connect the normally open wire of the switch to the normally open input terminal of the EAC.

8) Operational Check
Wiegand Test Unit
The ASSA ABLOY Wiegand Test Unit verifies your installation in the field*. The test unit checks for:
- proper wiring
- card reader data integrity
- lock functionality including lock/unlock, door position status, and request-to-exit (REX) status
In addition, this tool provides demonstration abilities to highlight the product's features and capabilities**.
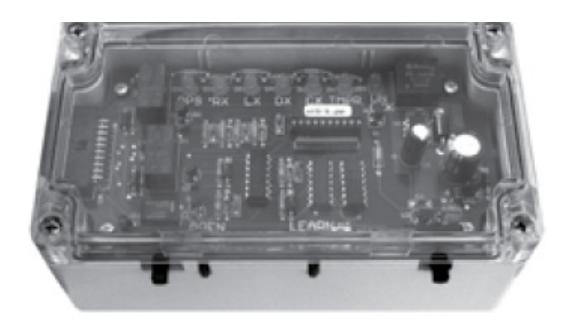
Wiegand Test Unit - WT1
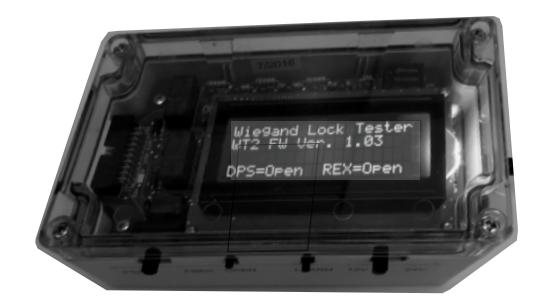
Wiegand Test Unit - WT2
Feature WT1 WT2 12 or 24VDC solenoid lock voltage adjustable X X Operates as Fail Safe or Fail Secure X X "Learn" mode allows testing of specific cards without programming at panel level X X Card reader data integrity is validated at test unit X X Displays detailed Wiegand data, including hexadecimal string and total bits received X Displays measured end-of-line resistor values (if applicable) X Displays key-press data from keypad readers† X
The SNT1 is an adapter harness assembly that connects and converts OSDP lock signaling to work with a Wiegand Test Box (WTB).
If using the OSDP adapter, the WT1 will unlock on credential read or any key press, regardless of what credential is learned (OSDP reader only).
When connected to a Wiegand reader or using OSDP adapter: the WT2 will unlock on credential read and display credential value. Credentials can be learned, as usual. Individual key press will be displayed for any key press, but they cannot be learned.
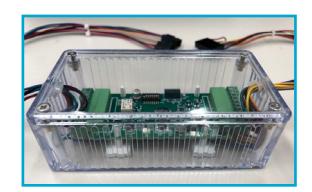
(SNT1) WTB OSDP adapter wiring harness
* For directions on use, see operating instructions provided with unit.
** SN200/210 keypad version works only with WT2
WT2 unit with 1.03 firmware or later is required

8) Operational Check (Continued)
Note: Once electrical wiring has been successfully completed according to proper application, perform the following steps:
- 1. Ensure lock is interfaced with Wiegand Test Unit to verify installation & wiring up to (frame side) point of hinge.
- 2. Turn power ON.
- 3. Wait for LED to turn RED and then present compatible credential and verify LED and sounder activity.
- 4. Verify valid card read on Wiegand Test Unit or at the EAC panel.
- 5. Verify system operation functions; i.e., when credential is presented to reader, the door should unlock.
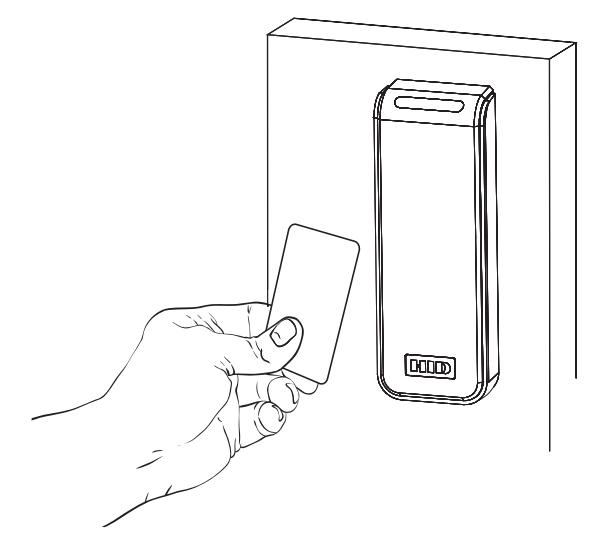
NOTE: Ensure LED operates as configured:
- For SN200, LED remains green when panel asserts GREEN_LED signal
- For SN210, Tamper, LED and sounder are controlled by OEM software
If the lock fails to operate when DC voltage is applied:
- 1. Remove power.
- 2. Confirm the polarity of the supply (i.e., '+' is positive).
If the lock is functioning opposite to the desired fail-safe or fail-secure operation:
- 1. Remove power and check the "Fail" condition by attempting to rotate the outside lever (e.g. if fail-secure, the outside lever should be rigid with power removed).
- 2. If the function is incorrect, remove the lock and repeat section 6, step 3 (DIP Switch configuration).




Corbin Russwin 225 Episcopal Road Berlin, CT 06037 Phone: 800-543-3658 Fax: 800-447-6714 corbinrusswin.com
Copyright © 2020-2023 ASSA ABLOY Access and Egress Hardware Group, Inc. All rights reserved. Reproduction in whole or in part without the express written permission of ASSA ABLOY Access and Egress Hardware Group, Inc. is prohibited. Patent pending and/or patent - www.assaabloydss.com/patents.
HID, iCLASS, and Edge are trademarks or registered trademarks of HID Global Corporation.
For installation assistance contact Corbin Russwin 1-800-810-WIRE (9473) • techsupport.corbinrusswin@assaabloy.com