Corbin Russwin ED6200A Series Discontinued Installation Instructions_FMC394A
Open the original PDF document
View PDF
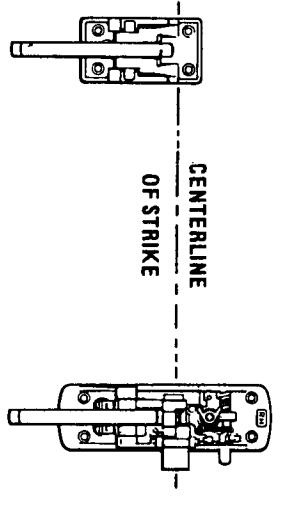
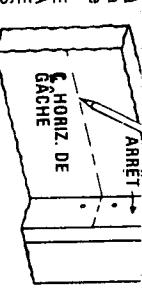
Line of Strike is 145 mm [5-11/16"] higher than desired height of Cross-Bar). TRANSFER HORIZONTAL CENTER LINE OF STRIKE TO INSIDE OF DOOR AT HINGE AND LATCH SIDE.
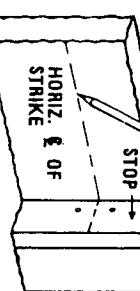
STRIKE MOUNTING HOLES SECOND SPOT CASE, TRIM AND
ACTIVE CASE
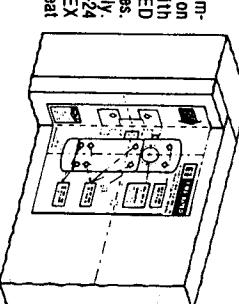
Fold Exit Device TEMPLATE toward you on dotted line and place on INSIDE of door against FACE of STOP or MULLION. Line up Horizontal C/L with Horizontal C/L Marked on Door. Spot and drill holes for Case and Strike.
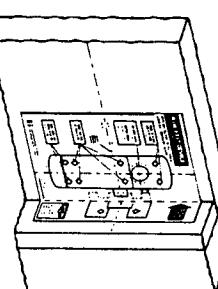
NO OUTSIDE TRIM
A., Use Active Case TEMPLATE to Spot Holes on INSIDE OF Door. Drill and Tap for $12-24 MACH. SCREWS or
B. If SEX NUTS have been Furnished Drill 7 mm (9/32") Diameter holes through door. Redrill holes on OUTSIDE OF DOOR to 9 mm (3/8") Diameter. Drive body of SEX NUTS into holes in DOOR from the OUTSIDE.
Position Trim Template on OUTSIDE of Door, CAREFULLY CHECK TRIM FUNCTION BEFORE SPOTTING AND DRILLING ONLY THOSE HOLES FOR YOUR TRIM FUNCTION.
INACTIVE CASE
WITH OUTSIDE TRIM
See TEMPLATE Furnished.
Position opposite edge of Template against Stop, folding on dotted line. Line up with HORIZONI'AL C/L MARKED ON DOOR, Spot and drill holes. For Case mounting screws only. Drill and Tap for No. 12-24 MACH. SCREWS or, if SEX NUTS have been turnished repeat STEP Number Two (B)
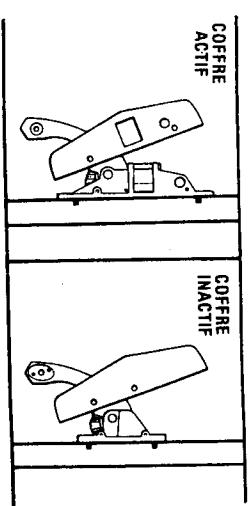
ACTIVE CASE INACTIVE 10
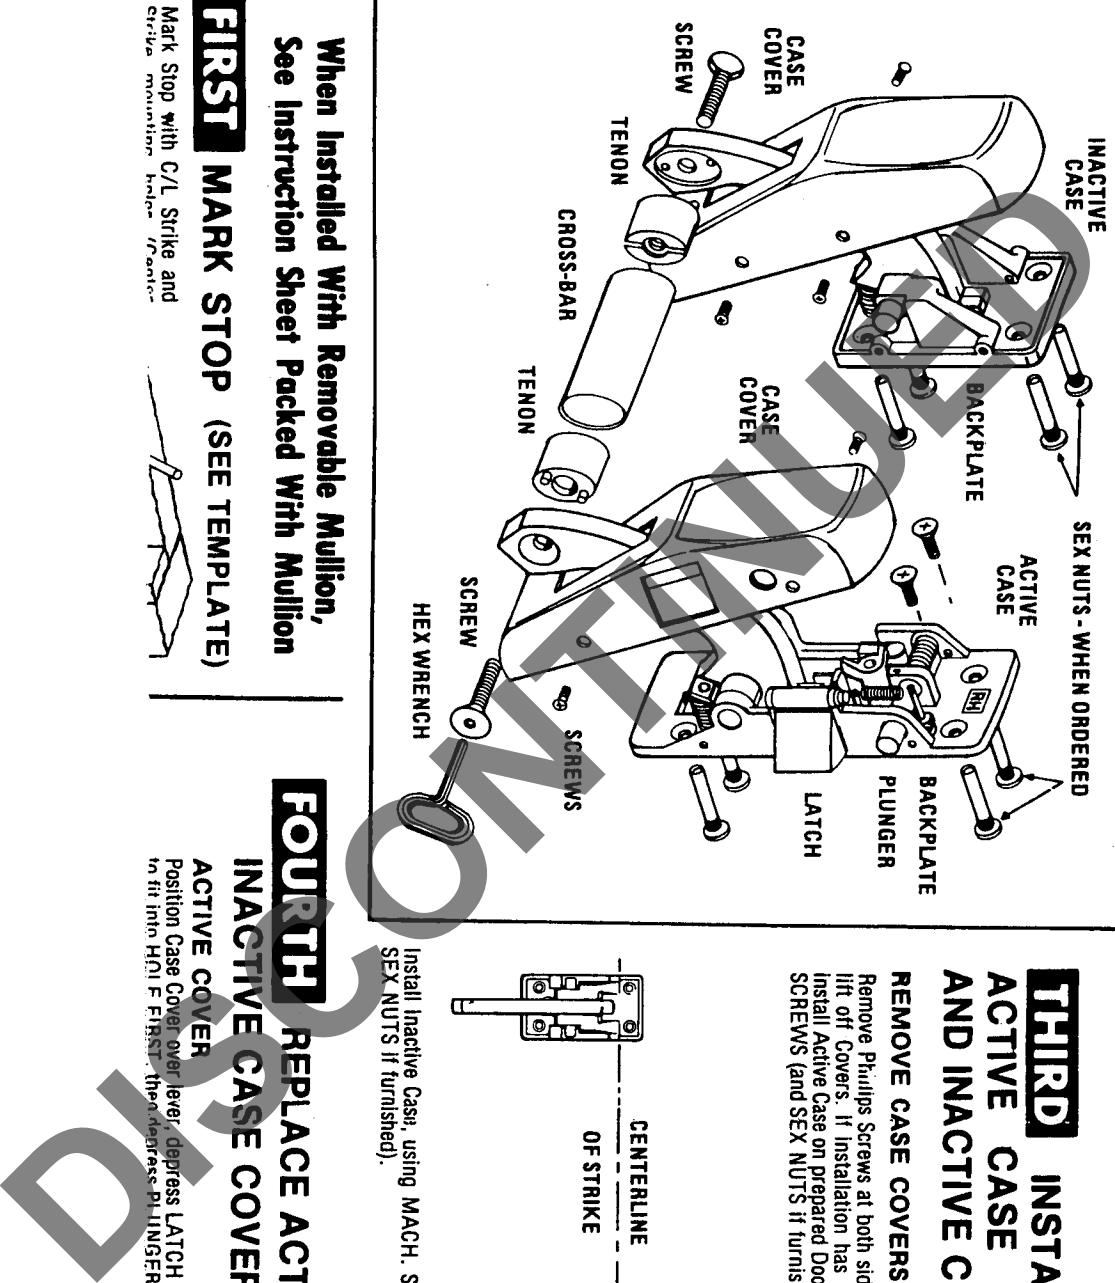
IIIII INSTALL CROSS-BAR
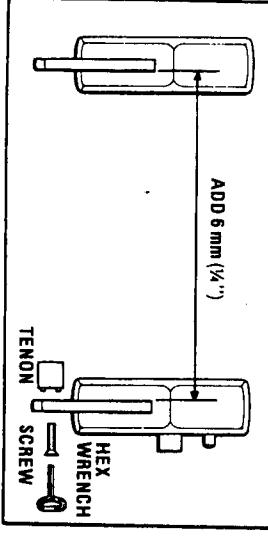
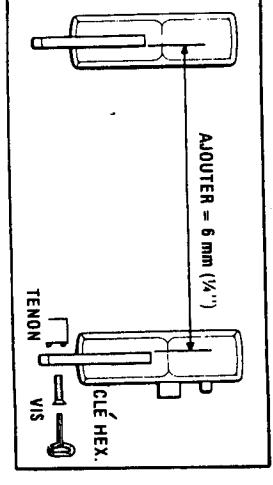
A. PLACE TENON ON 1 LEVER Using Hex Wrench furnished. DO NOT TIGHTEN. NOTE: Pins in Tenon line up with holes in Lever.
Line up Side Holes in Cover and Case, secure with Phillips screws provided.
INACTIVE COVER
Position Cover over Case and line up Holes on both sides, secure with Phillips screws provided.
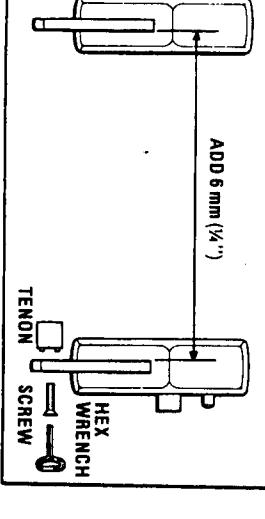
Measure distance between Levers near Hole where top of Lever enters Case. Add to this Dimension and cut Cross-Bar to this measurement. Remove burrs on inside of Cross-Bar.
TEST OPERATION OF DEVICE
NOTE: TO OBTAIN PROPER LATCHING POSITION, ADJUST STRIKE SO THAT DEVICE LATCHES TIGHTLY
Using holes marked on Stop in the FIRST Step. Install strike.
STRIKE
INSTALL STRIKE
WITHOUT BINDING.
1 (0)
IGVOR. TIGHTLY SECURE SCREWS USING SCREWDRIVER THROUGH BOW OF HEX WRENCH FURNISHED.
IF AFTER COMPLETION OF INSTALLATION, CROSS DOES NOT WORK FREELY, CHECK INSTALLATION BINDING OF LEVERS DUE TO IMPROPER BAR LENGICASE MISALIGNMENT.
Corbin Russwin Canada 3160 Orlando Drive Mississauga, Ontario L4V 1R5
ED6200A
B. PLACER LE 26 TENON DANS LA BARRE
DISPOSITIFS DE SORTIE CLASSES COUPE-FEU -
ET INACTIF LES COFFRES ACTIF TROIS POSER
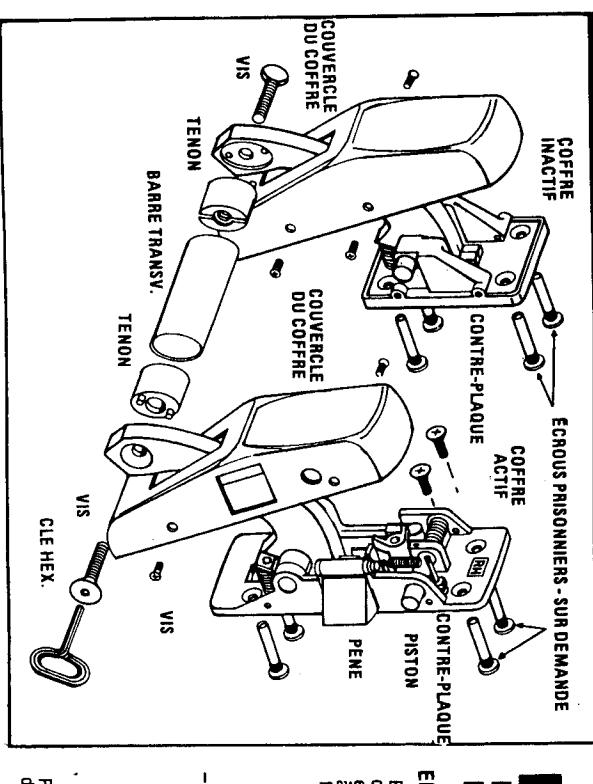
Enlever les vis Phillips de chaque côté des couver-cles et soulever ceux-ci. S'il n' y a pas de garniture extérieure, poser le ogffre actif sur la porte préparée à l'aide des VIS A METAL (et des ÉCROUS PRISONNIERS si fournis).
Poser le coffre inactif à l'aide des VIS À MÉTAL (et des ecrous prisonniers si fournis)
S'il y a un meneau amovible, consulter la feuille d'instructions fournie avec le meneau
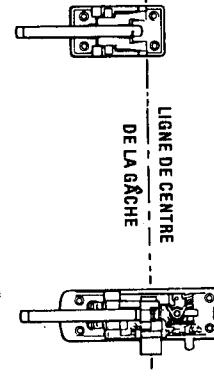
Marquer sur l'arrêt la C/L de la câche et les trous de pose de la
MARQUER L'ARRET (VOIR GABARIT)
COUVERCLES DES COFFRES
Mettre le couvercle enplace sur le bras, enfoncer le PENE sur le côté du coffre pour le faire pénêtrer dans le trou et enfoncer
REPLACER LES
COUVERCLE ACTIF
ENLEVER LES COUVERCLES
Placer l'autre tenon à affleurement dans le bout de la barre
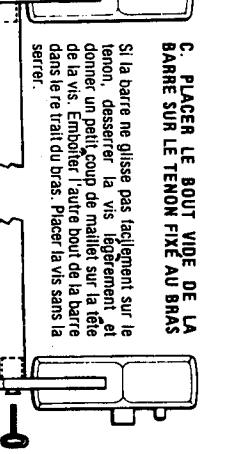
D. ASSUJETTIR LA BARRE DANS
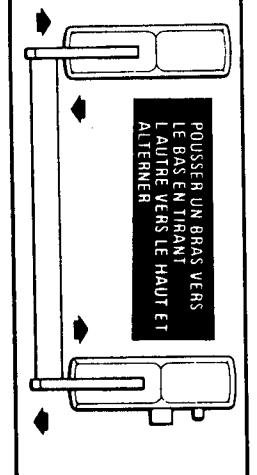
Donner à la barre un mouvement de balancement en poussant un bras vers le bas tout en tirant l'autre vers le haut et en alternant. Ce balance-
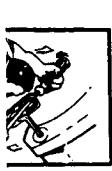
gache (La ligne de cventre est à 145 mm [5-11/16"] au-dessus de la hauteur désirée pour la barre
TRANSFERÉR LA LIGNE DE GENTRE HORIZONTALE DE LA GACHE SUR L'INTÉRIEUR DE LA PQRTE, CÔTÉ CHARNIERES ET CÔTÉ LOQUET.
)EUX
POSE DU COFFRE DE LA GARNI MARQUER LES TROUS DE
COFFRE ACTIF
Piler le GABARIT vers vous sur le pointillé et le placer sur L'INTÉ-RIEUR de porte contre la FACE de l'ARRÊT ou du MENEAU. Aligner la C/L horizontale avec celle marquée sur la porte. Marquer et perger les trous pour le coffre et la gâche.
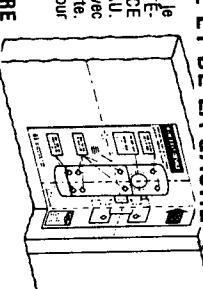
SANS GARNITURE EXTÉRIEURE
A. Repérer les trous sur l'INTERIEUR de la porte à l'aide du GABARIT du coffre-actif. Percer et tarauder pour vis à métal #12-24 ou
AVEC GARNITURE EXTERIEURE Voir GABARIT tourni Placer le gabarit sur l'EXTÈRIEUR de la porte. VÉRIFIER SOIGNEUSEMENT LA FONCTION DE GARNITURE AFIN DE PERCER SEULEMENT LES TROUS QUI S'Y RAPPORTENT. B. Si des ÉCROUS PRISONNIERS sont fournis, percer des trous de 7 mm (9/32") diamètre à travers la porte. Repercer sur JEXTÉRIEUR DE LA PORTE à 9 mm (3/8") dia. Enfoncer les ÉCROUS À PARTIR DU CÔTÉ EXTÉRIEUR DE LA PORTE.
COFFRE INACTIF
Placer le côté opposé du gabarit contre l'arrêt, pliant sur le pointillé. Aligner avec 13 C/L HORIZONTALE MARQUÉE SUR LA PORTE. Repérer et percer les trous. Pour vis de montage du coffre seulement. Percer et tarauder pour VIS À MÉTAL tarauder pour VIS À MÉTAL 12-24 ou, si des ECROUS PRISONNIERS sont fournis, repêter l'étape numéro Deux (B).
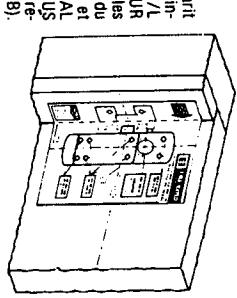
CINQ POSER LA BARRE TRANSVERSALE
Mesurer la distance entre les bras près du trou ou le haut de bras pénêtre dans le coffre. Ajouler 6 mm (%'') a cette dimension et couper ainsi la barre transversale. Enlever les bavures a l'inférieur de la barre.
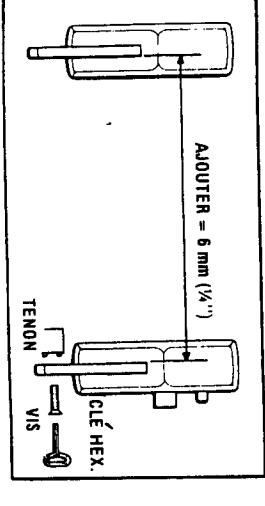
A. PLACER LE TENON SUR 1 BRAS à l'aide de la cië hexagonale fournie. NE PAS SERRER. REMARQUE: Les fiches du tenon s'alignent avec les trous du
ensuite le PISTON. Aligner les trous des vis ou couvercie et uu coffre et fixer avec les vis Phillips fournles.
COUVERCLE INACTIF
Placer le couvercle sur le cottre, aligner les trous de chaque côté et fixer avec les vis Phillips tourniès.
VERIFIER LE FONCTIONNEMENT
THE PASS OF THE STORE OF THE STORE OF THE STORE OF THE STORE OF THE STORE OF THE STORE OF THE STORE OF THE STORE OF THE STORE OF THE STORE OF THE STORE OF THE STORE OF THE STORE OF THE STORE OF THE STORE OF THE STORE OF THE STORE OF THE STORE OF THE STORE OF THE STORE OF THE STORE OF THE STORE OF THE STORE OF THE STORE OF THE STORE OF THE STORE OF THE STORE OF THE STORE OF THE STORE OF THE STORE OF THE STORE OF THE STORE OF THE STORE OF THE STORE OF THE STORE OF THE STORE OF THE STORE OF THE STORE OF THE STORE OF THE STORE OF THE STORE OF THE STORE OF THE STORE OF THE STORE OF THE STORE OF THE STORE OF THE STORE OF THE STORE OF THE STORE OF THE STORE OF THE STORE OF THE STORE OF THE STORE OF THE STORE OF THE STORE OF THE STORE OF THE STORE OF THE STORE OF THE STORE OF THE STORE OF THE STORE OF THE STORE OF THE STORE OF THE STORE OF THE STORE OF THE STORE OF THE STORE OF THE STORE OF THE STORE OF THE STORE OF THE STORE OF THE STORE OF THE STORE OF THE STORE OF THE STORE OF THE STORE OF THE STORE OF THE STORE OF THE STORE OF THE STORE OF THE STORE OF THE STORE OF THE STORE OF THE STORE OF THE STORE OF THE STORE OF THE STORE OF THE STORE OF THE STORE OF THE STORE OF THE STORE OF THE STORE OF THE STORE OF THE STORE OF THE STORE OF THE STORE OF THE STORE OF THE STORE OF THE STORE OF THE STORE OF THE STORE OF THE STORE OF THE STORE OF THE STORE OF THE STORE OF THE STORE OF THE STORE OF THE STORE OF THE STORE OF THE STORE OF THE STORE OF THE STORE OF THE STORE OF THE STORE OF THE STORE OF THE STORE OF THE STORE OF THE STORE OF THE STORE OF THE STORE OF THE STORE OF THE STORE OF THE STORE OF THE STORE OF THE STORE OF THE STORE OF THE STORE OF THE STORE OF THE STORE OF THE STORE OF THE STORE OF THE STORE OF THE STORE OF THE STORE OF THE STORE OF THE STORE OF THE STORE OF THE STORE OF THE STORE OF THE STORE OF THE STORE OF THE STORE OF THE STORE OF THE STORE OF THE STORE OF THE STORE OF THE STORE OF THE STORE OF THE STORE OF THE STORE OF THE STORE OF THE STORE OF THE STORE OF THE STORE OF THE STORE OF THE STORE OF THE ST
POSER LA GÂCHE
REMARQUE: POUR OBTE-NIR LE BON EMPLACE-MENT, AJUSTER LA GÂCHE POUR QUE LE DISPOSITIF S'ENCLENCHE BIEN SANS Suivant les trous marqués sur l'arrêt à l'étape UN, poser la STRIKE
Corbin Russwin Canada 3160 Orlando Drive Mississauga, Ontario L4V 1R5