CM-120 Series Keypads Programming Guide
Open the original PDF document
View PDF
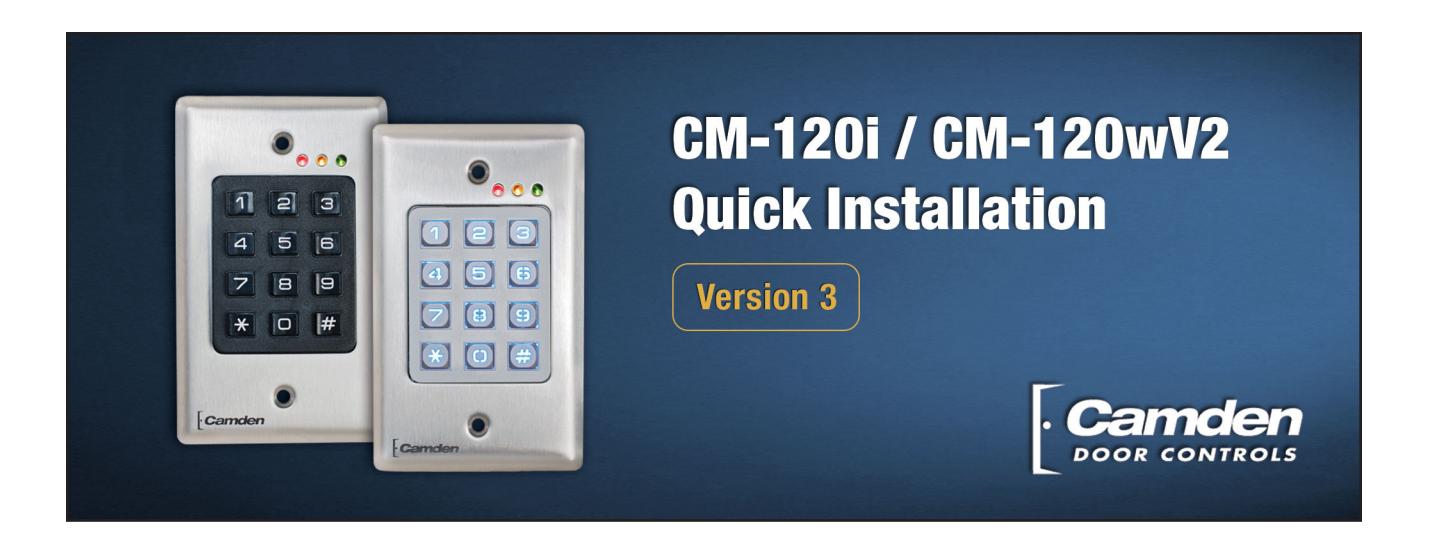
Package Contains
- 1 Keypad and faceplate assembly
- 1 Foam gasket (CM-120W only)
- 1 Lock Varistor (MOV)
- 2 #6-32 x 1" S/S Phillips Screws
- 2 #6-32 x 1" Tamperproof screws
- 1 Tamperproof screwdriver
Specifications
| Models | CM-120i / CM-120wV2 | |
|---|---|---|
| Illumination | CM-120i: No, CM-120wV2: Yes | |
| Size |
2 ¾" x 4 ½" x ¾"
(69.85mm x 114.30mm x 19.05mm) |
|
| Mounting | 2 x #6-32 machine screws | |
| Temperature | -40° F to +185° F (-40° C to +85° C) | |
| Operating Voltage | 12 / 24 Volts, AC / DC | |
| Current Draw | 30 mA standby, 90 mA max. | |
| Capacity | 999 User codes | |
|
Length
(possible codes) |
Up to 8 digits
(10 million possible codes) |
|
| Response Time | 0.3 seconds | |
| Inputs |
1 x REX input
1 x Door Contact Input |
|
| Relay Output | 2 x Form C (SPDT) | |
| Relay Contact Rating | 3 amps @ 24 VDC/120 VAC | |
| Wiegand Output | 26 bit raw (opt. Facility code) | |
| RF Output | 2-channel w/ optional TX-99 | |
| Time Delay | 1 to 255 seconds, or Latched | |
| Name | Memory Address | User Code | Name | Memory Address | User Code |
|---|---|---|---|---|---|
| Master User | 1 | 1234 | 36 | ||
| Manager | 2 | 37 | |||
| User #1 | 3 | 38 | |||
| User #2 | 4 | 39 | |||
| Etc | 5 | 40 | |||
| 6 | 41 | ||||
| 7 | 42 | ||||
| 8 | 43 | ||||
| 9 | 44 | ||||
| 10 | 45 | ||||
| 11 | 46 | ||||
| 12 | 47 | ||||
| 13 | 48 | ||||
| 14 | 49 | ||||
| 15 | 50 | ||||
| 16 | 51 | ||||
| 17 | 52 | ||||
| 18 | 53 | ||||
| 19 | 54 | ||||
| 20 | 55 | ||||
| 21 | 56 | ||||
| 22 | 57 | ||||
| 23 | 58 | ||||
| 24 | 59 | ||||
| 25 | 60 | ||||
| 26 | 61 | ||||
| 27 | 62 | ||||
| 28 | 63 | ||||
| 29 | 64 | ||||
| 30 | 65 | ||||
| 31 | 66 | ||||
| 32 | 67 | ||||
| 33 | 68 | ||||
| 34 | 69 | ||||
| 35 | 70 |
Make additional copies as required...
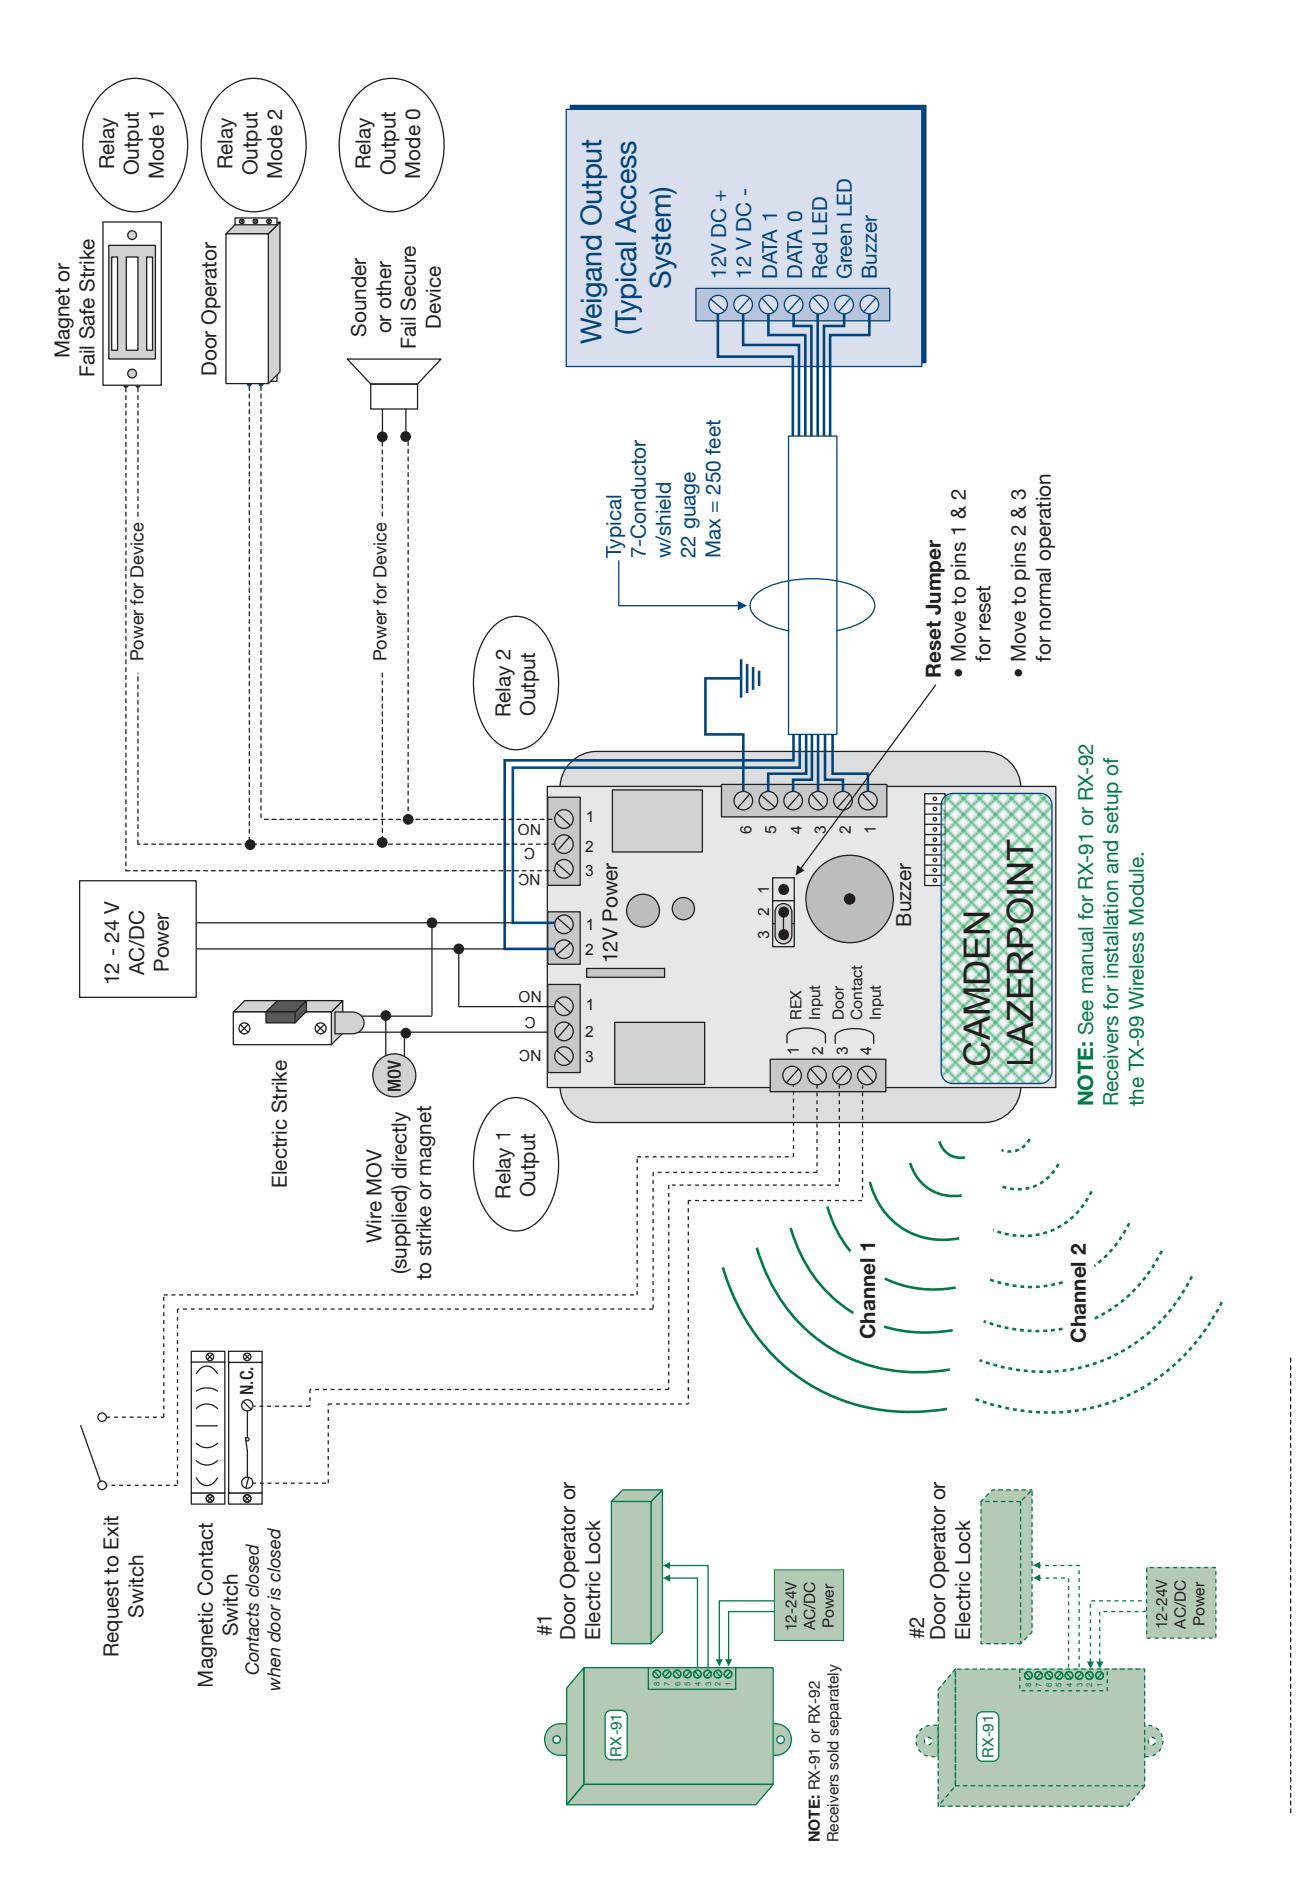
NOTE: Optional equipment shown as dotted lines
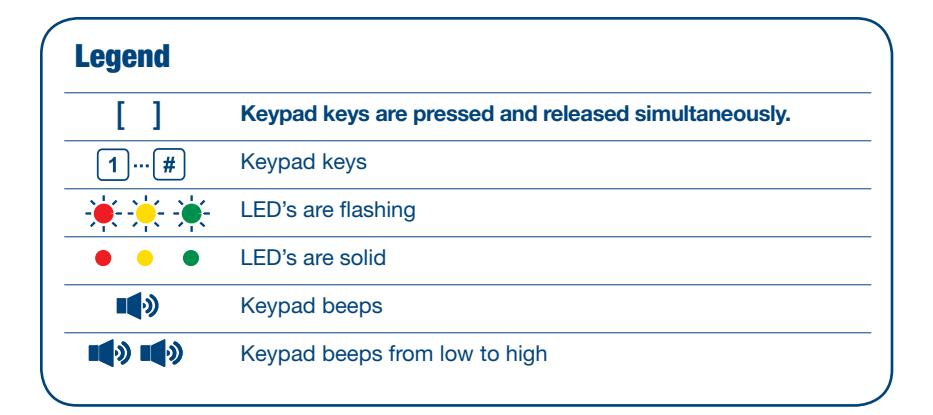
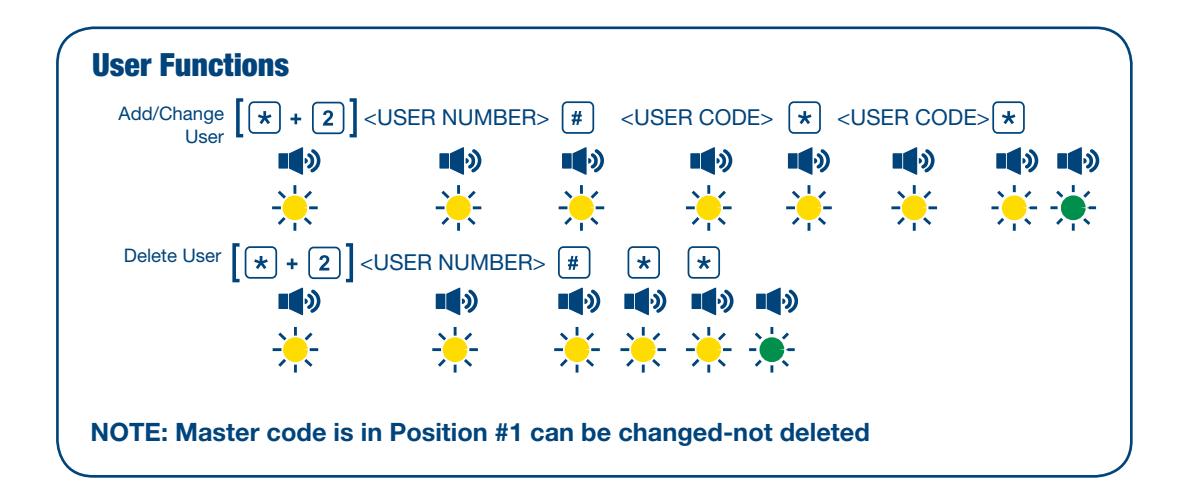
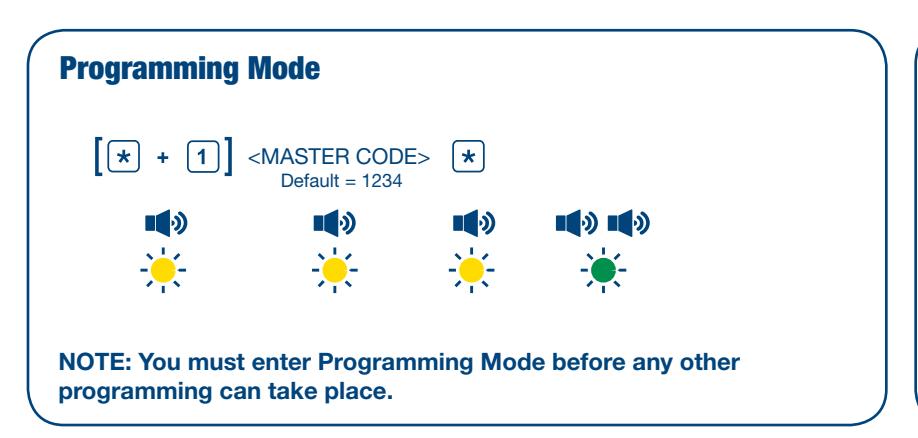
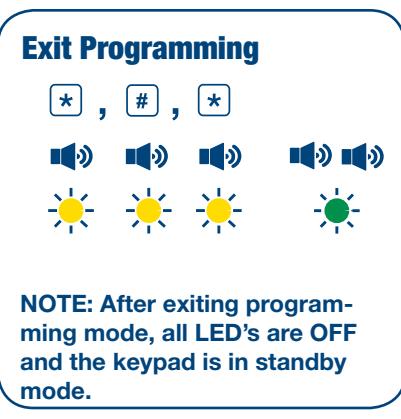
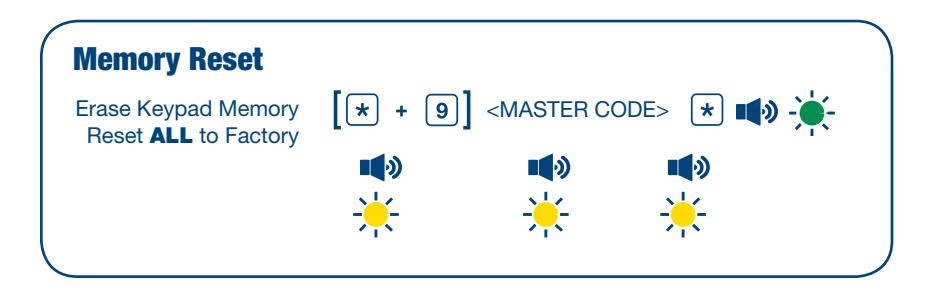
Admin Functions
Set Enter Key <NEW ENTER KEY> ( =Default)
Set Code Length <CODE LENGTH> 0=variable (default), valid entries = 1 - 8
Incorrect Code Count Alarm <# OF INVALID USER CODES> Default 0=Disabled
Force Unique User Codes <ENTRY> 1=Enabled (default), 0=Disabled
Anti-Tailgating <ENTRY> 1=Enabled, 0=Disabled (default)
Backlight Control <ENTRY> 1=Enabled, 0=Disabled (default)
User 2 "Global Lockout" <ENTRY> 1=Enabled, 0=Disabled (default)
Relay Output Mode <ENTRY>
Relay 1 (default), 1=Split, 2=Sequenced
Annunciation Control Functions
Yellow LED Enable <ENTRY> 0=disabled,1=enabled (default)
Buzzer Enable <ENTRY> 0=disabled,1=enabled (default)
Correct Code Audio Tone <ENTRY> 0=disabled (default), 1=enabled
Incorrect Code Audio Tone <ENTRY> 0=disabled, 1=enabled (default)
REX Release Enable <ENTRY> 0=disabled, 1=enabled (default)
REX <ENTRY>
Audio Tone 0=disabled (default), 1=enabled
Secure LED Enable <ENTRY> 0=disabled (default), 1=enabled

Time Delay/Duration Functions
[★ + 3] 0, # <OPERATE TIME> Default 8s (0-255 allowed) ★ ••••••••••••••••••••••••••••••••••• Relay 1 Operate Duration
[* + 3] 2, # <DELAY TIME> Default: Disabled Door Prop Open Alarm Delay
Relay 2 Operate Duration [* + 3] 3, # <OPERATE TIME> Default 8s (0-255 allowed) *
Relay 2 Delay on Operate ** Time
NOTE: Relay output mode must be set to Split or Sequenced for Relay 2 operate duration and delay on operate functions to work. Operate and Delay times are in seconds.
Latching Mode
Set "Latching Mode" for a User * User * USER NUMBER> # SENTRY> 0=disabled (default), 1=enabled * * * * Sentry 1=enabled * * * * Sentry 2=enabled * * * Sentry 2=enabled * * Sentry 2=enabled * Sentry 2=enabled * Sentry 2=enabled * Sentry 2=enabled * Sentry 2=enabled * Sentry 2=enabled * Sentry 2=enabled * Sentry 2=enabled * Sentry 2=enabled * Sentry 2=enabled * Sentry 2=enabled * Sentry 2=enabled * Sentry 2=enabled * Sentry 2=enabled * Sentry 2=enabled * Sentry 2=enabled * Sentry 2=enabled * Sentry 2=enabled * Sentry 2=enabled * Sentry 2=enabled * Sentry 2=enabled * Sentry 2=enabled * Sentry 2=enabled * Sentry 2=enabled * Sentry 2=enabled * Sentry 2=enabled * Sentry 2=enabled * Sentry 2=enabled * Sentry 2=enabled * Sentry 2=enabled * Sentry 2=enabled * Sentry 2=enabled * Sentry 2=enabled * Sentry 2=enabled * Sentry 2=enabled * Sentry 2=enabled * Sentry 2=enabled * Sentry 2=enabled * Sentry 2=enabled * Sentry 2=enabled * Sentry 2=enabled * Sentry 2=enabled * Sentry 2=enabled * Sentry 2=enabled * Sentry 2=enabled * Sentry 2=enabled * Sentry 2=enabled * Sentry 2=enabled * Sentry 2=enabled * Sentry 2=enabled * Sentry 2=enabled * Sentry 2=enabled * Sentry 2=enabled * Sentry 2=enabled * Sentry 2=enabled * Sentry 2=enabled * Sentry 2=enabled * Sentry 2=enabled * Sentry 2=enabled * Sentry 2=enabled * Sentry 2=enabled * Sentry 2=enabled * Sentry 2=enabled * Sentry 2=enabled * Sentry 2=enabled * Sentry 2=enabled * Sentry 2=enabled * Sentry 2=enabled * Sentry 2=enabled * Sentry 2=enabled * Sentry 2=enabled * Sentry 2=enabled * Sentry 2=enabled * Sentry 2=enabled * Sentry 2=enabled * Sentry 2=enabled * Sentry 2=enabled * Sentry 2=enabled * Sentry 2=enabled * Sentry 2=enabled * Sentry 2=enabled * Sentry 2=enabled * Sentry 2=enabled * Sentry 2=enabled * Sentry 2=enabled * Sentry 2=enabled * Sentry 2=enabled * Sentry 2=enabled * Sentry 2=enabled * Sentry 2=enabled * Sentry 2=enabled * Sentry 2=enabled * Sentry 2=enabled * Sentry 2=enabled * Sentry 2=enabled * Sentry 2=enabled * Sentry 2=enabled * Sentry 2=enabled * Sentry 2=ena
Alarm Control Functions
Incorrect Code Alarm [* + 4] 0, # <ENTRY> 0=disabled (default),1=buzzer, 2=relay 2, 3=buzzer & relay2
Stuck Key Alarm [* + 4] 2, # <ENTRY> 0=disabled (default),1=buzzer
Door Prop Open Alarm [* + 4] 3, # <ENTRY> 0=disabled (default),1=buzzer, 2=relay 2, 3=buzzer & relay2
Incorrect Code Alarm [ * + 4] 5 , # <ENTRY> 0=disabled (default),1=buzzer
Door Forced Open Alarm [* + 4] 6, # <ENTRY> 0=disabled (default),1=buzzer, 2=relay 2, 3=buzzer & relay2
Wiegand Control Functions
Wiegand Protocol Selection * + 5 0, # <ENTRY> 0=disabled (default), 1=26 bit, 2-26 bit & facility code
Wiegand Facility

| Symptom | Solution |
|---|---|
| Cannot get into programming mode |
The keypad requires the * and 1 be pressed and released simultaneously to prevent
accidental programming. Enter the correct Master Code (default=1234) |
| Cannot Program a User Code |
User code 1 is reserved for the Master Code and will not activate the Relays
Enter User Functions (above) |
| Code does not activate the door |
The keypad Relays do NOT provide any voltage and therefore will not operate the
strike without a separate power supply. Ensure the strike is wired correctly. |
| Lost/Forgot Master Code |
Move the jumper (located on the back of the keypad.) From pins 2 + 3 to pins 1 + 2
all the LED's will blink and beep 4 times pause and then 4 more times. Once reset is complete, move jumper back to pins 2 + 3. This resets the master code only all user codes + other programmed functions stay the same (as they where previously programmed) |
|
Nothing happens when the code is
entered. No lights. No sound, nothing (Dead) |
1) Check the keypad power supply with a volt meter to ensure power is present.
2) Cycle the power. (Remove power from the keypad for 60 seconds, then re apply power) |
|
Red light blinks slowly.
Can not enter any code |
1) Possible stuck button condition-check all buttons, run finger on button to free
stuck button. 2) Door open condition-close door or service door contact. If condition does not change, cycle the power (Remove power for 60 seconds, then re apply power). |
Before calling Tech Support please have:
- 1- Product Number
- 2- Product in front of you
- 3- Voltmeter/Multimeter
- 4- Manual

5502 Timberlea Blvd. Mississauga, ON Canada L4W 2T7 • Toll Free: 1 877 226-3369 (CAMDEN9) Tel: (905) 366-3377 • Fax: (905) 366-3378 • E-mail: info@camdencontrols.com • www.camdencontrols.com