Alarm Lock RR-1BUTTON Programming Instructions
Open the original PDF document
View PDF
345 Bayview Avenue Amityville, New York 11701 For Sales and Repairs 1-800-ALA-LOCK For Technical Service 1-800-645-9440 (Note: Technical Service is for security professionals only) Publicly traded on NASDAQ Symbol: NSSC
RR-1BUTTON Wireless Remote Release Button Programming Instructions When Used with Trilogy Networx<sup>™</sup> Locking Devices
© ALARM LOCK 2012 WI1999 7/12
OVERVIEW
The Wireless Remote Release (order part RR-1BUTTON) is a device used to wirelessly unlock Trilogy Networx™ series locking devices, OR locking devices wired to the RR-RECEIVER (see WI2012). The Wireless Remote is intended for fixed mounting to the underside of a desk or other hidden location with a short hook and loop strip provided (for a portable pocket-size remote release, see part RR-4BKEYFOB). The Wireless Remote requires one battery (pre-installed) that features a service life of up to 24,000 openings (use 3V lithium button cell, type CR2450 only). During normal operation, the locking device typically opens within 2 seconds of the button press.
Note: Up to ten (10) Wireless Remotes can be ultimately "paired" (connected) with one individual Networx locking device. Each Wireless Remote can only be paired with one specific Networx locking device at a time, thus when a paired Wireless Remote is later paired with a second locking device, the first pairing is erased.
The Wireless Remote is not currently supported by PL Series Networx locking devices. Visit the Alarm Lock website (<u>www.alarmlock.com</u>) for supported firmware versions.
PAIRING PROCEDURE
Pairing is performed locally at the keypad. Important: This pairing procedure should be performed after the locking device has been programmed by DL-Windows.
-
1. Open DL-Windows
, select the desired Lock Profile, open the
Programmable Features
screen,
Remote
tab. Check to enable one of the following desired features:
- Remote Release (Momentary)
- Remote Toggles Passage Mode
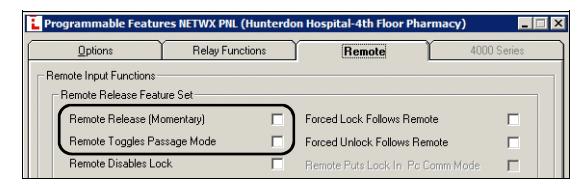
If neither are checked, the Wireless Remote pairing will be disabled upon subsequent DL-Windows programming downloads. Therefore, check to enable one of these two features and then send the programming to the locking device (see Ol352 for complete DL-Windows programming instructions). This will ensure that the pairings to be added now will be unaffected by later downloads.
- 2. At the locking device keypad, enter Program Mode (press the Master Code followed by ).
- 3. To pair the first remote, press:

Verify keypad sounds "beep-beep-beep" continuously. (The
"beep-beep" indicates the locking device is ready and will wait about 30 seconds for the next step).
-
4. With the Wireless Remote in hand
, observe its LED as you perform the next steps:
- a. Press and hold the button.
- b. The red LED lights ...keep holding the button...
- c. When the LED flashes green , release the button...
-
d. Wait a few seconds...observe the LED as follows:
- LED solid green = Pairing successful. Go to step 5 to pair another Wireless Remote; otherwise go to step 6.
- LED solid red = Pairing unsuccessful. Start again at step 3.
- 5. To pair another Wireless Remote, you will need to start again at step 3, but with a slight change, as follows: As previously stated, up to ten (10) Wireless Remotes may be enrolled into one locking device. Each Wireless Remote added occupies a "slot" (numbered 1-10); therefore, increment the "slot" number of the new Wireless Remote in step 3. For example, when pairing the first remote in step 3, you pressed:
| 5 |
|---|
To pair a second remote, you will need to press:
| 6 | 5 | 2 | * |
To pair a third remote, you will need to press:
| (1) (6) (5) |
|---|
...and so on. Therefore, to enroll another Wireless Remote, go to step 3, but use the incremented Wireless Remote "slot" number. Use the table below to track the location of each Wireless Remote in your system:
| Location of Locking Device: | ||
|---|---|---|
| Slot 1: | Slot 6: | |
| Slot 2: | Slot 7: | |
| Slot 3: | Slot 8: | |
| Slot 4: | Slot 9: | |
| Slot 5: | Slot 10: | |
6. Test to ensure correct operation:
Testing the Wireless Remote is required to synchronize the Wireless Remote with the locking device. Furthermore, the first time you perform the test below, the locking device may not always open on the first try. DO NOT BE CONCERNED, this is normal during this testing process. Test as follows:
- a. At the keypad, exit Program Mode by pressing and holding any button.
- b. Press and release the Wireless Remote button.
- c. The LED lights red...
- d. ...within two seconds the red LED turns off. The locking device should open. If not, do not be concerned, this is normal. Wait a few seconds and start again at step b
above. When the locking device unlocks and relocks, the testing process ends and "normal" Networx system operation resumes. Note: During normal operation, the locking device is designed to always open on the first button press (no need to "press and hold"; one press is sufficient).
CLEARING A WIRELESS REMOTE
For a Wireless Remote paired to a locking device, this procedure essentially "un-pairs" and restores a Wireless Remote to its default settings.
- 1. Unscrew all 4 rear screws on the Wireless Remote to detach the back cover.
- 2. Remove the circuit board and use a pencil to push the battery (CR2450 button cell) from its holder.
- 3. Press and hold the Wireless Remote button . Keep holding the button and slide the button cell back into its holder (positive (+) side up); continue holding the button.
- 4. While holding the button , wait until the LED rapidly toggles between red and green (" red-green-red-green " continuously), then release the button.
- 5. Replace the PC board , attach the rear cover and replace the 4 rear screws. Test the Remote.
The Wireless Remote will be "un-paired" with the locking device, and will be available for future pairing. Note: This procedure is not required to allow a previously paired remote to be paired with a new locking device; simply pair the remote with the new locking device as per the " PAIRING PROCE-DURE " on page 1 and the first pairing will be erased.
CLEARING A LOCKING DEVICE
Up to ten (10) Wireless Remotes can be simultaneously paired with one individual Networx locking device. Use Function 64 to remove all paired Wireless Remotes from a single locking device:
- 1. At the locking device keypad , enter Program Mode (press the Master Code and press ; ).
- 2. Press the following : ;64:
Note: Function 64 will disable all hardwired remote release ("Remote Input") switches, if present. In addition, if a Wireless Remote is misplaced or stolen, ALL Wireless Remotes must be removed from the locking device to ensure system security.
3. Exit Program Mode : Press and hold any key until a series of beeps is heard.
LOW BATTERY INDICATION
During normal operation, when the Wireless Remote button is pressed and its battery is weak, its LED will flash red-green repeatedly for several seconds. Always replace a weak battery as soon as possible. Use one 3V lithium type CR2450 button cell only. Replace Cell: Unscrew all 4 rear screws, detach the back cover, remove circuit board and use pencil to push the button cell from its holder. Slide a new cell into its holder (positive (+) side up). Replace the PC board, attach the rear cover and replace the 4 rear screws. Test the Remote.
REPLACING A LOCKING DEVICE
If the paired locking device is physically replaced with a new locking device, the " PAIRING PROCEDURE " must be repeated with each Wireless Remote.
ALARM LOCK LIMITED WARRANTY
ALARM LOCK SYSTEMS, INC. (ALARM LOCK) warrants its products to be free from manufacturing defects in materials and workmanship for 24 months following the date of manufacture. ALARM LOCK will, within said period, at its option, repair or replace any product failing to operate correctly without charge to the original purchaser or user.
This warranty shall not apply to any equipment, or any part thereof, which has been repaired by others, improperly installed, improperly used, abused, altered, damaged, subjected to acts of God, or on which any serial numbers have been altered, defaced or removed. Seller will not be responsible for any dismantling or reinstallation charges.
THERE ARE NO WARRANTIES, EXPRESS OR IMPLIED, WHICH EXTEND BEYOND THE DESCRIPTION ON THE FACE HEREOF. THERE IS NO EXPRESS OR IMPLIED WARRANTY OF MERCHANTABILITY OR A WARRANTY OF FITNESS FOR A PARTICULAR PURPOSE. ADDITIONALLY, THIS WARRANTY IS IN LIEU OF ALL OTHER OBLIGATIONS OR LIABILITIES ON THE PART OF ALARM LOCK.
Any action for breach of warranty, including but not limited to any implied warranty of merchantability, must be brought within the six months following the end of the warranty period. IN NO CASE SHALL ALARM LOCK BE LIABLE TO ANYONE FOR ANY CONSEQUENTIAL OR INCIDENTAL DAMAGES FOR BREACH OF THIS OR ANY OTHER WARRANTY, EXPRESS OR IMPLIED, EVEN IF THE LOSS OR DAMAGE IS CAUSED BY THE SELLER'S OWN NEGLIGENCE OR FAULT.
In case of defect, contact the security professional who installed and maintains your security system. In order to exercise the warranty, the product must be returned by the security professional, shipping costs prepaid and insured to ALARM LOCK. After repair or replacement, ALARM LOCK assumes the cost of returning products under warranty. ALARM LOCK shall have no obligation under this warranty, or otherwise, if the product has been repaired by others, improperly installed, improperly used, abused, altered, damaged, subjected to accident, nuisance, flood, fire or acts of God, or on which any serial numbers have been altered, defaced or removed. ALARM LOCK will not be responsible for any dismantling, reassembly or reinstallation charges.
This warranty contains the entire warranty. It is the sole warranty and any prior agreements or representations, whether oral or written, are either merged herein or are expressly canceled. ALARM LOCK neither assumes, nor authorizes any other person purporting to act on its behalf to modify, to
change, or to assume for it, any other warranty or liability concerning its products.
In no event shall ALARM LOCK be liable for an amount in excess of ALARM LOCK's original selling price of the product, for any loss or damage, whether direct, indirect, incidental, consequential, or otherwise arising out of any failure of the product. Seller's warranty, as hereinabove set forth, shall not be enlarged, diminished or affected by and no obligation or liability shall arise or grow out of Seller's rendering of technical advice or service in connection with Buyer's order of the goods furnished hereunder.
ALARM LOCK RECOMMENDS THAT THE ENTIRE SYSTEM BE COMPLETELY TESTED WEEKLY.
Warning: Despite frequent testing, and due to, but not limited to, any or all of the following; criminal tampering, electrical or communications disruption, it is possible for the system to fail to perform as expected. ALARM LOCK does not represent that the product/system may not be compromised or circumvented; or that the product or system will prevent any personal injury or property loss by burglary, robbery, fire or otherwise; nor that the product or system will in all cases provide adequate warning or protection. A properly installed and maintained alarm may only reduce risk of burglary, robbery, fire or otherwise but it is not insurance or a guarantee that these events will not occur. CONSEQUENTLY, SELLER SHALL HAVE NO LIABILITY FOR ANY PERSONAL INJURY, PROPERTY DAMAGE, OR OTHER LOSS BASED ON A CLAIM THE PRODUCT FAILED TO GIVE WARNING. Therefore, the installer should in turn advise the consumer to take any and all precautions for his or her safety including, but not limited to, fleeing the premises and calling police or fire department, in order to mitigate the possibilities of harm and/or damage.
ALARM LOCK is not an insurer of either the property or safety of the user's family or employees, and limits its liability for any loss or damage including incidental or consequential damages to ALARM LOCK's original selling price of the product regardless of the cause of such loss or damage.
Some states do not allow limitations on how long an implied warranty lasts or do not allow the exclusion or limitation of incidental or consequential damages, or differentiate in their treatment of limitations of liability for ordinary or gross negligence, so the above limitations or exclusions may not apply to you. This Warranty gives you specific legal rights and you may also have other rights which vary from state to state.
THE FOLLOWING STATEMENT IS REQUIRED BY THE FCC.
This equipment generates and uses radio-frequency energy and, if not installed and used properly, that is, in strict accordance with the manufacturer's instructions, may cause interference to radio and television reception. It has been type tested and found to comply with the limits for a Class-B computing device in accordance with the specifications in Subpart J of Part 15 of FCC Rules, which are designed to provide reasonable protection against such interference in a residential installation.
However, there is no guarantee that interference will not occur in a particular installation. If this equipment does cause interference to radio or television reception, which can be determined by
turning the equipment off and on, the user is encouraged to try to correct the interference by one or more of the following measures: reorient the receiving antenna; relocate the computer with respect to the receiver; move the computer away from the receiver; plug the computer into a different outlet so that computer and receiver are on different branch circuits.
If necessary, the user should consult the dealer or an experienced radio/television technician for additional suggestions. The user may find the following booklet prepared by the Federal Communications Commission helpful: "How to Identify and Resolve Radio-TV Interference Problems". This booklet is available from the U.S. Government Printing Office, Washington, DC 20402; Stock No. 004-000-00345-4.