Aiphone KB-3MRD Operation Manual
Open the original PDF document
View PDFVIDEO SENTRY COLOR TILT
COLOR TILT VIDEO ENTRY SECURITY INTERCOM
Models: KB-3MRD , Master station with monitor
KB-3HRD, Sub-master station with monitor
OPERATION MANUAL
This Manual and the Markings on the product contain various symbols in order that the product can be used safely and properly, and that the installer and user are protected from injury and property damage.
The following precautions must be thoroughly read and understood before proceeding.
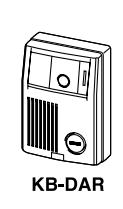
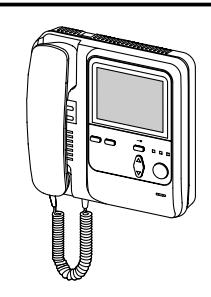
KB-3MRD KB-3HRD
PRECAUTIONS ON INSTALLATION & WIRING
Negligence could result in death or serious injury.
↑ CAUTION Negligence could result in injury or damage to property.
The following precautions also apply to KB-3HRD sub station with monitor.

- 1. Do not connect any power source other than specified to terminals +, on KB-3MRD. Fire or damage to the unit could result.
- 2. Do not open KB-3MRD. High voltage is present inside, and it can cause electric shock.
- 3. Do not change or alter KB-3MRD. It can cause fire or electric shock.
- 4. Make sure wires are connected properly before plugging in power supply. 5. Keep the KB-3MRD unit away from water or any other liquid. Fire or electric A
- shock could result.
- 6. Do not put any forcible strength on the video monitor. Damage may result.
- 7. Keep AC plug away from moisture or dust.
- 8. Keep AC cord away from being marred or crushed.
- 9. Do not plug or unplug with wet hands.10. Do not put any metal into KB-3MRD through openings. It can cause fire,
- electric shock or unit damage.

- 1. Do not install or make any wire terminations while power supply is plugged in. \(\infty\) It can cause electrical shock or damage to the unit. 2. Do not manually hold down hook switch to verify chime volume. It sounds very
- loud in the handset, and can cause hearing damage. 3. Mount KB-3MRD on wall in a convenient location, but not where it could be
- bumped or jarred.
- 4. In case of electrical storms, unplug power supply from AC outlet. It can cause fire, electric shock, or power surge damage. 5. Do not install KB-3MRD components in any of the following locations, as it may cause the system to malfunction;
- High or extreme cold temperature area: under direct sunlight, near equipment that varies in temperature, in front of air conditioner, inside a refrigerated area, etc.
- Places subject to moisture or humidity extremes (bathroom, cellar, greenhouse, etc.) - Places subject to environmental conditions, such as oil, dust, chemicals, salt, etc.
- Places subject to constant vibration or impact.
- Places subject to constant vibration or impact. Places where noise generating devices such as TV or radio are close by.
GENERAL PRECAUTIONS
- 1. KB-3MRD equipment, except for KB-DAR, is designed for indoor use only. Do not install outdoors.
- 2. KB-3MRD system is not operational during a power failure.
- 3. In areas where broadcasting station antennas are close by, intercom system may be affected by radio frequency interference.
- 4. Keep all DC wiring at least 30cm(1') away from AC 100~240V wiring, fluorescent lighting, or dimmer switches. Otherwise, cross AC wiring at a 90° angle.
Examples of Symbols;
GENERAL PRECAUTIONS: - A mark indicates caution statement (incl. danger and warning), which is specifically shown inside.

GENERAL INSTRUCTIONS: - • mark indicates contents which demands a specific action shown inside or attached.

GENERAL PROHIBITIONS: - O mark indicates contents which prohibit a specific action shown inside or attached.

1 SYSTEM OUTLINE & COMPONENTS
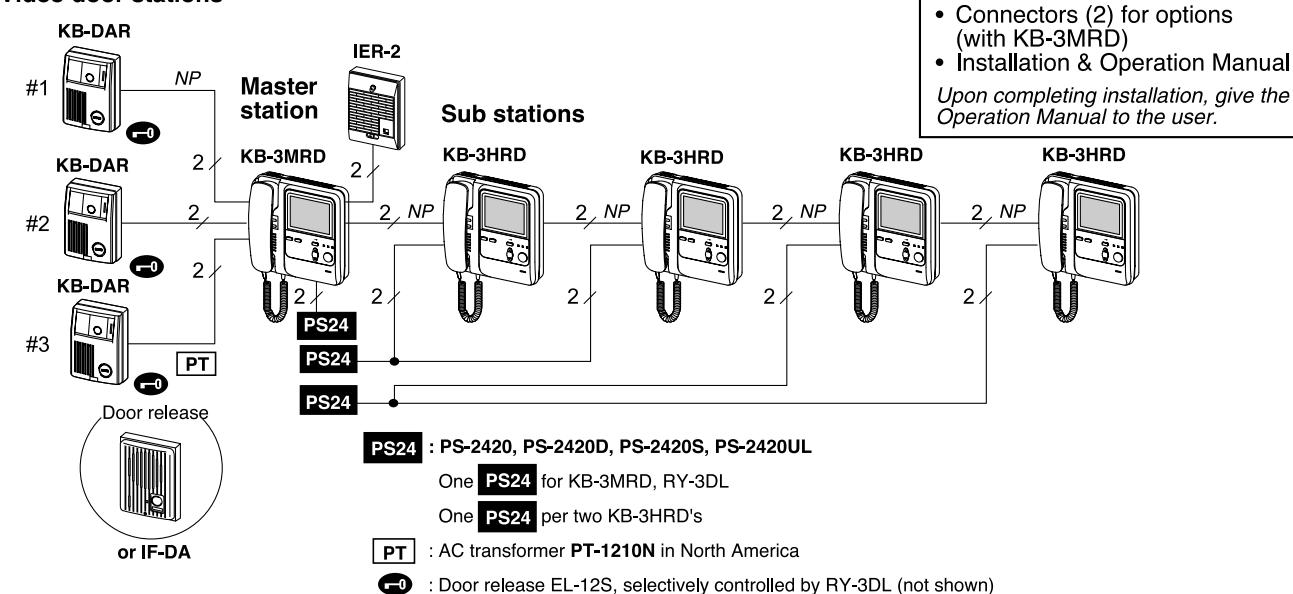
VIDEO SENTRY COLOR TILT 3 - 5: KB-3MRD is an audio video entry security intercom for 3 video doors & max. 5 room stations with monitor.
Video door stations
2 NAMES & FEATURES
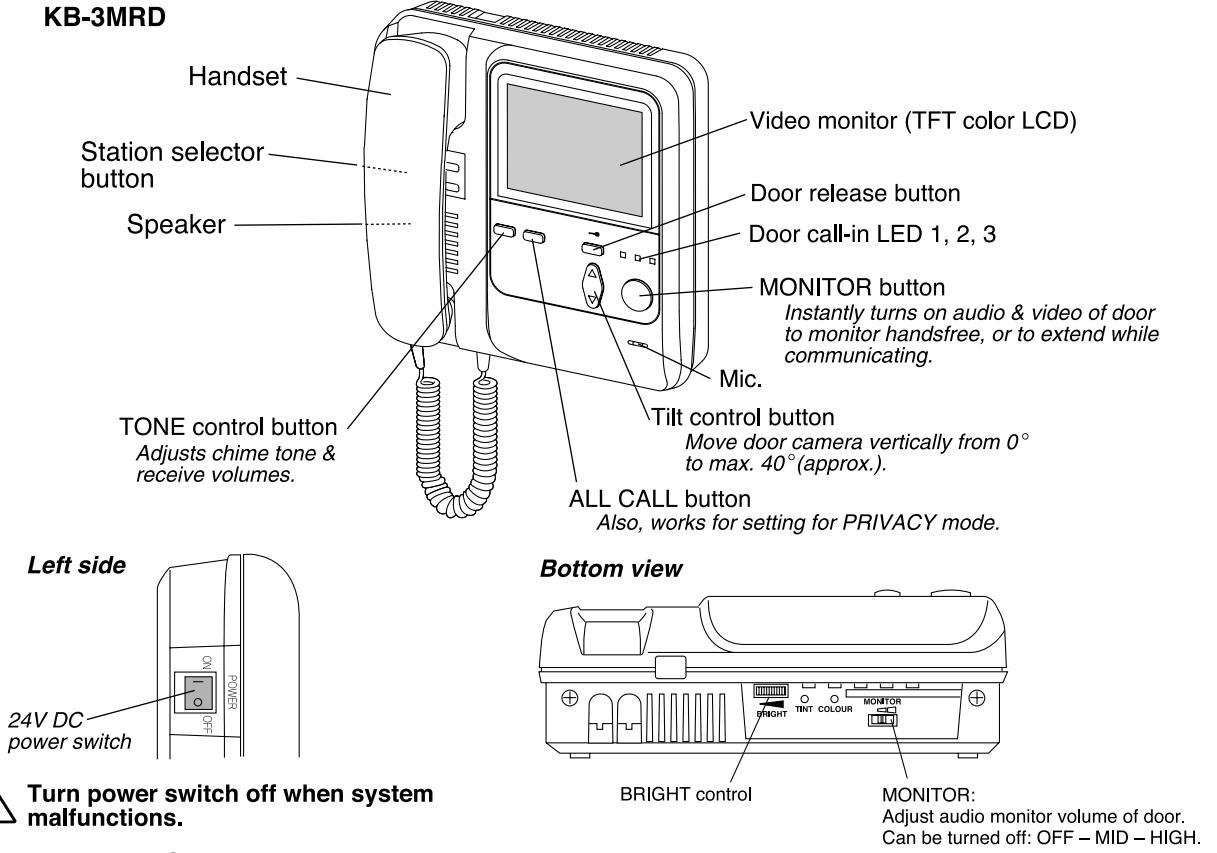
FEATURES
- Audio video entry security intercom 3 doors 5 room stations with monitor with TILT camera control.
- Clear and bright image with TFT(*1) Color LCD monitor and DSP(*2) for door station.
- INSTANT ON audio and video from door station when door calls or during monitoring from room station.
- Selective room calling with handsfree reply at called station.
- ALL CALL button.
- Selective door release control with RY-3DL adaptor.
- Max. 100m distance to farthest sub station w/monitor. See power supply requirements.
(*1) TFT = Thin Film Transistor
PACKAGE CONTENTS
Packet of screws
Master & sub stations w/monitor
(KB-3MRD or KB-3HRD)
(*2) DSP = Digital Signal Processor
2 NAMES & FEATURES (continued)
1. Setting Chime cut-off & White light turn on/off
Open the directory cover, pushing on either edge with ball-point pen.
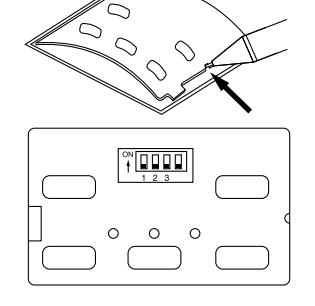
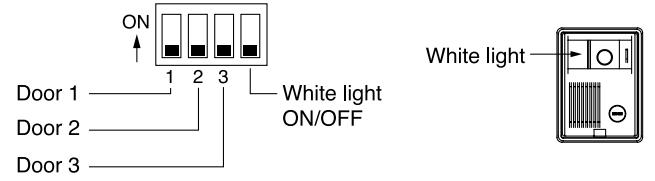
Chime tone cut-off: On each room station Put a switch 1 ~3 to upper ON position, which silences chime tone from that door station.
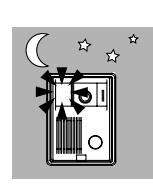
White light: On KB-3MRD master only Put the left switch to upper ON position. In low light conditions, the white light turns on automatically when door calls. It is not activated in brightly lit conditions.
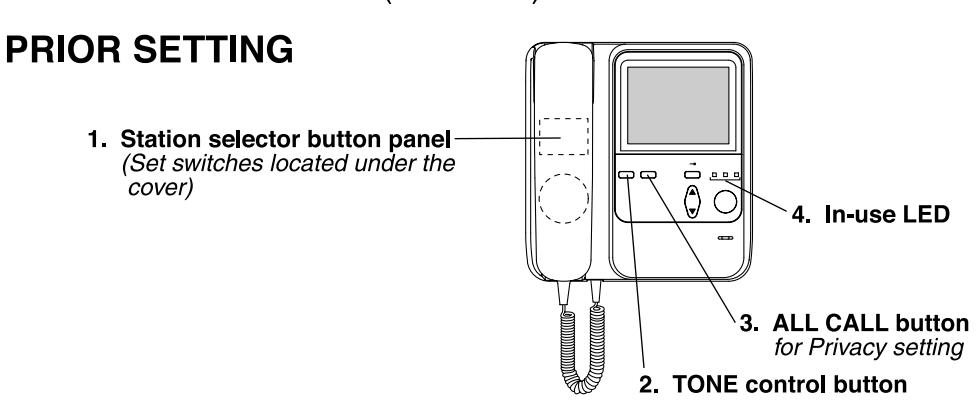
2. Setting Chime tone/Receiver volumes with TONE control button
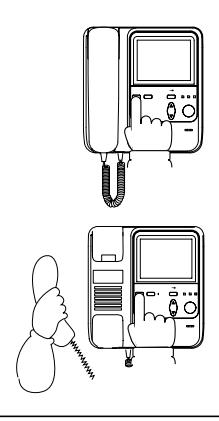
Chime tone: On each room station In standby, press TONE control. Chime volume changes from STANDARD→ HIGH→ LOW.
Handset receiver volume: On each room station While communicating with door station or another room station, press TONE control. Receiver volume changes from STANDARD→ HIGH→ VERY HIGH.
NOTE: The setting is cancelled and returns to STANDARD position, when power switch is turned off or when power fails. Reprogram as needed.
3. Setting for Privacy with ALL CALL button
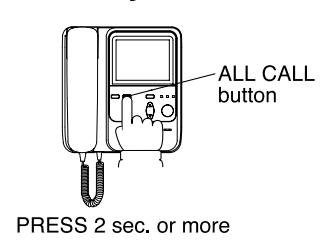
Set Privacy mode: On each room station In standby, press ALL CALL button for 2 sec. or more. ALL CALL button is lit green.
Release Privacy mode: On each room station In standby, press ALL CALL button for 2 sec. or more. ALL CALL button is not lit any more.
NOTE: Privacy mode is cancelled when Power switch is turned off or when power fails.
4. In-use LED
When All Call button is lit red and door call-in LED is on, the system is in use. Wait until lights go off to use the system.
DOOR CALL-IN
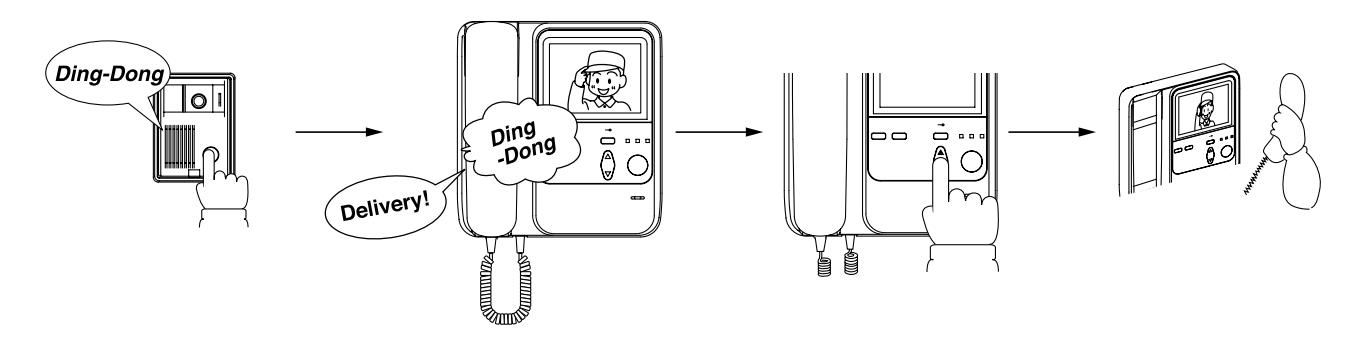
- 1. When call button is pressed at a door station .
- At all room stations, chime tone sounds and image comes on.
- 3. Move the door camera with TILT control button, if necessary.
- Lift handset on any room station.
- 5. When finished, replace handset. Image also turns off.
Operational notes
- 1. If call-in is not replied within approx. 30 sec., audio/image turns off.
- 2. Even after 30 sec., pick up the nearest handset to answer. The calling door station will be connected if answered within 30 seconds after the image turned off.
- Door audio cannot be heard with MONITOR control (bottom) in OFF position (Listen to audio with handset).
- Chime tone sounds at IER-2 call extension speaker.
- 5. Door audio cannot be heard during tilt operation.
- 6. Image may vary at each extremity of viewing area, but it is not a malfunction.
- 7. During tilt operation, the motor may make some noise at the video door station, but it is not a malfunction.
Tone & LED annunciation:
| Tone | Door call-in LED | |
|---|---|---|
|
Video door 1
Video door 2 Video door 3 (or audio) |
4-tone chime
2-tone chime 8-tone chime |
LED 1 flashing red (*)
LED 2 flashing red (*) LED 3 flashing red (*) |
(*) After the inside station has entered communication, the light remains steadily lit.
Calling inside with direct voice (Instant - On feature)
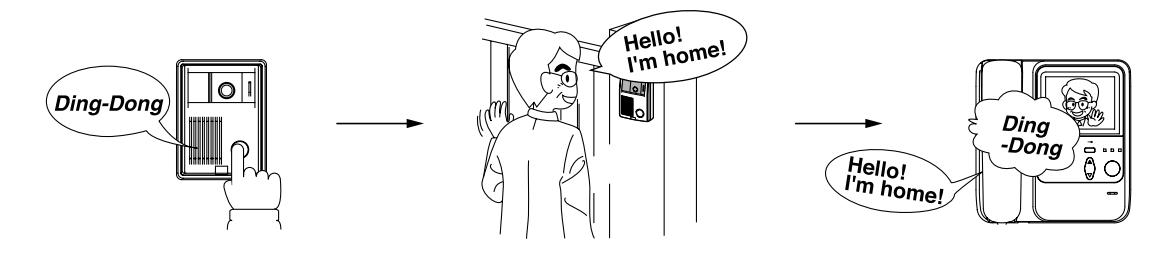
- 1. Momentarily depress CALL button on door station.
- Speak toward the KB-DAR video door station. After chime tone sounds, start speaking.
- Inside the room, after chime tone sounds and monitor shows the image, outside voice audio is heard.
Operational notes
- 1. The call-in image/audio times out automatically in approx. 30 sec.
- To reply, lift handset on any inside station. When MONITOR volume control is turned OFF, the door audio cannot be heard.
MONITORING DOOR
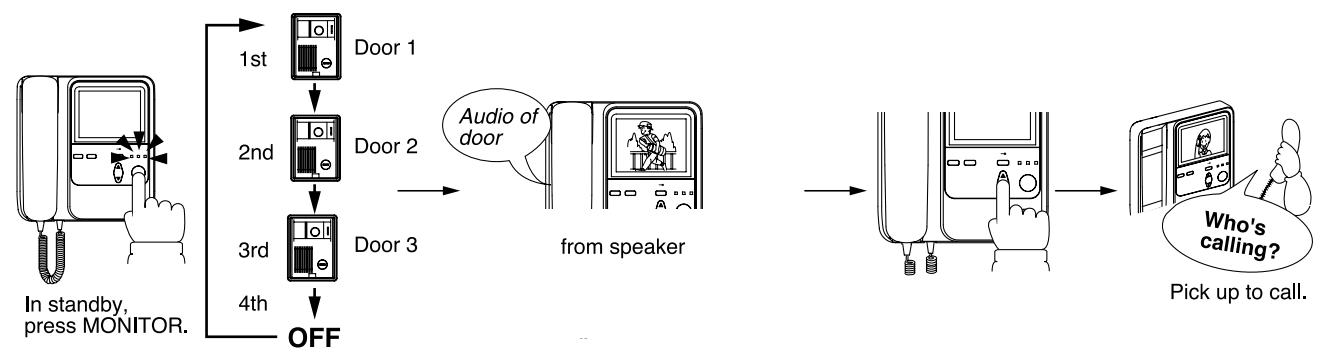
- While in standby, press MONITOR button.
- Both audio and image of door 1 turn on for approx. 30 sec.
- Move the door camera vertically, pressing either top or bottom edge of TILT control button.
- 4. Press MONITOR button to view door 2.5. Press MONITOR button third time to view door 3.
- 6. Press MONITOR button to end monitoring.
Operational notes
- Door call-in LED: The lighting also moves as MONITOR button is pressed.
- 2. IF-DA audio door station at third door cannot be audio monitored.
- 3. Monitoring times out in approx. 30 sec. Press MONITOR within 30 sec. to view the same door.
- Check MONITOR volume on bottom of the unit. Outside audio is not heard with MONITOR control in the OFF position.
- Inside audio cannot be heard at door when handset is hung up.
- 6. During tilt operation, door audio is not heard.
- 7. Stop pressing TILT control, when the picture reaches the top or bottom.
- 8. Image may vary at each extremity of viewing area, but it is not a malfunction.
- During tilt operation, the motor may make some noise at the video door station, but it is not a malfunction.
When another room station calls in during monitoring

- · Selective call : double pretone
- All call : single pretone
- View and hear door 1 to 3 hands free.
- Room call-in starts with pre-tone, double (for selective call) or single-tone (for all call), ending monitoring mode.
- Lift handset to connect with the calling room station.
When another door station calls in during monitoring
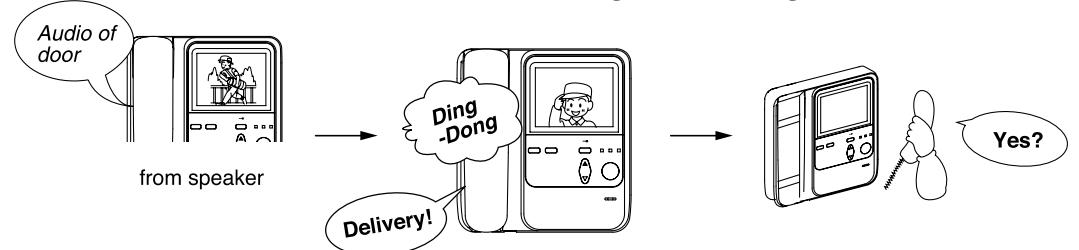
- 1. While one door station is being viewed on a monitor, another door station calls in.
- When the door calls, the chime is heard, and the image changes to that of the calling door.
- Lift handset to reply to the door.
Operational notes
- Door audio & image times out in approx. 30 sec.
- 2. To extend, press MONITOR button.
INTERNAL COMMUNICATION
Calling by selective call
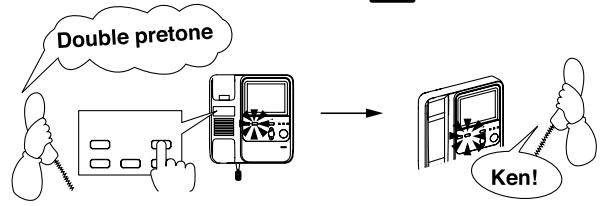
- Lifting handset, press a station selector button 1 ~ 5. ALL CALL button turns on.
- Call by voice, and communicate when the called: person replies hands free.
Calling by All Call
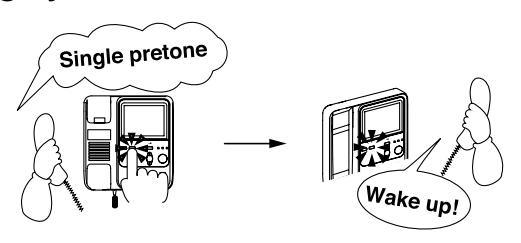
- 1. Lifting handset, press ALL CALL button. (ALL CALL button flashes red)
- Call by voice, and communicate when the called person picks up to reply. (ALL CALL button turns on)
Answering selective call
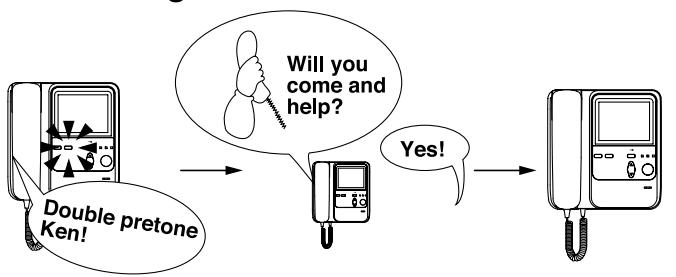
- Double pretone sounds and voice is heard. (ALL CALL button is steadily lit)
- 2. Without lifting handset, reply toward the station mic.
- 3. When conversation is complete, the calling station simply hangs up handset.
Operational notes
On the other stations, ALL CALL button is steadily lit. On the other stations. (Pretone does not come out) Other room stations can not initiate the call.
Answering All Call
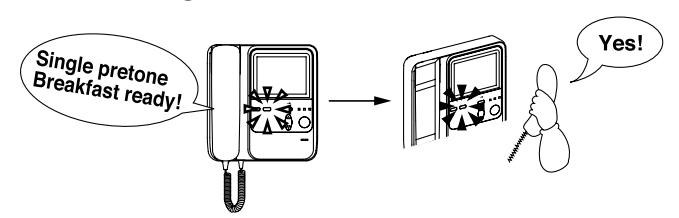
- Single pretone sounds, and caller's voice is heard. (ALL CALL button flashes)
- Pick up handset on any station, as needed. (ALL CALL button is steadily lit)
Receiving door call during internal communication
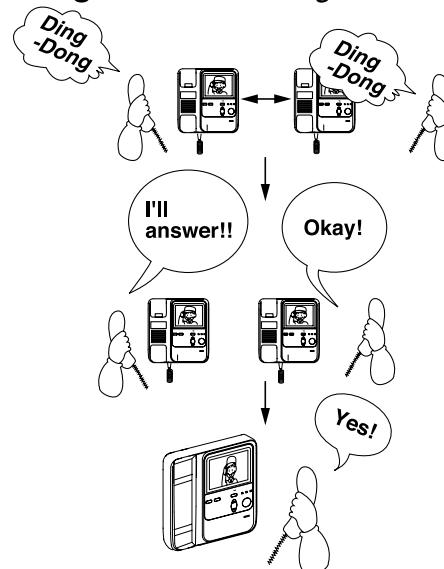
- Chime tone is heard through handset being used, and image comes on.
- 2. Hang up both handsets to end internal communication.
- 3. Answering station picks up again to answer door.
Operational notes
- 1. Chime tone is not heard at the other room stations.
- 2. When called, image comes on at all the room stations.
- 3. When answered, the monitor turns off at the non-communicating room stations.
- Any other room station cannot break in on the answered call from the door. Wait until ALL CALL button & door call-in LED go out.
TRANSFERRING DOOR CALL
Transferring
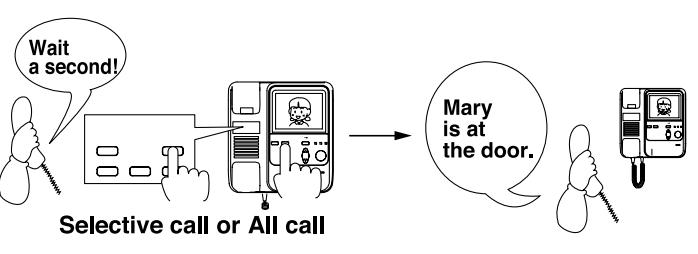
- 1. While communicating with the door, press a selector button or ALL CALL button. (Call-in LED begins flashing)
- 2. Call by voice, and hear the response from the other station. (Inside audio cannot be heard at door)
- 3. First person hangs up handset after transferring call to second person.
- Transferred station presses MONITOR button to connect to door. (Door call-in LED is steadily lit)
Operational notes
- 1. When the transferred room station is unavailable, press MONITOR button to reconnect with the door.
- Transferring calls among room stations is not available. (End your present call and call the room station desired) KB-3SD audio sub master station is not capable of
- calling the other room stations selectively, but can call with All Call.
Receiving a transferred call
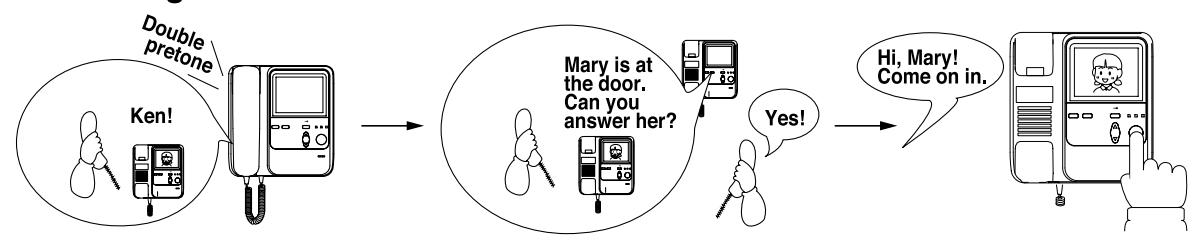
- 1. Sounds double pretone (for selective call) or single pretone (for all call) sounds, and then voice comes in.
- Lift handset and okay to answer the door.
- 3. Holding handset, press MONITOR button to connect with the door.
Activating door strike
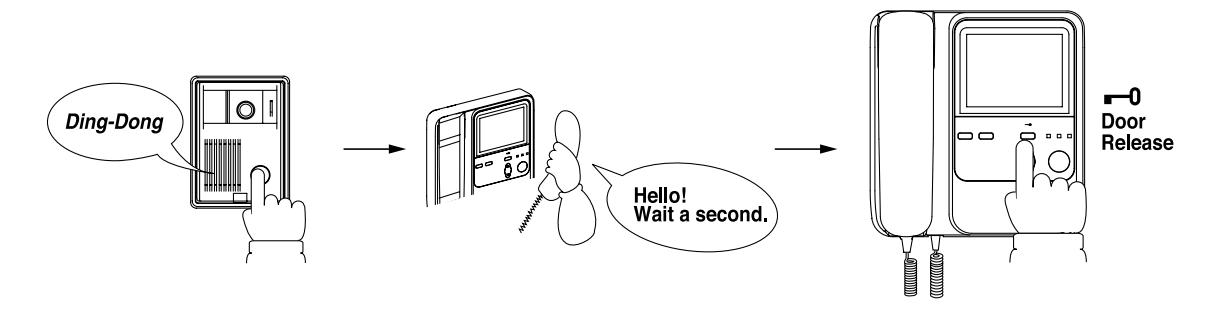
- When door calls, pick up any handset to reply. While the channel is established, depress and hold down Door Release button.
4 TECHNICAL PRECAUTIONS
Trouble-shooting guide
| TROUBLE MODE | CAUSE OF TROUBLE | SOLUTION |
|
The KB-3MRD system does
not operate. |
When KB-3MRD master station POWER switch is turned off, the whole system does not operate. | Check POWER switch on KB-3MRD and power source. |
| Chime tone does not sound on room stations. | Chime cut-off switch is set to ON position. | Chime cut-off switch at individual station (located under directory cover). |
| Communication and call tone volumes are smaller. | Check volume controls. | Adjust each volume Chime, Receive and Monitor to higher position. |
| There is noise in communication. | Communication can be interfered by computer, TV, Radio & Withby located close by. | Keep these devices 1m (3'3") away from intercom. |
| Door audio cannot be heard at room station when called. | MONITOR switch is set to left OFF position. | Place MONITOR switch to mid or high position. |
| ALL CALL button is remains lit. | Check the particular station to see if it is in Privacy mode. | Release Privacy mode by pressing ALL CALL for more than 2 sec. |
| Image does not come on. | Check if KB-3MRD is affected by Cellular-phone or other devices producing electromagnetic wave and magnetic field. | Remedy by keeping these devices away from the intercom. |
| Image has occasional white lines. | Check strong light such as sunlight coming into the lens. |
This is not a malfunction.
Remedy the cause. |
| Darker (whiter) image | Check that BRIGHT control is adequately adjusted. | Adjust BRIGHT control as needed. |
Cleaning
Clean the KB-3MRD/KB-3HRD equipment with a soft cloth dampened with neutral household cleanser. Never use any harsh cleaner or cloth.
LCD monitor
It must be noted in advance that the TFT color LCD panel, though manufactured with very high precision techniques, inevitably has a very small portion of picture elements that are steadily lit or not lit at all, which is not considered a unit malfunction. The LCD monitor looks dark in bright sunlit area, etc. Adjust BRIGHT control to high position to increase monitor luminosity, or reduce ambient lighting.
Viewing image on LCD monitor
See the image right in front of the LCD monitor. When viewed down, the image may look too bright, and when viewed up, the image may look dim, but this is not a malfunction.
- Strong light, such as direct sunlight, etc. may cause silhouette on the monitor, but this is not a malfunction.
- At the gate or porch illuminated by fluorescent lamp, the picture may vary, but this is not a malfunction.
- . In the night with low lighting conditions, the picture may look dim, but this is not a malfunction.
- When outside temperature lowers sharply after rainfall, etc., the inside of camera may fog up slightly, causing a blurry picture, but this is not a malfunction. Normal operation will be restored when moisture evaporates. Keep KB-3MRD power switch in on position. If not, KB-3HRD sub stations
- are not operational.
(KB-3MRD, KB-3HRD, KB-3SD)-
Power source: 24V DC.
Current consumption:
KB-3MRD: 710mA(max). 230mA(Standby). KB-3HRD: 260mA(max). 80mA(Standby). KB-3SD: 85mA(max). 50mA(Standby). PS-2420, PS-2420D, PS-2420S, PS-2420UL
· Power supply: One for KB-3MRD.
One for 2 x KB-3HRD's.
Communication: Handset simultaneous. Handsfree
simultaneous at room station
(selective call).
Fire-retardant ABS plastic. White. Housing & color: • Dimensions: 185 (W) x 195 (H) x 84 (D) (mm).
7-1/4"(W) x 7-3/4"(H) x 7-1/2"(D).
900 g (1.98 lbs.) approx. 12V AC, 400mA. • Weight:
• Door release:
WARRANTY
Aiphone warrants its products to be free from defects of material and workmanship under normal use and service for a period of two years after delivery to the ultimate user and will repair free of charge or replace at no charge, should it become defective up on which examination shall disclose to be defective and under warranty. Aiphone reserves unto itself the sole right to make the fi nal decision whether there is a defect in materials and/or workmanship; and whether or not the product is within the warranty. This warranty shall not apply to any Aiphone product which has been subject to misuse, neglect, accident, power surge, or to use in violation of instructions furnished, nor extended to units which have been repaired or altered outside of the factory. This warranty does not cover batteries or damage caused by batteries used in connection with the unit. This warranty covers bench repairs only, and any repairs must be made at the shop or place designated in writing by Aiphone. Aiphone will not be responsible for any costs incurred involving on site service calls. Aiphone will not provide compensation for any loss or damage incurred by the breakdown or malfunction of its products during use, or for any consequent inconvenience or losses that may result.
The object area of X is the EU.
This equipment has been tested and found to comply with the limits for a Class B digital device, pursuant to Part 15 of the FCC Rules. These limits are designed to provide reasonable protection against harmful interference in a residential installation. This equipment generates, uses, and can radiate radio frequency energy, and if not installed and used in accordance with the instructions, may cause harmful interference to radio communications. However, there is no guarantee that interference will not occur in a particular installation.
If this equipment does cause harmful interference to radio or television reception, which can be determined by turning the equipment off and on, the
user is encouraged to try to correct the interference by one or more of the following measures: Reorient or relocate the receiving antenna. Connect the equipment into an outlet on a circuit different from that to which the receiver is connected. Increase the separation between the equipment and receiver. Consult the dealer or an experienced radio/TV technician for help.