Aiphone IS-IP Series Network Direct System Operation Manual 0811
Open the original PDF document
View PDFAIPHONE
IS SERIES
Commercial & Security IP Video Intercom system
Network Direct System
OPERATION MANUAL
Thank you for selecting Aiphone for your communication and security needs. Please read this manual and the separate "SETTING MANUAL" carefully before setting and using this system.
* Please make sure to read this manual for safe and correct use of the system, and keep it in a safe place for future reference.
CONTENTS
|
INTRODUCTION
4 |
||||
|---|---|---|---|---|
|
PRECAUTIONS
4 |
||||
|
WARNING
4 |
||||
|
CAUTION
4 |
||||
|
GENERAL PRECAUTIONS
5 |
||||
|
Notes on using this system
5 |
||||
|
Notices
5 |
||||
|
GETTING STARTED
6 |
||||
|
PART NAMES
6 |
||||
|
Color monitor IP master
station (IS-IPMV) 6 |
||||
| ■ Control panel6 | ||||
| ■ Monitor7 | ||||
|
Vandal-resistant IP door
station 9 |
||||
|
OUTLINE OF OPERATIONS
10 |
||||
| Communication11 | ||||
| Transferring11 | ||||
|
Paging
12 |
||||
|
Monitoring
12 |
||||
|
Door release
13 |
||||
|
SETTING AND ADJUSTMENT
14 |
||||
|
MASTER STATION SETTINGS
AND ADJUSTMENTS 14 |
||||
|
Setting items
14 |
||||
|
Setting the display language
15 |
||||
|
Adjusting screen brightness
[BRIGHTNESS] 15 |
||||
|
Adjusting sound volume [TONE
VOL], [RECEIVE VOL] 15 |
||||
|
Initial settings [INITIAL
SETTING] 16 |
||||
| USING THE SYSTEM | 20 |
|---|---|
|
RECEIVING AND ANSWERING
A CALL ON THE MASTER |
|
| STATION | 20 |
| Receiving a call | 20 |
| Answering a call | 21 |
|
■ Communication in the hands-free
mode21 |
|
|
■ Communication in the press-to-talk
mode21 |
|
|
■
Communication by using the handset 22 |
|
|
Viewing video images at a
video door station |
23 |
| ■ Switching Zoom/Wide23 | |
| ■ Pan & Tilt23 | |
| ■ Adjusting images24 | |
|
Transferring to another master
station |
25 |
| ■ Communication transferring25 | |
| ■ Call transferring25 | |
| Door release | 26 |
| Using the PRIVACY function | 26 |
|
PERFORMING CALLING,
MONITORING AND PAGING ON THE MASTER STATION |
27 |
|
Searching for a station, zone or
remote site |
27 |
|
Searching for a station, zone or remote
site from the list29 |
|
|
Searching for a station or zone by
number using the dial keys31 |
|
|
Searching for a station, zone or
remote site from the placed call or received call list32 |
|
|
Selecting a station, zone or remote site
by using the speed dial buttons32 |
|
Calling another station
(direct voice call) |
33 |
|---|---|
| Monitoring | 34 |
| ■ Monitoring34 | |
| ■ Scan-monitoring34 | |
|
Viewing video images at the
target station |
35 |
| Paging | 35 |
| OTHER FUNCTIONS | 36 |
| Sending e-mails | 36 |
| APPENDIX | 37 |
| TECHNICAL PRECAUTIONS | 37 |
| AVAILABLE CHARACTER | |
| LIST | 37 |
| SPECIFICATIONS | 38 |
| WARRANTY | 39 |
INTRODUCTION
The IS system is a commercial and security video intercom system especially designed for applications in facilities such as offi ce buildings, factories, schools, hospitals, and prisons. Installed separately from conventional general-purpose internal communications systems, the IS system can be used as a video door entry system, emergency announcement system, rescue assistance system, urgent call system, public announcement system, and access control system.
About this manual
This manual describes how to use a network direct system (without an IP control unit) only. For a standard (IP) system (including one or more IP control units), refer to the "OPERATION MANUAL" for the standard (IP) system.
Notice the following:
- Master stations and door stations that can be used in a network direct system are IP units (IS-IPMV, IS-IPDV, IS-IPDVF and IS-SOFT) only.
- You can also call, page or communicate with a remote site. This manual also describes operations for calling, paging and communicating with a network direct system in a remote site. So note that the term "a remote site" used in this manual means "a network direct system in a remote site". For a standard (IP) system in a remote site, refer to the "OPERATION MANUAL" for the standard (IP) system.
PRECAUTIONS
- General Prohibitions Prohibition to Dismantle the Unit Prohibition on Subjecting the Unit to Water
- General Precautions
WARNING
Negligence could result in death or serious injury.
- 1. Do not dismantle or alter the unit. Fire or electric shock could result.
- 2. Keep the unit away from water or any other liquid. Fire or electric shock could result.
- 3. High voltage is present internally. Do not open the case. Electric shock could result.
- 4. Do not connect any non-specifi ed power source to the +, terminals. Also, do not install two power supplies in parallel to a single input. Fire or damage to the unit could result.
- 5. Do not connect any terminal on the unit to an AC power line. Fire or electric shock could result.
- 6. Do not use power supply with a voltage other than specifi ed. Fire or electric shock could result.
- 7. Do not put any metal or fl ammable material into the unit through the openings. Fire, electric shock, or unit trouble could result.
- 8. The unit is not explosion-proof. Do not install or use near gases or fl ammable materials. Fire or explosion could result.
- 9. Existing wiring such as chime wiring, etc. may contain high voltage AC electricity. Damage to the unit or electric shock could result. Wiring and installation should be done by a qualifi ed technician.
CAUTION
Negligence could result in injury to people or damage to property.
- 1. Do not install or make any wire terminations while power supply is plugged in. It can cause electrical shock or damage to the unit.
- 2. When mounting the unit on a wall, install the unit in a convenient location, but not where it could be jarred or bumped. Injury could result.
- 3. Before turning on power, make sure wires are not crossed or shorted. If not, fi re or electric shock could result.
- 4. For power supply, use Aiphone power supply model or model specifi ed for use with system. If non-specifi ed product is used, fi re or malfunction could result.
- 5. On products with ground terminals, connect to an earth ground. Fire or malfunction could result.
- 6. Do not put anything on the unit or cover the unit with cloth, etc. Fire or unit trouble could result.
-
7. Do not install the unit in any of the following locations. Fire, electric shock, or unit trouble could result.
- * Places under direct sunlight or places near heating equipment that varies in temperature.
- * Places subject to dust, oil, chemicals, hydrogen sulfi de (hot spring).
- * Places subject to moisture and humidity extremes, such as bathrooms, cellars, greenhouses, etc.
- * Places where the temperature is quite low, such as inside a refrigerated area or in front of an air conditioner.
- * Places subject to steam or smoke (near heating or cooking surfaces).
- * Where noise generating devices such as dimmer switches or inverter electrical appliances are closeby.
- * Locations subject to frequent vibration or impact.
- 8. Do not put high pressure on the LCD. If fractured, injury could result.
- 9. If the LCD is punctured, do not allow contact with the liquid crystal inside. Infl ammation could result. If necessary, gargle your mouth and clean your eyes or skin with clear water for at least 15 minutes, and consult your doctor.
- 10. Do not use the handset when you perform a call test or check the volume, otherwise it may cause damage to your ear. Be sure to use the built-in speaker.
- 11. Be sure to perform a call test or check the volume with the handset on the hook. If you operate the hook switch with the handset on your ear, a sudden call etc. may arrive causing damage to your ear.
GENERAL PRECAUTIONS
- 1. Keep the unit more than 1m (3.3') away from radio or TV set.
- 2. Keep the intercom wires more than 30cm (12'') away from AC 100-240V wiring. AC induced noise and/or unit malfunction could result.
- 3. Install the unit in an area that will be accessible for future inspections, repairs, and maintenance.
- 4. As to other manufacturer's devices (such as door releases) used with this system, comply with the Specifi cations and Warranty conditions that the manufacturers or venders present.
- 5. If the unit is down or does not operate properly, turn off the power to the unit.
- 6. When wall-mounted, the top of the unit may darken and sooty. This does not indicate a malfunction.
- 7. The unit case may become a warm with use, but this is not a unit malfunction.
- 8. If it is used close to a cellular phone, the unit may malfunction.
- 9. The unit can be damaged if dropped. Handle with care.
- 10. The unit becomes inoperative during power failure.
- 11. In areas where broadcasting station antennas are close by, the intercom system may be affected by radio frequency interference.
- 12. All the units, except for door station, is designed for indoor use only. Do not use outdoors.
- 13. This product, being a control unit of door release, should not be used as a crime prevention device.
- 14. It must be noted in advance that the LCD panel, though manufactured with very high precision techniques, inevitably will have a very small portion of its picture elements always lit or not lit at all. This is not considered a unit malfunction.
- 15. Door station is weather-resistant, but do not spray high-pressure water. Unit trouble could result.
- 16. Due to the environmental sound around the unit, it may hinder smooth communication, but this is not a malfunction.
- 17. Refrain from using the color monitor station in sunlit areas.
- 18. At night, due to reduced lighting on the object, the monitor sees more noise and the face becomes more diffi cult to see, but this is not malfunction.
- 19. For the hands-free communication: If you stand too far away, it may be diffi cult for the other person to hear the communication.
- 20. If there are loud noises around the unit (such as music playing or children crying), the sound may break up and be diffi cult to hear.
- 21. During communication, if you speak before the other person has fi nished talking, your voice may not come through clearly. Communication will proceed smoothly if you wait until the other person has fi nished before speaking.
- 22. At a gate or porch illuminated by a fl uorescent lamp, the picture may vary, but this is not a malfunction.
- 23. The outline of video images displayed by video door station may differ from that of the actual person(s) or background, but this is not a malfunction.
- 24. If the screen of a video door station freezes during wintertime, the picture may become diffi cult to see or the call button may not move, but this is not a malfunction.
- 25. Aiphone assumes no responsibility for corruption of saved information (such as changes to or deletion of saved information). Please be aware of this in advance.
- 26. Warm-color lighting shining on the video door station may change the tint of the picture on the monitor.
- 27. When outside temperature lowers sharply after rainfall, etc., the inside of the camera may fog up slightly, causing a blurry picture, but this is not a malfunction. Normal operation will be restored when moisture evaporates.
- 28. When talking continuously, the talking may be interrupted by the noise cut function because the continuous talk is regarded as a noise, but this is not a malfunction.
- 29. During monitoring, the noise cut function does not work for making outside sounds easy to hear, so the noise may be heard louder than during communication.
- 30. When the unit's screen is illuminated with strong light, the image looks white or silhouetted. But this is not a unit trouble.
Notes on using this system
- Depending on the network environment and computer, it may not be useable.
- You need to set the ID/password to access the web server when changing the system settings or doing the system maintenance. The system administrator must keep the ID/password without fail. If you forget the ID/password, you must initialize the unit, thus all the setting contents return to default.
- The ID/Password to access the web server for setting the system is the customer's responsibility. Make sure you set a password that cannot be easily guessed by a third party. We recommend that you change the ID/Password on a regular basis.
- You may not be able to operate stations while updating the System settings by using a PC.
- If communications are congested or multiple video door stations are used for call or communication within the system, the frame rate may be degraded or communications may be interrupted.
- You can also refer to our web site at http://www.aiphone.net/ for some parts of the instructions for this system.
- If you are experiencing diffi culties in the use of the system, please check our web site at http://www.aiphone.net/.
Notices
- We will under no conditions be liable for damage that occurs due to failures in network equipment; failures due to internet providers and cell phone companies; failures such as disconnected lines and other losses in communication, which render it impossible to provide this service or in any way delay this service due to causes outside of our responsibility; or if an error or missing data occurs during transmission.
- We will under no conditions be liable for damage caused if a customer's password or transmitted information are leaked through bugging or unlawful computer access over Internet communication.
- We will under no conditions be liable for damage that occurs due to the inability to communicate due to malfunctions, problems, or operational errors in this product.
- We will under no conditions be liable for any damages or losses resulting from this product's contents or specifi cations.
- This manual was created by Aiphone Co., Ltd., all rights reserved. Copying a part of or this entire manual without prior permission from Aiphone Co., Ltd. is strictly forbidden.
- Please note that images and illustrations depicted in this manual may differ from the actual ones.
- Please note that this manual may be revised or changed without prior notice.
- Please note that product specifi cations may be changed for the sake of improvement without prior notice.
- Please be aware that it is the customer's responsibility to ensure that their computer is secure. We will under no conditions be liable for security failures.
- This system is not intended for life support or crime prevention. It is just a supplementary means of conveying information. Aiphone will under no conditions be liable for loss of life or property which occurs while the system is being operated.
- This system is not intended for preventing physical injury, accidents caused by disasters and property damage.
- When the web server is rebooted, all the registrations are returned to the settings that were made last time. Please make the settings again.
PART NAMES
Color monitor IP master station (IS-IPMV)
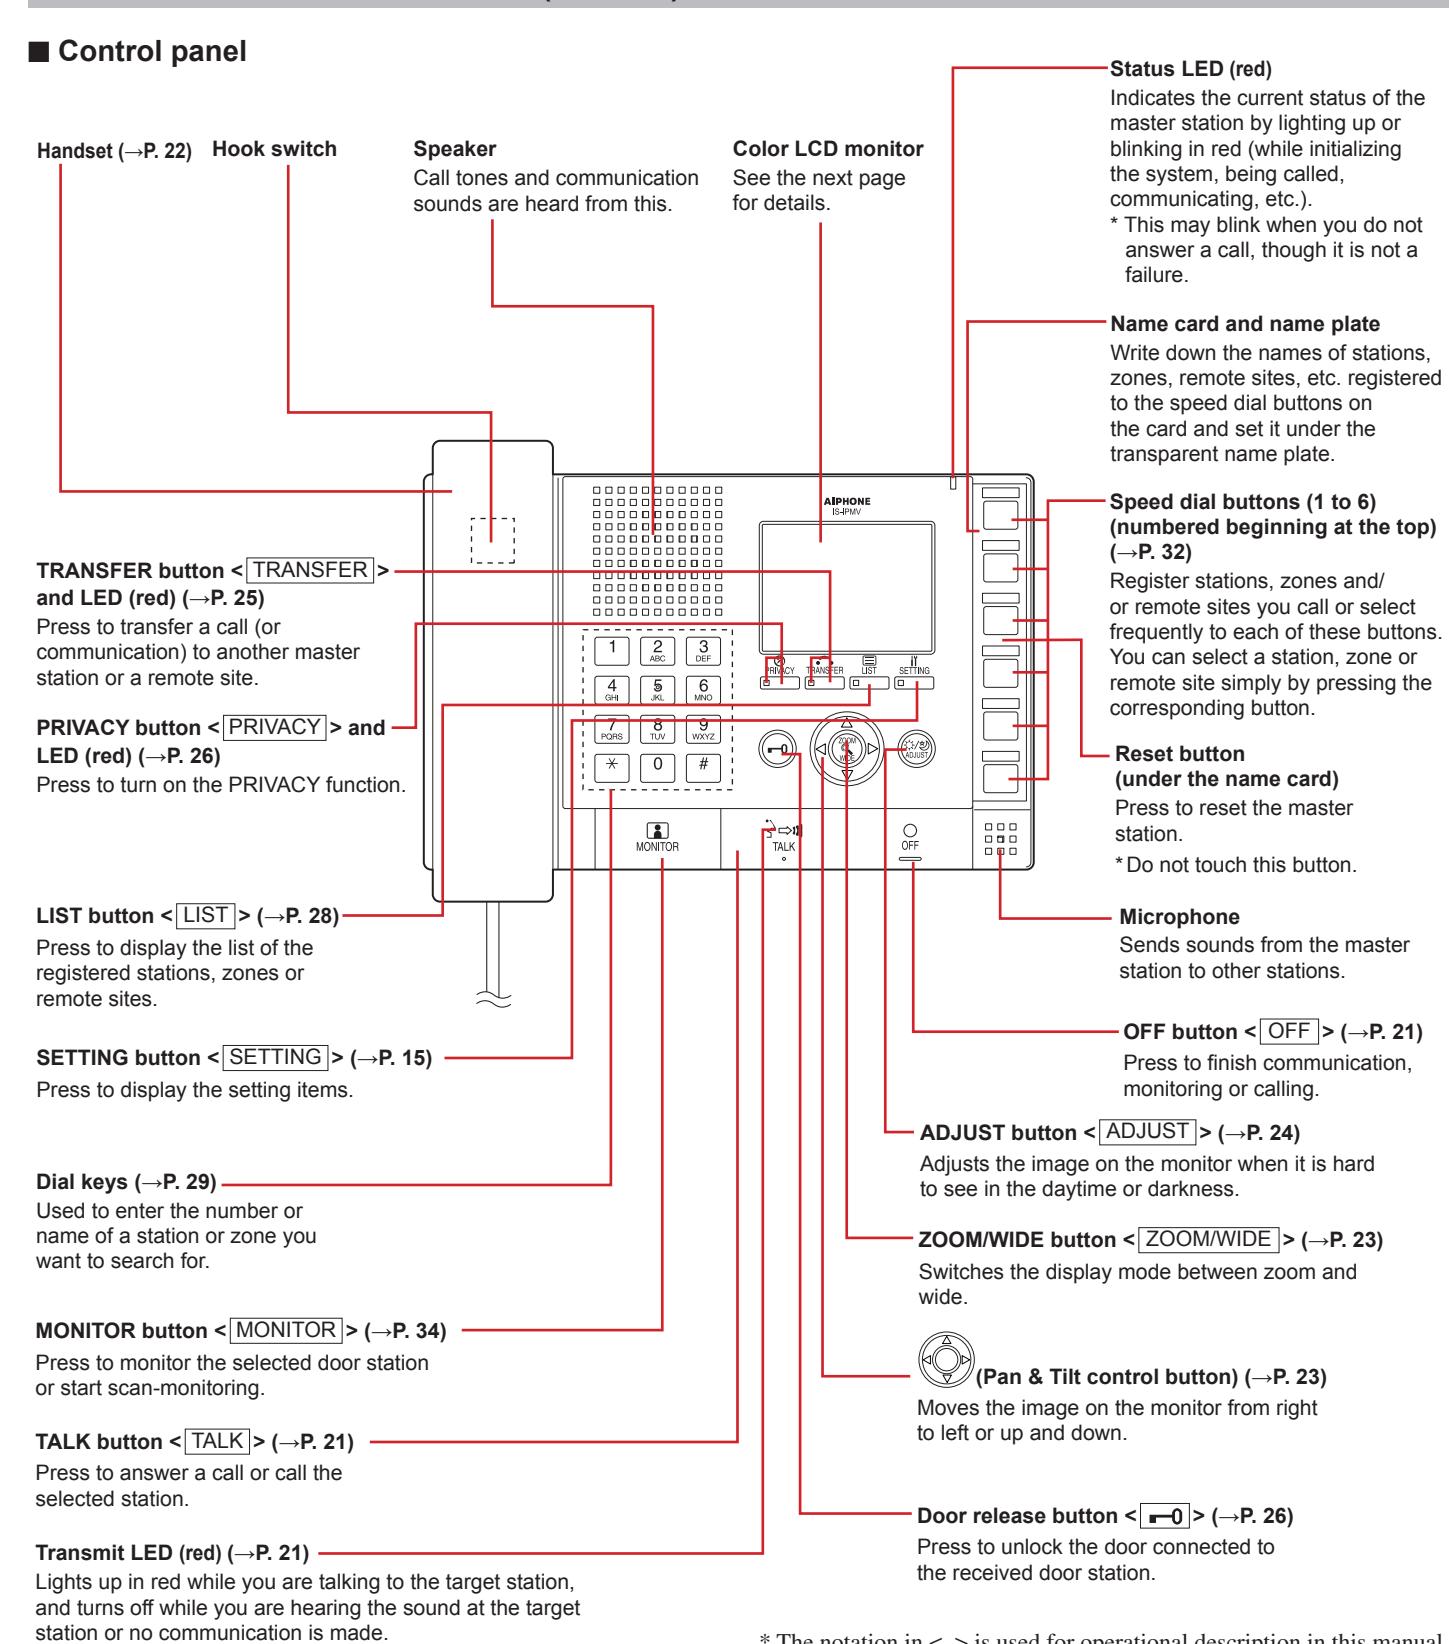
* The notation in < > is used for operational description in this manual.
■ Monitor
Display item examples
List of stations, zones and/or remote sites (→P. 29)
The list of the stations, zones and/or remote sites you searched for is shown here. Stations, zones and/or remote sites are displayed either by number and/or name depending on the setting on the "INITIAL SETTING".
* "NOT AVAILABLE" appears in the list when a corresponding station, zone or remote site is not detected.
List page no. (→P. 16)
When the list of stations, zones and/or remote sites, or setting items consists of two or more pages, the current page no. is shown here.
-Information display (→"USING THE SYSTEM")
Displays the name (or number) of selected or calling station, operation method, etc.
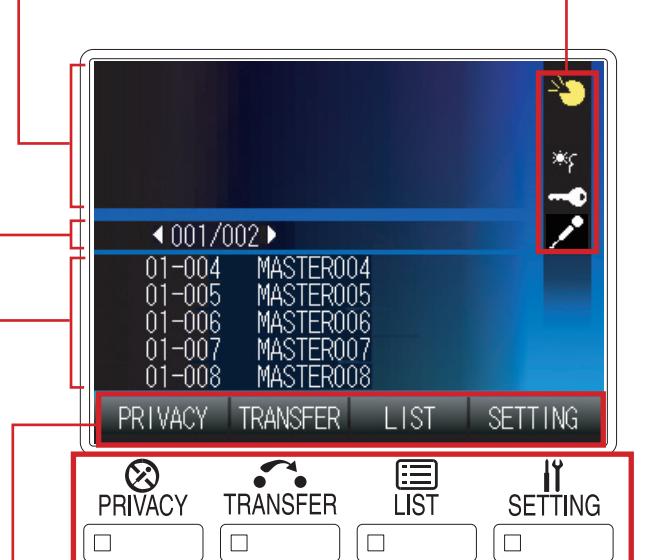
-Function buttons
The function buttons are also enabled when the function indicators just above the buttons are displayed.
* The function name on an indicator may differ from the name of the corresponding button. In that case, the button operates as the function of the indicator.
-Function indicators
The indicators differ depending on the display mode.
* These are not touch panel keys.
Status display icons
The following icons are displayed here depending on the status of the master station.
* The color of an icon changes according to the priority level. Normal: green
Priority: yellow Urgent: red
| Icons | The status when the icon appears |
|---|---|
| * | Appears while talking to the target station, being called from another master station, etc. |
| Appears while being called. | |
| - | Appears when paging. |
| * 3 | Appears when the image on the monitor is adjusted by pressing the ADJUST button. |
| - | Appears while the door release is activated by pressing the door release button. |
| Ø | Appears when the microphone volume is set to OFF, or the PRIVACY function is activated. |
| c. | Appears while transferring is suspended. |
| *** | Appears while receiving a call from a station transferred by another one. * This icon also appears on the station that performs transferring. |
| Appears while searching for a station, zone or remote site. | |
| Appears while monitoring. | |
| ! | Appears during scan-monitoring. |
| Appears when an error message is displayed. | |
| IĬ | Appears when a setting screen is displayed. |
| Appears when the microphone volume is set to ON. | |
| Shows it is a waiting time for shifting to the next performance, etc. |
NOTE:
The above display example differs from the actual one.
Display examples
[Standby mode]
* The monitor with no display (black) may also be in the standby mode.
Date, time, station no. and name of this master station
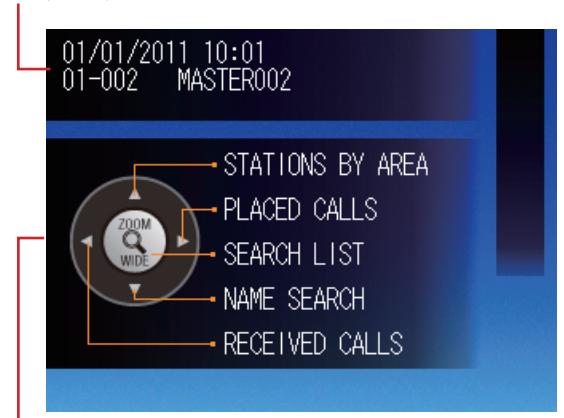
Key map for selecting the search items
[When talking with a door station]
Station no. and name (or remote site no. and name) of the target station or calling station
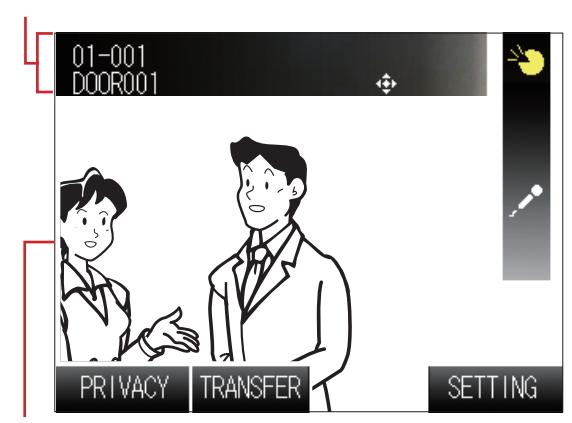
The video image at the target or calling station is displayed.
[When called from another master station]
Station no. and name (or remote site no. and name) of the calling station
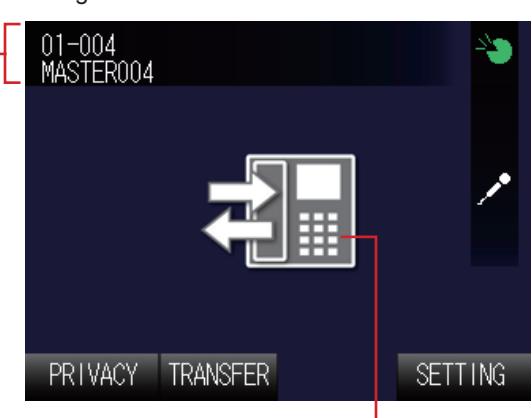
The calling station type image (or remote site symbol image) If the target station or calling station is a master station, no video image is displayed.
Displaying call and/or paging record and reception record
Call and/or paging record and reception record can be displayed on the monitor for each up to 20 items.
-
* When no answer was returned to an incoming call from this master station, it is displayed in the reception record list. In the records, unanswered incoming calls are marked with ☆ (outlined in yellow) or .
- : Unanswered calls that have not been confi rmed on the list yet
- ☆ : Unanswered calls that have already been confi rmed on the list
NOTES:
- The calls that are not received at the master station are not recorded. (An IS-IPMV cannot receive two or more calls at a time.)
- The record of unanswered incoming calls can also be automatically displayed by the setting on the "INITIAL SETTING". ( → P. 17)
- A monitoring operation is not recorded. If monitoring is shifted to talking, it will be recorded.
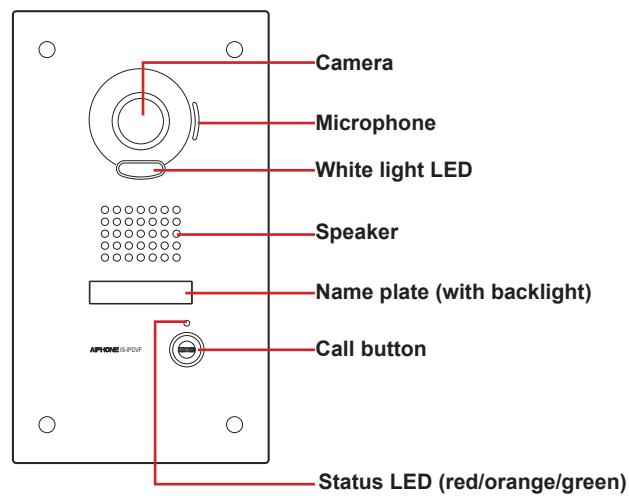
Vandal-resistant IP door station
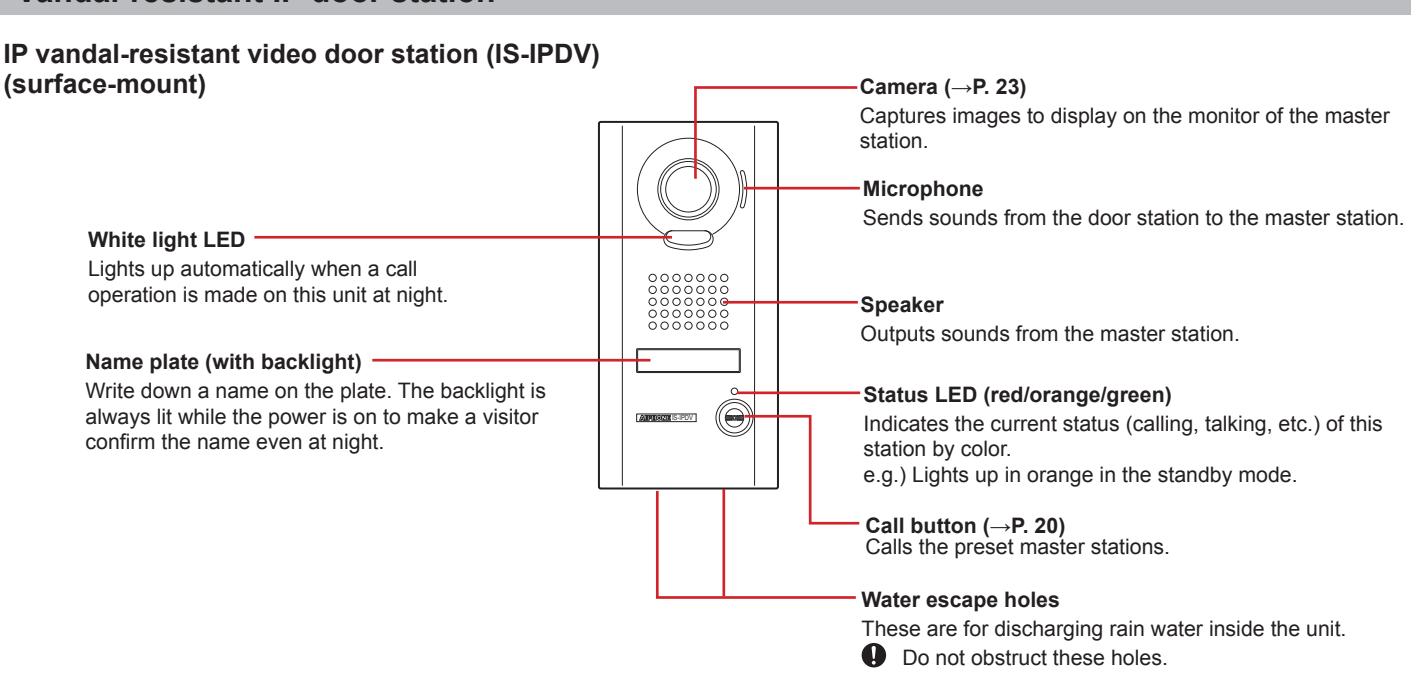
IP vandal-resistant video door station (IS-IPDVF) (flush-mount)
OUTLINE OF OPERATIONS
This manual mainly describes the following operations.
- · Operations you can do within a site (communication, transferring, paging, monitoring, door release, etc.)
- · Operations you can do between sites (communication, transferring, paging, door release, etc.)
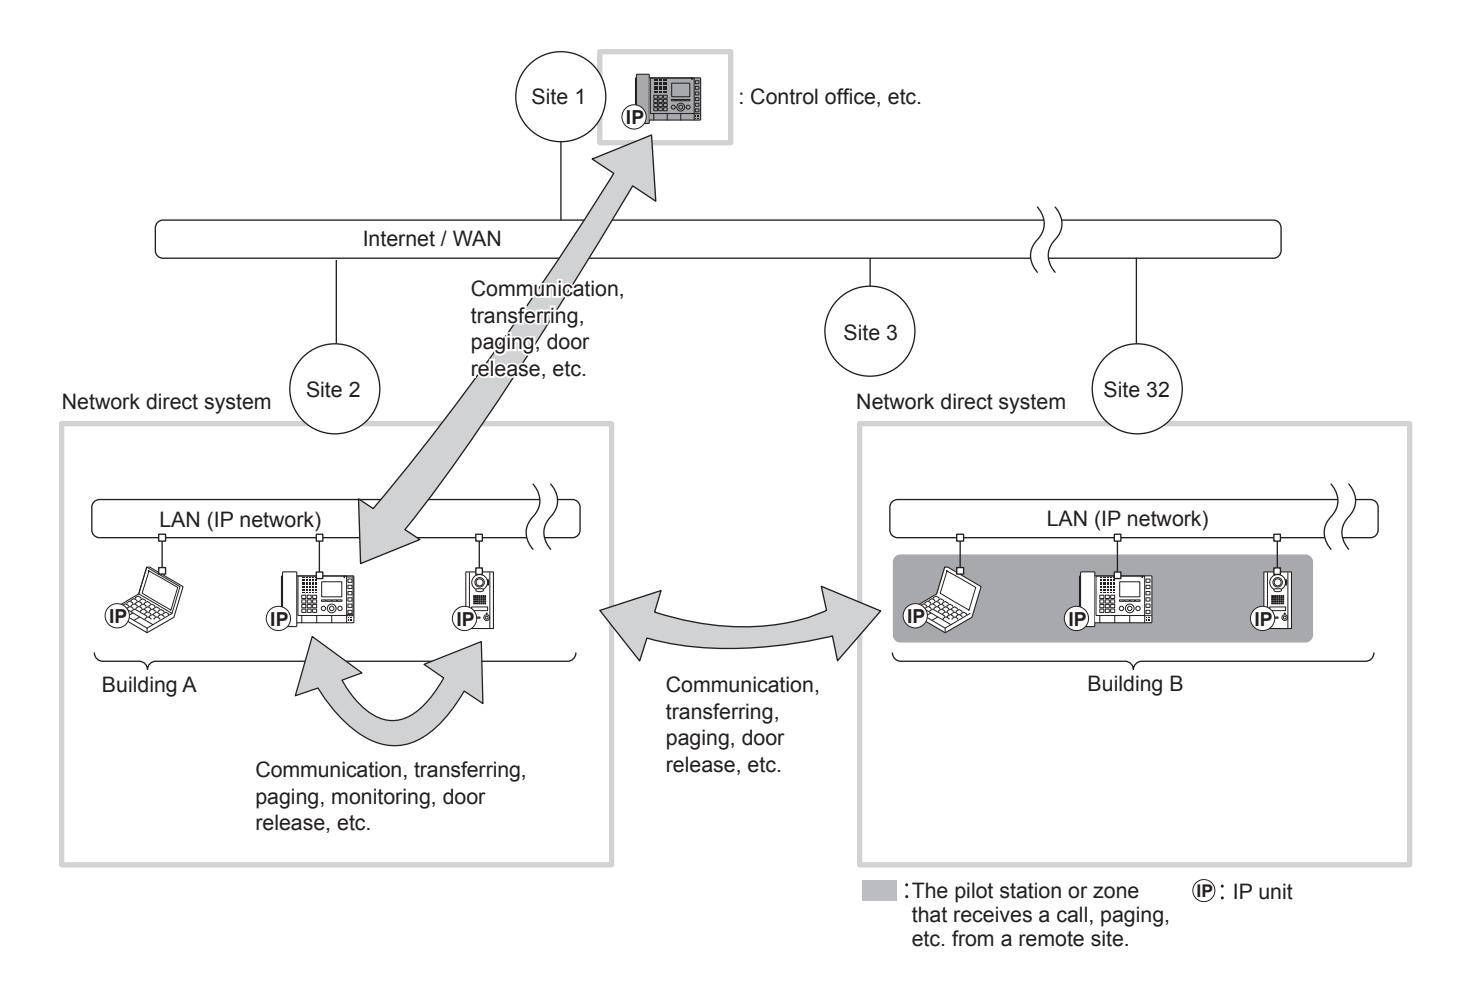
NOTES:
- The arrows in the figure above show examples of operations.
- For operating a PC master station (IS-SOFT), refer to the "OPERATION MANUAL" for the PC master station.
- The term "a remote site" used in this manual means "a network direct system in a remote site".
- You can communicate with the pilot station or page the pilot zone registered in a remote site. You cannot select a desired station or zone in a remote site.
- Depending on the system configuration of a remote site, some operations to the site may be disabled.
- A call or talk may not be possible when the communication path is fully occupied.
- Video images at the target video door station may not appear on the monitor when the video path is fully occupied even though a call or talk is possible.
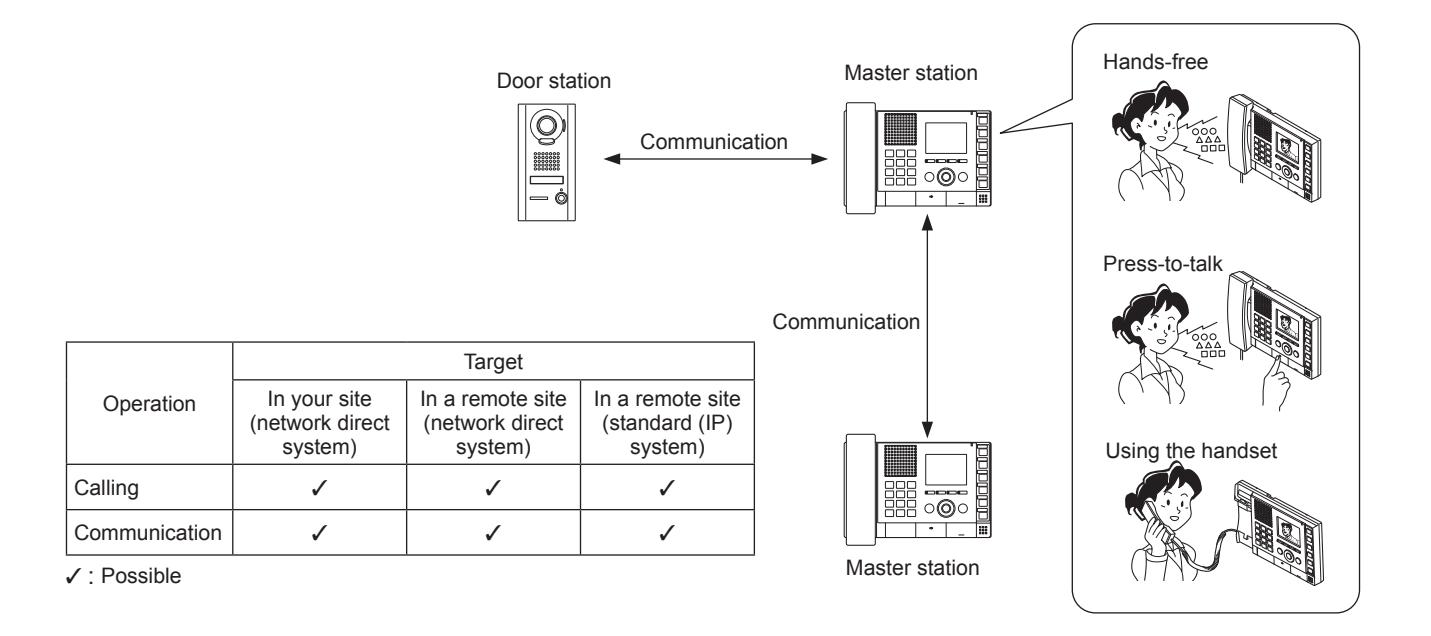
Communication
- On a door station, you can call up to 20 preset master stations in your site at the same time. Or you can call up to 19 master stations in your site and a remote site (up to 20 master stations at the remote site).
- On a master station, the communication method can be selected from the hands-free mode, the press-to-talk mode, or using the handset.
(→P. 21)
• You can also communicate with a remote site (the pilot station registered in the site).
Transferring
When communicating with a received call on a master station, you can transfer it to another master station in your site. (→P. 25)
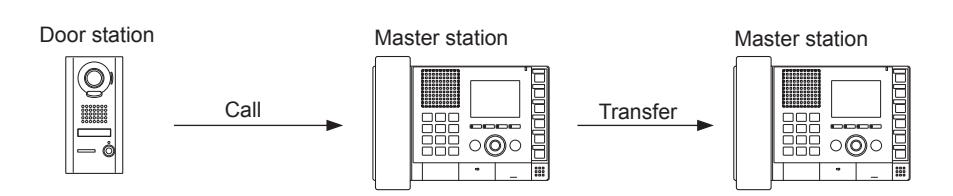
- * You can also make a transfer setting for transferring calls to a designated master station automatically.
- * For a call from another master station, you can transfer it when you are communicating with it (not to the remote site).
- * You can also transfer a call to a remote site. (However, you cannot transfer a call received from a remote site to another remote site.)
- * You cannot transfer a communication to a remote site.
| Target | |||
|---|---|---|---|
| Operation | In your site (network direct system) | In a remote site (network direct system) | In a remote site (standard (IP) system) |
| Communication transferring | ✓ | _ | |
| Call transferring (automatic) | ✓ | ✓ | ✓ |
| Scheduled call transferring (automatic) | ✓ | ✓ | ✓ |
✓ : Possible — : Impossible
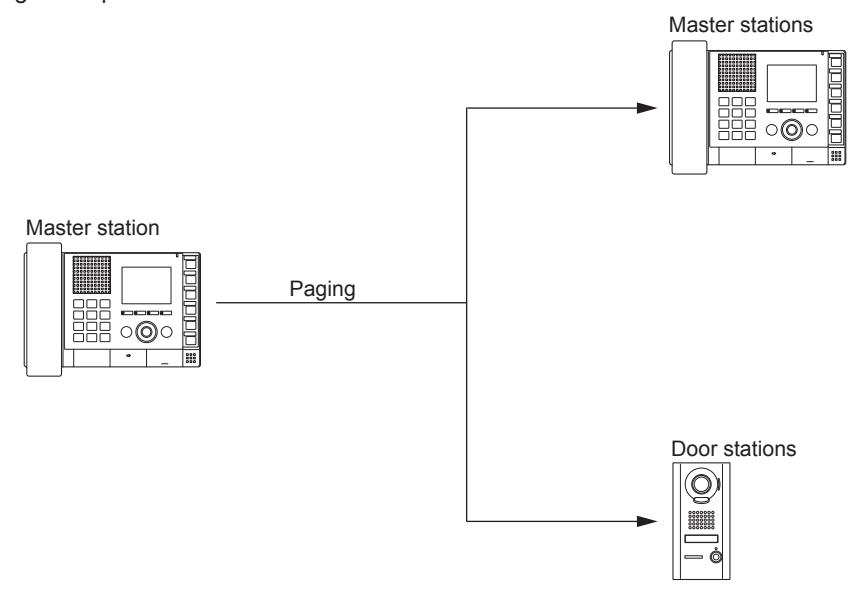
Paging
On a master station, you can initiate paging to the selected zone(s). All the stations previously registered to the zone(s) receive the paging. (→P. 35)
- * You can also call another master station or a door station in your site individually by direct voice call. The receiver can reply in the hands-free mode.
- * You can also make paging to the pilot zone in a remote site.
| Target | |||
|---|---|---|---|
| Operation |
In your site
(network direct system) |
In a remote site
(network direct system) |
In a remote site
(standard (IP) system) |
| Paging | ✓ | ✓ | ✓ |
| Chime paging | — | — | ✓ |
| Scheduled chime paging (automatic) | — | — | — |
✓ : Possible — : Impossible
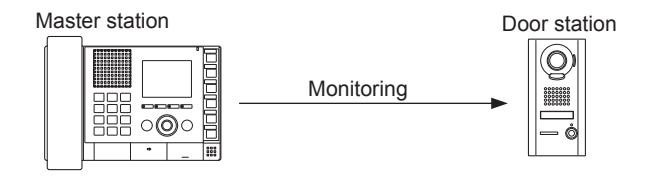
Monitoring
On a master station, you can monitor a door station in your site.
You can also initiate the scan-monitoring (monitoring multiple preset stations sequentially). (→P. 34)
* You cannot monitor or scan-monitor a remote site.
| Target | |||
|---|---|---|---|
| Operation |
In your site
(network direct system) |
In a remote site
(network direct system) |
In a remote site
(standard (IP) system) |
| Monitoring | ✓ | — | — |
| Scan-monitoring | ✓ | — | — |
✓ : Possible — : Impossible
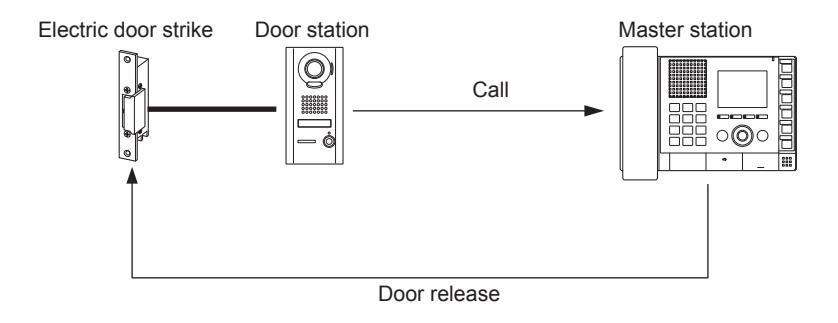
Door release
On a master station, you can unlock the door associated with a door station call in which a door release device is connected.
* You can also unlock the door (door release device) connected to a door station in a remote site depending on the setting.
| Target | |||
|---|---|---|---|
| Operation | In your site (network direct system) | In a remote site (network direct system) | In a remote site (standard (IP) system) |
| Door release | 1 | 1 | ✓ |
✓ : Possible
SETTING AND ADJUSTMENT
MASTER STATION SETTINGS AND ADJUSTMENTS
Make the basic and initial settings and adjustments on a master station after the system settings are completed. Make the settings and adjustments to all of the master stations individually.
NOTE: First change the display language for the monitor screen to the language you need. (→ P. 15)
Setting items
You can make the settings and adjustments for the following items. We especially recommend you make all the settings of the items in [INITIAL SETTING] before the fi rst use of the master station.
* [INITIAL SETTING] is available when the master station is in the standby mode.
| Item | Sub item | Setting range | Default value | |
|---|---|---|---|---|
| [BRIGHTNESS] | - | 1-10 | 6 | |
| [TONE VOL] | - | OFF, 1 - 10 | 6 | |
| [RECEIVE VOL] | - | OFF, 1 - 10 | 6 | |
| [INITIAL | [DOOR CALL TONE] | DOOR CALL: NORMAL | 1-6 | 1 |
| SETTING] | DOOR CALL: PRIORITY | 2 | ||
| DOOR CALL: URGENT | 3 | |||
| [ROOM SUB CALL TONE] | RM SUB CALL: NORMAL | (Not available in a network direct | 4 | |
| RM SUB CALL: PRIORITY | system) | 5 | ||
| RM SUB CALL: URGENT | 6 | |||
| [COMMUNICATION METHOD] | - |
HF (hands-free or press-to-talk)
/PTT (press-to-talk) |
HF | |
| [DISPLAY] | [DISPLAY LANGUAGE] | EN (English) | EN | |
| FR (French) | ||||
| ES (Spanish) | ||||
| NL (Dutch) | ||||
| IT (Italian) | ||||
| DE (German) | ||||
| JP (Japanese) | ||||
| [UN-ANSWERED CALL] | ON/OFF | OFF | ||
| [LIST ORDER] | ABC/123 | 123 | ||
| [SPEED DIAL] | [SPEED DIAL1] | (Register a station, zone or remote | - | |
| [SPEED DIAL2] | site to each speed dial.) | |||
| [SPEED DIAL3] | ||||
| [SPEED DIAL4] | ||||
| [SPEED DIAL5] | ||||
| [SPEED DIAL6] | ||||
| [TRANSFER] | [CALL TRANSFER] | ON/OFF | OFF | |
| [TRANSFER DESTINA] | (Registering a target) | - | ||
| [TRANSFER DELAY] | 00-60 (sec.) | 00 | ||
| [SCHEDULE TRANSFER] | ON/OFF | OFF | ||
| [SCHEDULE DESTINA] | (Registering a target) | - | ||
| [TELEPHONE TRANSFER] | (Not available in a network direct | OFF | ||
| [SCHEDULE TEL TRANSFE] | system) | OFF | ||
| [PRIVACY] | [PRIVACY MODE] | OFF/1/2 | OFF | |
| [PRIVACY-2 CALL TONE] | 1-6 | 4 | ||
| [INITIALIZATION] | - | NO/YES | NO | |
NOTES:
- The monitor will change to the standby mode if approx. one minute has elapsed with no operation on the master station. In that case, the setting results will be saved at that time.
- The above list is a brief overview of the setting items available on the master station. The descriptions, and the style and order of descriptions do not necessarily equate with the actual displays.
Setting the display language
When the master station is started up for the first time, the [DISPLAY LANGUAGE] setting screen appears on the monitor. The display language for the monitor screen is set to English as default. First change it to the language you need as follows.
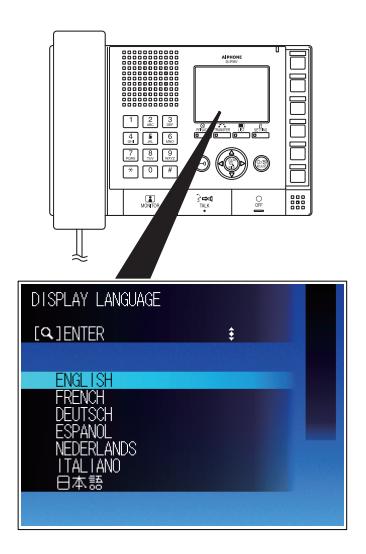
- 1 Press repeatedly to select the target language (so that it is highlighted).
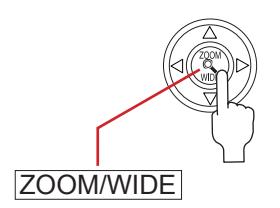
- 2 Press ZOOM/WIDE to decide on the selected one.
Adjusting screen brightness [BRIGHTNESS]
You can adjust the brightness of the monitor in 10 levels.
- * This adjustment can also be made while receiving a call, communicating or monitoring (when [SETTING] is displayed on the monitor).
- 1 Press SETTING in the standby mode.
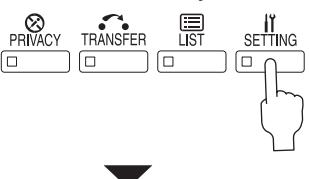
The setting screen appears.
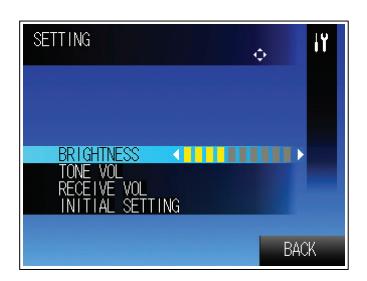
- Press (Pan & Tilt control button) repeatedly to select [BRIGHTNESS] (so that it is highlighted).
-
3
Press repeatedly to change the level.
- * You can see the change of brightness as you change the value.
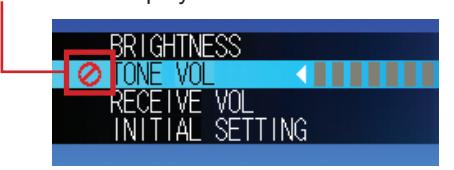
Adjusting sound volume [TONE VOL], [RECEIVE VOL]
You can adjust the sound volume of call tone [TONE VOL] and receiving tone [RECEIVE VOL] respectively. The adjusting range is off and 1 to10.
- * This adjustment can also be made while receiving a call, communicating or monitoring (when [SETTING] is displayed on the monitor).
- 1 Press SETTING in the standby mode. The setting screen appears.
- Press repeatedly to select [TONE VOL] or [RECEIVE VOL] you wish to adjust (so that it is highlighted).
-
3 Press repeatedly to change the level.
- * The call tone sounds in the selected level.
- * If you change the level when communicating, you can check the receiving sound volume of the selected level as it's changed.
- * This icon is displayed when the volume is set to off.
Initial settings [INITIAL SETTING]
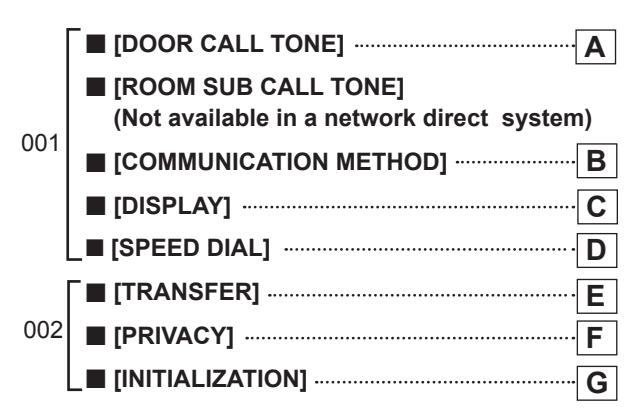
Make the initial settings before beginning to use the master station. You can set the following items under [INITIAL SETTING].
Basic setting procedure
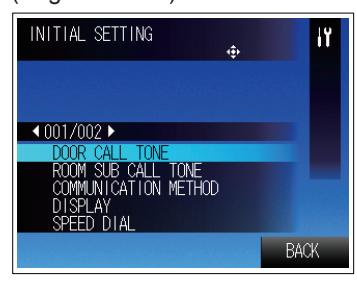
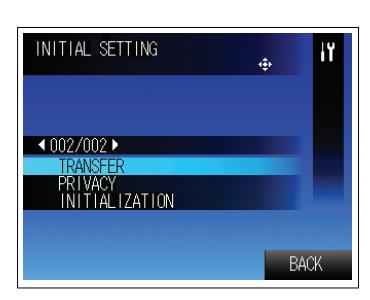
- 1) Press SETTING in the standby mode. The setting screen appears.
- 2) Press repeatedly to select [INITIAL SETTING] (so that it is highlighted).
- 3) Press ZOOM/WIDE to select.
-
4) Press repeatedly to select the item you wish to set (so that it is highlighted).
- * Pressing repeatedly turns pages of the list.
(Page 001/002)

(Page 002/002)
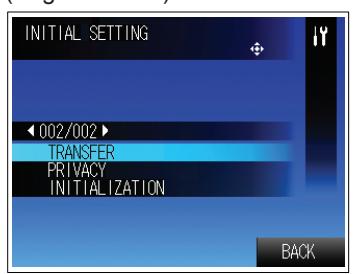
NOTE:
The above display example differs from the actual one.
* When [BACK] is displayed, pressing SETTING will return to the setting screen.
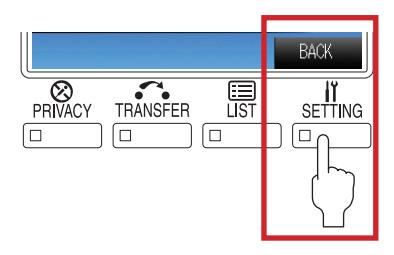
- 5) Press ZOOM/WIDE to decide on the selected item.
- 6) Make the settings on the selected item.
(NOTE: Step 1 below corresponds to steps 4) and 5) of " Basic setting procedure " above.)
A Setting the call-in tones [DOOR CALL TONE] You can set the call-in tones from door stations [DOOR CALL TONE]. The call-in tones can be set for the priority "Normal",
"Priority" and "Urgent" individually.
Press 1 repeatedly to select [DOOR CALL TONE] you wish to set (so that it is highlighted), and then press ZOOM/WIDE to decide on the selected item.
2 Press repeatedly to select [DOOR CALL: NORMAL], [DOOR CALL: PRIORITY] or [DOOR CALL: URGENT] (so that it is highlighted), and then press ZOOM/WIDE to decide on the selected one.
3 Press repeatedly to select the desired tone (1 to 6), and then press ZOOM/WIDE to decide on the selected one.
- * You can check the selected tone by hearing it whenever selected.
- * Press SETTING as "BACK" function to return to the previous screen.
B Setting the communication method for using the microphone and speaker [COMMUNICATION METHOD]
You can select the communication method for using the microphone and speaker between HF (hands-free) and PTT (press-to-talk).
- 1 Press repeatedly to select [COMMUNICATION METHOD] (so that it is highlighted), and then press ZOOM/WIDE to select.
- Press ZOOM/WIDE, then press repeatedly to select [HF] or [PTT] (so that it is highlighted), and then press ZOOM/WIDE to decide on the selected one.
[HF]: HF or PTT [PTT]: PTT only
C Setting the display modes of the monitor [DISPLAY] You can make the following settings for the display modes.
| Sub item | Description | Setting range |
|---|---|---|
| [DISPLAY | Selects the language for | EN (English) |
| LANGUAGE] | displaying the monitor screen. | FR (French) |
| ES (Spanish) | ||
| NL (Dutch) | ||
| IT (Italian) | ||
| DE (German) | ||
| JP (Japanese) | ||
| [UN-ANSWERED | Sets whether or not to display | ON | |
| CALL] | the record of unanswered incoming call(s) automatically. | OFF |
| [LIST ORDER] | LIST ORDER] Selects either name or no. to | |
| sort the list. | 123 (no.) | |
1 Press repeatedly to select [DISPLAY] (so that it is highlighted), and then press ZOOM/WIDE to select.
The sub items are displayed.
- Press repeatedly to select the sub item [DISPLAY LANGUAGE], [UN-ANSWERED CALL] or [LIST ORDER] you wish to set (so that it is highlighted), and then press ZOOM/WIDE to decide on the selected one.
- Press repeatedly to select the desired one, and then press ZOOM/WIDE to decide on the selected one.
- 4 In the same way, make the settings for the other sub items.
- * Press SETTING as "BACK" function to return to the previous screen.
D Registering the desired stations, zones and/or remote sites to speed dials [SPEED DIAL]
You can register the stations, zones and/or remote sites you frequently call or select for paging to the speed dials. Up to six stations, zones and/or remote sites can be registered to "SPEED DIAL1" - "SPEED DIAL6". The registered stations, zones and/or remote sites can be selected by using the corresponding speed dial buttons.
- * Only one station, zone or remote site can be registered to a speed dial.
- 1 Press repeatedly to select [SPEED DIAL] (so that it is highlighted), and then press ZOOM/WIDE to select.
- (When registering a station, zone or remote site to "SPEED DIAL1"):
Press to select [SPEED DIAL1] (so that it is highlighted), and then press ZOOM/WIDE to decide on the selected one.
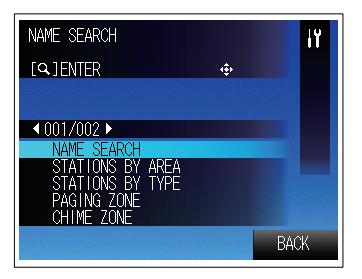
The SEARCH LIST appears.
-
Press to select the desired search item (so that it is highlighted), and then press ZOOM/WIDE.
- Refer to pages 28-31 for details about searching for a station, zone or remote site.
- 4 Search for the target station, zone or remote site.
- 5 Press ZOOM/WIDE with the selected station, zone or remote site highlighted.
The selected station, zone or remote site is registered to [SPEED DIAL1].
- * When a remote site (a network direct system) is selected, next select the function ([CALL] or [PAGING]), and then press ZOOM/WIDE].
- [CHIME] is not available for the network direct system in both your site and remote sites.
- 6 In the same way, register other stations, zones and/ or remote sites to [SPEED DIAL2] - [SPEED DIAL6].
NOTE:
To delete the content(s) registered to a speed dial button, select the target speed dial (so that it is highlighted) and then press PRIVACY as "DELETE".
E Setting the call transferring [TRANSFER]
You can make the following settings for transferring calls.
| Sub item | Description | Setting range |
|---|---|---|
|
[CALL
TRANSFER] |
Enables (ON) or disables (OFF) the call transferring. |
ON
OFF |
|
[TRANSFER
DESTINA] (Transfer destination) |
(Available when [CALL
TRANSFER] is set ON.) Selects a master station in your site or a remote site as the transfer target. |
(Registering a master station or a remote site) |
|
[TRANSFER
DELAY] |
(Available when [CALL
TRANSFER] is set ON and the target is set at [TRANSFER DESTINA].) Sets the time of starting transferring after a call is received. |
00-60 (sec.) |
|
[SCHEDULE
TRANSFER] |
Enables or disables the call transferring to be performed on the schedule preset by the system settings automatically. |
ON
OFF |
|
[SCHEDULE
DESTINA] (Schedule destination) |
(Available when [SCHEDULE TRANSFER] is set ON.) Selects a master station in your site or a remote site as the transfer target on the schedule. | (Registering a master station or a remote site) |
1 Press repeatedly to select [TRANSFER] (so that it is highlighted), and then press ZOOM/WIDE to select.

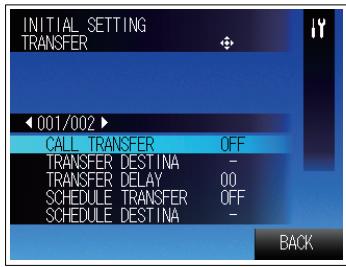
The sub items are displayed.
* The sub items can also be displayed by pressing TRANSFER in the standby mode.
NOTE.
The above display example differs from the actual one.
Press repeatedly to select the target sub item (so that it is highlighted), and then press ZOOM/WIDE to select.
3 Make the settings on each sub item as follows.
[CALL TRANSFER]:
Press repeatedly to select ON or OFF, and then press ZOOM/WIDE to decide on the selected one.
[TRANSFER DESTINA] (Transfer destination):
* This setting is available only when [CALL TRANSFER] is ON.
Press repeatedly to select the target master station in your site or a remote site (so that it is highlighted), and then press ZOOM/WIDE.
* The LED on TRANSFER lights up (red) when [CALL TRANSFER] is set ON and the target is set at [TRANSFER DESTINA].
[TRANSFER DELAY]:
* This setting is available only when [CALL TRANSFER] is set ON and the target is set at [TRANSFER DESTINA].
Press repeatedly to set the delay time, and then press ZOOM/WIDE to select.
* If the delay time is set to "00", a call will be transferred to the target directly.
[SCHEDULE TRANSFER]:
Press repeatedly to select ON or OFF, and then press ZOOM/WIDE to decide on the selected one.
[SCHEDULE DESTINA] (Schedule destination):
* This setting is available only when [SCHEDULE TRANSFER] is ON.
Press to select the target master station in your site or a remote site (so that it is highlighted), and then press ZOOM/WIDE.
* Press SETTING as "BACK" function to return to the previous screen.
F Setting the PRIVACY function [PRIVACY]
Setting of the PRIVACY function is available when called from another master station.
When the PRIVACY MODE is activated, the microphone turns off and you will not be heard by the caller.
| Sub item | Description | Setting range |
|---|---|---|
| [PRIVACY MODE] | Sets whether or not to activate the PRIVACY function. To activate the PRIVACY function, select the PRIVACY MODE 1 or 2. | (PRIVACY MODE) 1: The microphone is off (mute). (PRIVACY MODE) 2: The microphone is off (mute) and the caller and you are notified by a tone when you receive the call that you are in the PRIVACY MODE. OFF: The microphone is on. |
|
[PRIVACY-2 CALL
TONE] |
(Available when
(PRIVACY MODE) 2 is selected.) Selects the call tone from 6 types. |
1-6 |
1 Press repeatedly to select [PRIVACY] (so that it is highlighted), and then press ZOOM/WIDE to select.
The sub items are displayed.
- * The sub items can also be displayed by pressing PRIVACY in the standby mode.
- Press repeatedly to select the sub item [PRIVACY MODE] or [PRIVACY-2 CALL TONE] you wish to set (so that it is highlighted), and then press ZOOM/WIDE to decide on the selected one.
- 3 Make the settings on each sub item as follows.

[PRIVACY MODE]:
Press repeatedly to select the desired mode (so that it is highlighted), and then press ZOOM/WIDE to decide on the selected one.
* When (PRIVACY MODE) 1 or (PRIVACY MODE) 2 is selected, the LED on PRIVACY lights up (red).
[PRIVACY-2 CALL TONE]:
* This setting is available only when [PRIVACY MODE] is set to (PRIVACY MODE) 2.
Press repeatedly to select the desired call tone, and then press ZOOM/WIDE to decide on the selected one.
You can check the selected tone by hearing it whenever selected.
G Initializing the set contents [INITIALIZATION]
You can reset all the set contents to default.
1 Press repeatedly to select [INITIALIZATION] (so that it is highlighted), and then press ZOOM/WIDE to select.
"RETURN TO DEFAULT?" is displayed.
- 2 Press ZOOM/WIDE to continue the initialization procedure.
-
Press repeatedly to select [YES] (so that it is highlighted) to perform initializing, and then press ZOOM/WIDE to select.
- * Select [NO] if you will cancel initialization.
NOTE:
If you have repositioned the master station, initialize it to clear the speed dial settings etc., and make the settings again.
RECEIVING AND ANSWERING A CALL ON THE MASTER STATION
The following describes the communication method using this system.
- * When receiving a call from a remote site, the operation methods are the same as described below, however it may take a longer time for some operations and their responses. For example, there may be a time difference between a call starting at a remote site and the call tone ringing on the target master station in your site.
- * The term "a remote site" used in this manual means "a network direct system in a remote site".
- * To make a communication (or calling, paging, etc.) between your site and a standard (IP) system in a remote site, also refer to the "OPERATION MANUAL" for the standard (IP) system.
Receiving a call
Door station (in your site or a remote site)
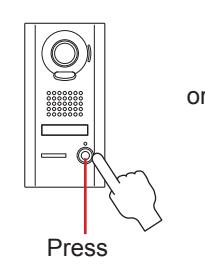
Another master station (in your site or a remote site)
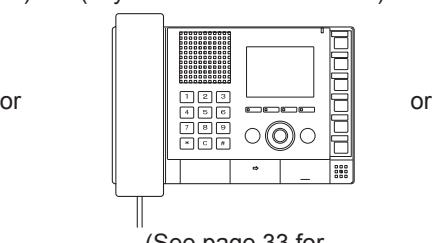
(See page 33 for how to call from a master station.)
PC master station (in your site or a remote site)
(See the "OPERATION MANUAL" for the PC master station (IS-SOFT).

-
The call tone rings, and the corresponding display appears.
1
- * The call tone from a door station differs from the setting. (→P. 16)
- e.g.) When called from a video door station
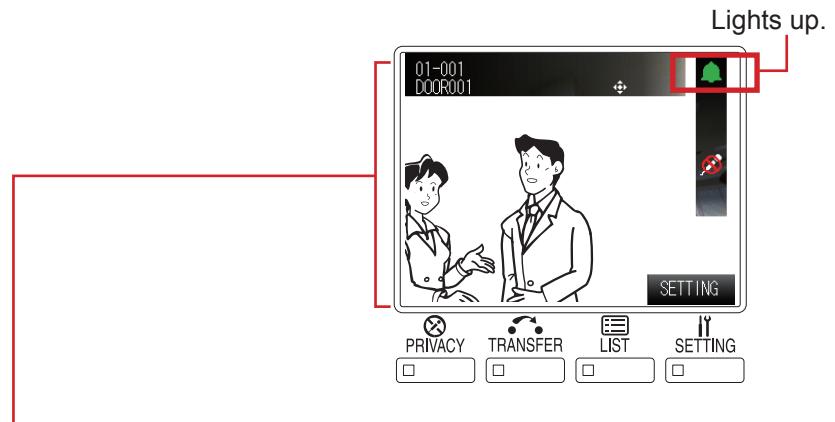
The station no., station name and video image at the calling station (following the symbol image) are displayed. (When called from a remote site, the site no., site name and video image at the calling station (following the symbol image) are displayed. The station name will not be displayed.)
- * It may take long until a video image appears on the monitor.
- * When another master station calls in, the station type image is displayed. When called from a remote site, the remote site symbol image is displayed.
- * An incoming call from another master station will be a direct voice call. (However, when the PRIVACY MODE is set to "2", you will be notifi ed of an incoming call by the display information and call tone.)
NOTE:
An IS-IPMV cannot receive two or more calls at a time.
Answering a call
The maximum duration of communication is preset in the System setting. (It can be set to a maximum of 10 minutes.)
-
1
Answer the call in one of the following ways.
- Communication in the hands-free mode (Available when "COMMUNICATION METHOD" is set to "HF" in the "INITIAL SETTING")
<When called in from a door station>
1) Press TALK momentarily.
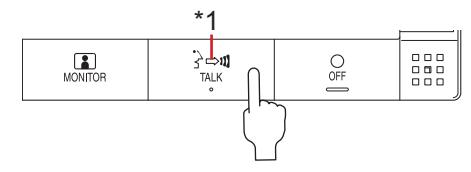
After a beep, you can communicate in the handsfree mode.
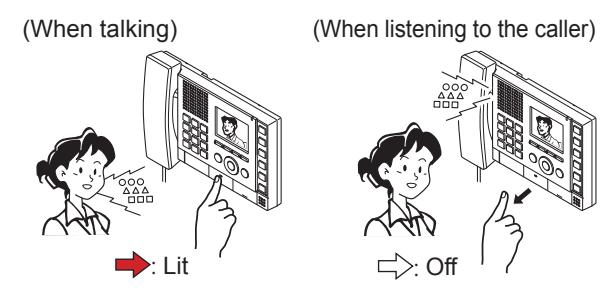
*1: When talking: → (Lit) When listening to the caller: □ (Off)
2) When you have finished the communication, press OFF.
Communication will end.
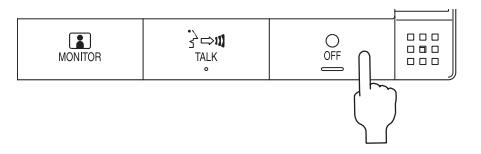
-
* You can communicate in the press-to-talk mode by the following operation even when "HF" is set (e.g., when it is noisy around you).
- Press and hold TALK for a few seconds while being called. (Beeps twice and [PRIVACY] disappears from the display.)
- Press and hold TALK for more than one second while communicating. (Beeps once and [PRIVACY] disappears from the display.)
<When you received a direct voice call from another master station>
You can talk back to it. If you press and hold <a>[TALK]</a> for more than one second, it changes to the press-to-talk mode. (Beeps once and <a>[PRIVACY]</a> disappears from the display.)
■ Communication in the press-to-talk mode (Available when "COMMUNICATION METHOD" is set to "PTT" in the "INITIAL SETTING")
<When called in from a door station>
1) Press TALK momentarily.
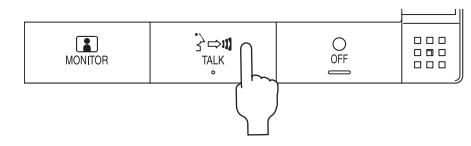
After a beep, you can communicate in the press-to-talk mode.
2) Press and hold TALK to talk and release to listen to the caller.
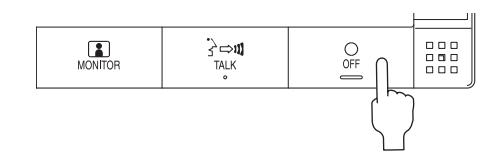
3) When you have finished the communication, press OFF.
Communication will end.
<When you received a direct voice call from another master station>
Press and hold TALK to talk with and release to listen to the caller.
■ Communication by using the handset
<In the hands-free mode>
-
1) Lift the handset and you can communicate with the handset.
- * You can also communicate in the press-to-talk mode by pressing and holding TALK .
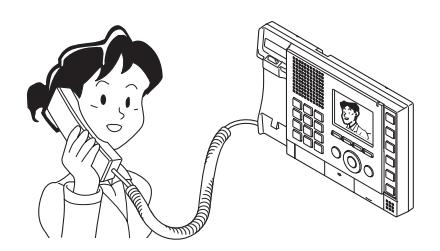
2) When you have fi nished the communication, put the handset on the hook. Communication will end.
<In the press-to-talk mode>
You can communicate in the press-to-talk mode by pressing and holding TALK even when you are communicating with the handset.
NOTE:
Communication will end automatically according to the set communication time.
About the priority
The order of priority for two or more actions (communication, calling, paging, monitoring, etc.) performed at the same time is as follows depending on the priority setting.
| Priority | Setting | Action |
|---|---|---|
| 1 (high) | [URGENT], [BROADCAST]*1 | Communication, |
| 2 | [PRIORITY] | calling, paging |
| 3 | [NORMAL] | |
| 4 (low) | - |
Monitoring, scan
monitoring |
- * Earlier call has priority over later call if the priority setting is the same. When the communication path is occupied, it is notifi ed by a sound.
- * Communication takes priority over calling. However, when a call with higher priority comes in, the communication will be forcibly stopped.
* 1 : [BROADCAST]:
This can be selected only when you perform paging. When [BROADCAST] is selected, you can perform paging while interrupting all the other communications of lower priority. In that case, no receiver can answer you.
NOTE:
When communication is stopped by receiving a higher priority operation, a notice sound rings.
USING THE SYSTEM
Viewing video images at a video door station
You can view video images at the target station when receiving a call from or communicating with a video door station, or monitoring a video door station in your site. The video images can be adjusted as necessary by using the following functions on the master station.
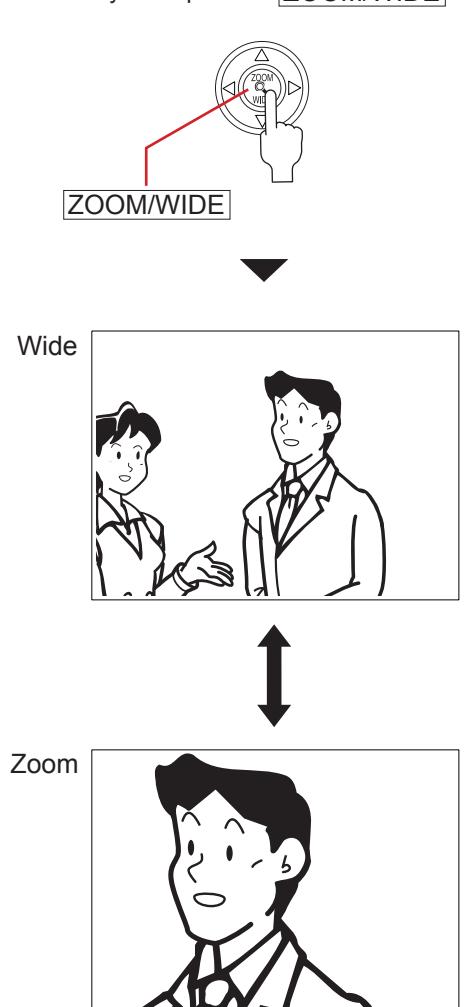
■ Switching Zoom/Wide
The display mode on the monitor can be switched between zoom and wide by each press of ZOOM/WIDE.
NOTES:
- The preset position of zoom image is set in the System setting on a PC.
- When the display mode switches from wide to zoom, the zoom image from the preset position is displayed.
- Depending on the properties of the video door station camera, the wide image may appear more distorted than the zoom image but this is not a malfunction.
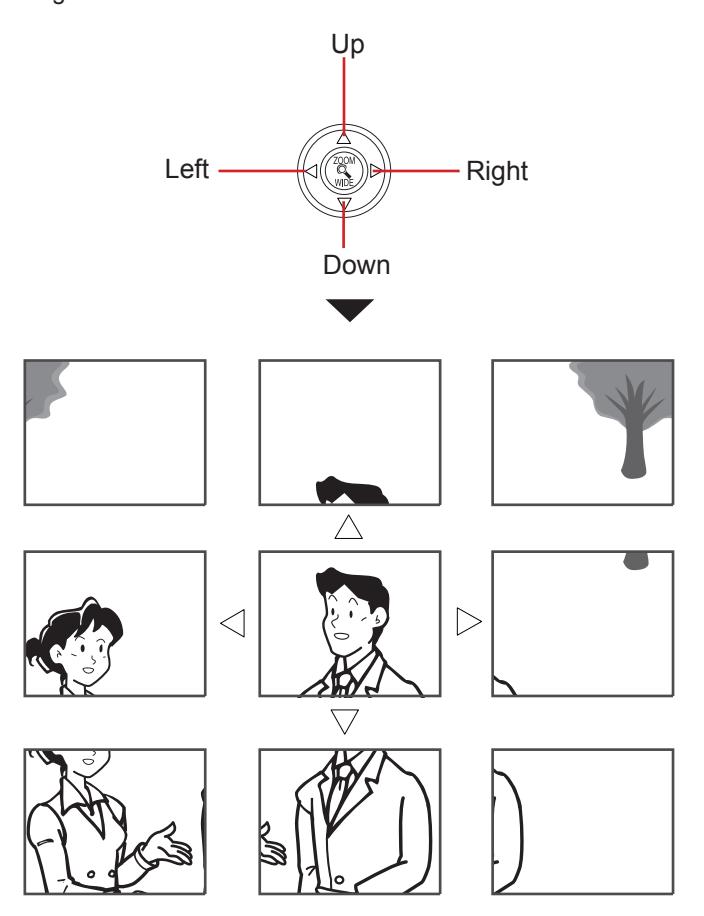
- In the zoom mode, the image can be moved from right to left or up and down.
■ Pan & Tilt
When a zoom image is displayed, pressing image as shown below.
NOTES:
- The image range of the zoom mode and wide mode differs. The edge of wide image will not be displayed with the zoom mode.
- At night, the object image may be blurred and less-visible when moving the image from right to left or up and down because illumination to the object is reduced. The same applies to a moving object.
■ Adjusting images
If the image on the monitor is diffi cult to see, you can adjust the image.
1 Press ADJUST when the image is diffi cult to see.
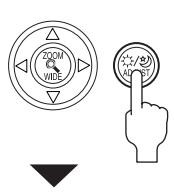
The backlight or night sensitivity is automatically adjusted.
- * The discrimination between day and night is performed automatically by the door station.
- * The adjustment result may vary depending on the System setting on a PC.
<Day> <Night> [Before adjustment] [Before adjustment]


[After adjustment] [After adjustment]
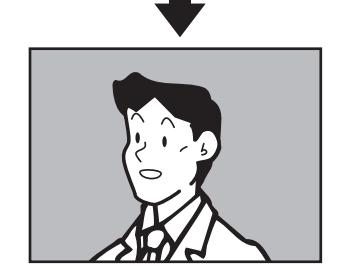
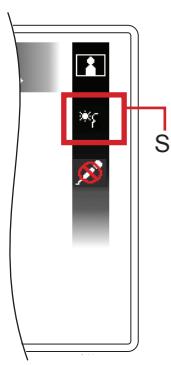
Shows which adjustment is being made.
: Backlight adjustment
: Night sensitivity adjustment
To restore the image before adjustment
Press ADJUST again.
The icon is cleared and the image before adjustment is restored.
NOTE:
Pressing ADJUST at night may make visitors' faces easier to see, but may also make moving objects more diffi cult to see.
USING THE SYSTEM
Transferring to another master station
You can transfer a call received from a door station to another master station while communicating with it (communication transferring), as well as setting calls to be automatically transferred in the "INITIAL SETTING".
* For a call from another master station, you can transfer it when you are communicating with it. However, you cannot transfer the communication to a remote site.
■ Communication transferring
- 1 Receive a call and communicate with it.
- 2 Press TRANSFER
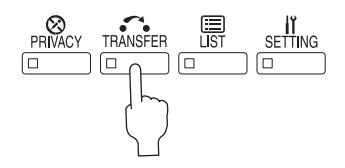
- 3 Press to select the master station in your site to which you want to transfer the call (so that it is highlighted) from the list.
- 4 Press TALK or ZOOM/WIDE
Appears while the transfer is being performed.
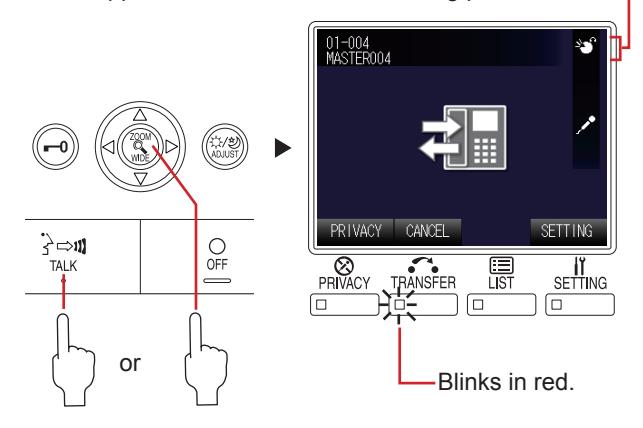
- * While transferring, a sound rings at the source station to indicate a transfer.
- 5 Press OFF to enable the communication between the station that called you and the transfer target station.
NOTE:
You cannot transfer a call from a remote site to another remote site.
■ Call transferring
You can transfer a call to the designated master station (in your site or a remote site) automatically (without answering it) by the "TRANSFER" settings in the "INITIAL SETTING". (→P. 18)
- * This function is useful when you are absent or you cannot receive and answer a call.
- * When transferring to a remote site, a master station in the remote site should have been registered as the pilot station of the site.
The following settings can be made.
- Transferring a call to the designated master station or remote site automatically (→P. 18 [CALL TRANSFER], [TRANSFER DESTINA])
- ② Setting the delay time of triggering transferring after a call is received (→P. 18 [TRANSFER DELAY])
- ③ Setting a schedule for call transferring in the System setting on a PC (→P. 18 [SCHEDULE TRANSFER], [SCHEDULE DESTINA])
- * When both ① and ③ are set, ① takes priority.
Door release
You can release the door lock while being called from, communicating with, or monitoring a door station if a door release device is connected to the station.
Press •• while being called from, communicating with, or monitoring the door station.
The door lock is released for the time set in the System setting on a PC.
* If the set release time is "0", it can be released while the button is pressed and held.
NOTES:
- To enable door release to a door station in a remote site, the appropriate setting must be made at the remote site.
- This function is disabled during scan-monitoring. ( P. 34)
Using the PRIVACY function
The PRIVACY function of a master station prevents you from being heard by other master stations (in your site) or remote sites that call you.
To activate the PRIVACY function
Set the PRIVACY MODE to "1" or "2" in the "INITIAL SETTING". If you will not use the PRIVACY MODE, set it to "OFF".
■ While receiving a call
When the PRIVACY function is activated
The microphone of your master station is muted, so the sounds at your side are not heard by the caller.
When the PRIVACY function is off
The microphone of your master station is enabled, so the sounds at your side are heard by the caller.
■ To communicate with the caller
When the PRIVACY function is activated
Press TALK or lift the handset, and the microphone is enabled. Then you can communicate with the caller.
· When the PRIVACY function is off
You can communicate with the caller without pressing TALK or lifting the handset.
* To mute the microphone temporarily: Press and hold PRIVACY, and the microphone is muted. Release PRIVACY to enable the microphone.
The status of master station depending on the PRIVACY MODE
|
PRIVACY
MODE |
LED | When receiving a call from another master station or remote site | When communicating with a door station |
|---|---|---|---|
| 1 | Lit |
|
|
| 2 | Lit | The microphone is muted. When you receive a call from a master station or remote site, the caller and you are notified by a tone that you are in the PRIVACY MODE. When you press TALK or lift the handset to answer the call, the microphone is enabled. | |
| OFF | Off |
|
NOTE:
When "COMMUNICATION METHOD" is set to "PTT" (press-to-talk mode) in the "INITIAL SETTING", you do not have to activate the PRIVACY function.
PERFORMING CALLING, MONITORING AND PAGING ON THE MASTER STATION
The following describes how to operate the master station to perform calling, monitoring and paging.
- * If your network direct system includes a PC master station (IS-SOFT), refer to the "OPERATION MANUAL" for the PC master station (IS-SOFT) for details about operating it.
- * The term "a remote site" used in this manual means "a network direct system in a remote site".
- * To make a communication (or calling, paging, etc.) between your site and a standard (IP) system in a remote site, also refer to the "OPERATION MANUAL" for the standard (IP) system.
Searching for a station, zone or remote site
Read this section before you perform calling, monitoring or paging for the first time to learn how to search for stations, zones or remote sites. The search can be performed in the following search methods by using the search items, dial keys or speed dial buttons to suit your needs.
Searching for a station, zone or remote site from the list ( P. 29)
Search items: A, B, C, D, E (E is for a remote site.)
Searching for a station or zone by number using the dial keys ( P. 31)
Searching for a station, zone or remote site from the placed call or received call list ( P. 32)
Search items: F , G
Selecting a station, zone or remote site by using the speed dial buttons ( P. 32)
Speed dial buttons
■ Basic procedure for selecting the search items
The search items A – G can be selected from the standby mode or the SEARCH LIST.
- * The items and can be selected from both the standby mode and the SEARCH LIST.
- * A remote site can be selected by using the search item E , F , G , or the speeds dial buttons.
[In the standby mode]
Press the corresponding button on to select the target search item A , B , F or G by following the key map.
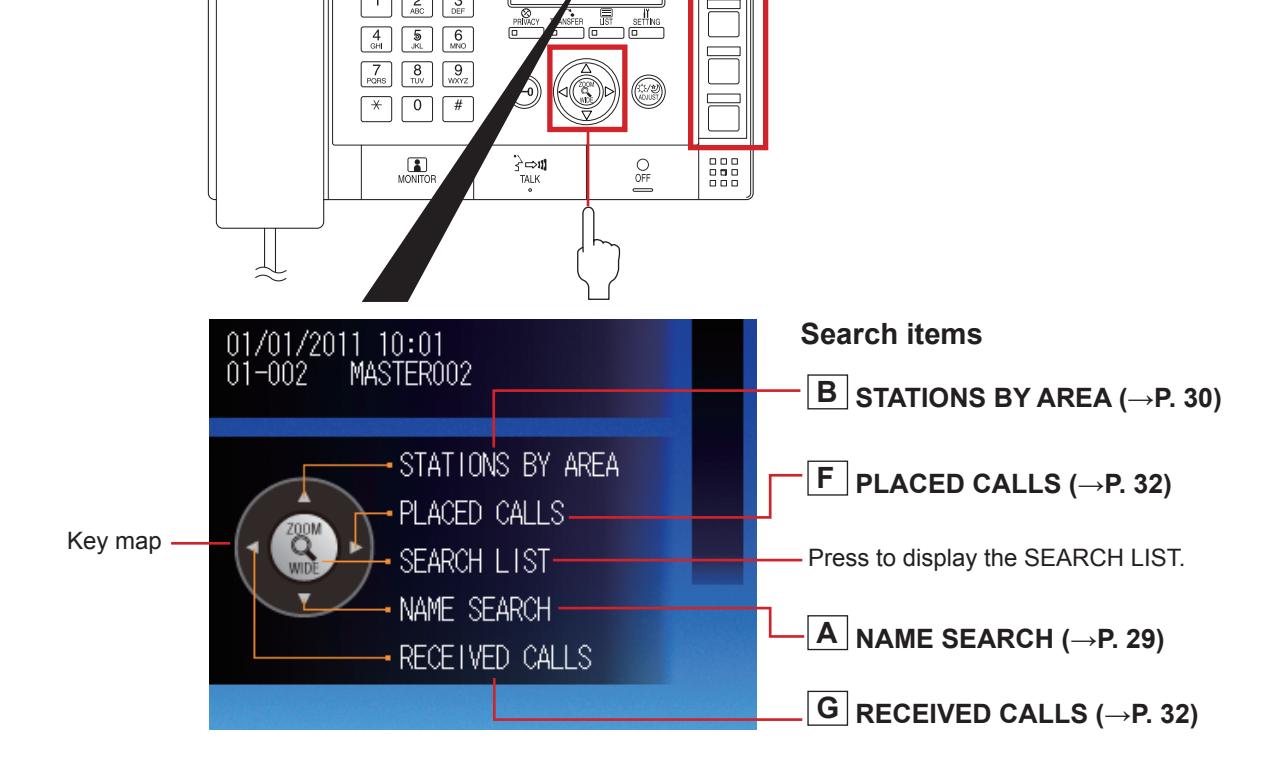
[In the SEARCH LIST]
-
1
Press LIST or ZOOM/WIDE in the standby mode.
- The search items are shown in the SEARCH LIST.
- 2 Press repeatedly to select the target search item A to E (so that it is highlighted).
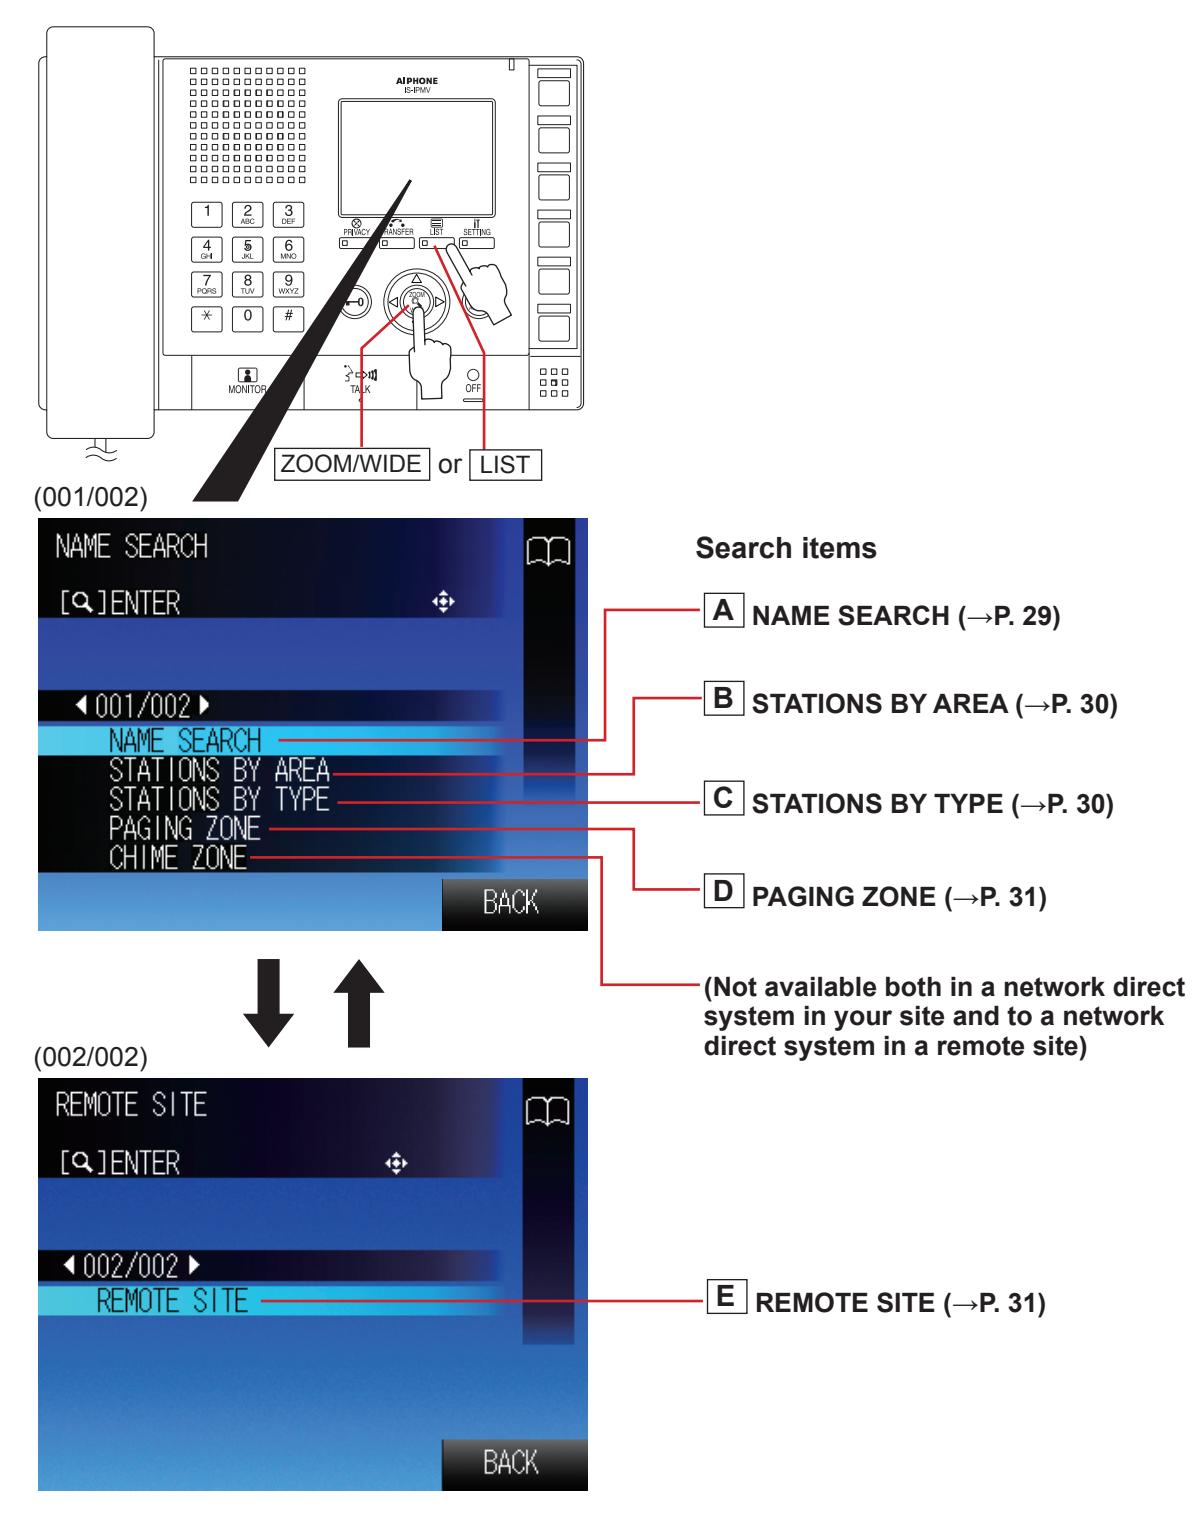
3 Press ZOOM/WIDE to decide on the selected one.
Searching for a station, zone or remote site from the list
- A Searching for a station or zone in your site by entering the name [NAME SEARCH]
- 1 Select [NAME SEARCH] either in the standby mode (→P. 27) or the SEARCH LIST (→P. 28).
- 2 Enter a name by using the dial keys. (→P. 37)
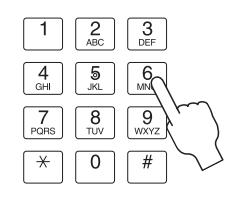
e.g.) When searching for "MASTER004"; Press the dial keys as follows.


The entered characters are displayed here.
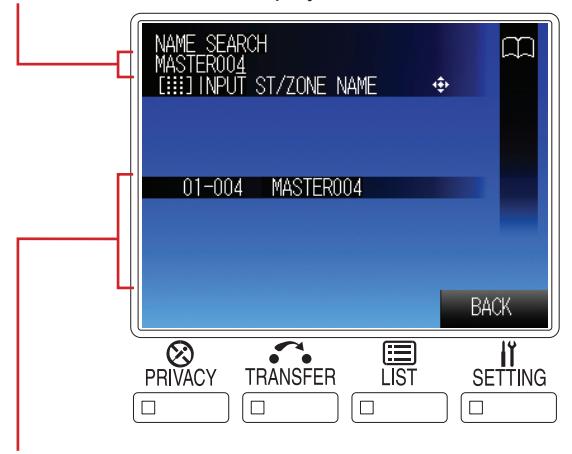
All the station and/or zone names that include the entered characters in your site are displayed in the list.
* The search is narrowed down whenever a character is added.
NOTE:

You can also select a station from the list by using you select [NAME SEARCH] in step 1.
To delete the just entered character:
Press 🔾 .
To enter the same characters or characters on the same dial key sequentially:
(e.g.: To enter "AB")
- 1. Enter "A". (Press the dial 2 key once.)
- 2. Press .
- 3. Enter "B". (Press the dial 2 key twice.)
-
Press to select the target station or zone (so that it is highlighted) from the list.
- You can select up to 5 stations and/or zones if [ADD/RMV] is displayed on the screen. (See below.)
- 4 Start calling (talking), monitoring or paging by following the procedure for the corresponding performance. (→P. 33-35)
To select two or more stations and/or zones from the list: (When ADD/RW (Add/Remove) is displayed on the screen)
1) Press LIST as ADD/RW with the target station or zone highlighted.
The station or zone is checked.
- * Press LIST as ADD/RMV again to clear the check.
- 2) Repeat step 1) to select more stations and/or zones.
- You can select up to 5 stations and/or zones. To select 5 stations and/or zones, after checking 4 stations and/or zones, select the 5th one so that it is highlighted. (The 5th station or zone is not checked.)
- You cannot select two or more remote sites.
B Searching for a station in your site by designating an area [STATIONS BY AREA]
- 1 Select [STATIONS BY AREA] either in the standby mode (→P. 27) or the SEARCH LIST. (→P. 28)
- Press to select the target area from the list (so that it is highlighted), and then press ZOOM/WIDE to select.
All the stations in the area are displayed in the list.
-
3 Press to select the target station (so that it is highlighted).
- * You can select up to 5 stations. (→P. 29)
- 4 Start calling (talking), monitoring or paging by following the procedure for the corresponding performance. (→P. 33-35)
- C Searching for a station in your site by designating a station type [STATIONS BY TYPE]
- 1 Select [STATIONS BY TYPE] from the SEARCH LIST. (→P. 28)
All the station types are displayed in the list.
Press to select the target station type from the list (so that it is highlighted), and then press ZOOM/WIDE to select.
All the stations of the selected type are displayed in the list.
-
3 Press to select the target station (so that it is highlighted).
- * You can select up to 5 stations. (→P. 29)
- 4 Start calling (talking), monitoring or paging by following the procedure for the corresponding performance. (→P. 33-35)
D Searching for a paging zone in your site from the list [PAGING ZONE]
1 Select [PAGING ZONE] from the SEARCH LIST. (→P. 28)
All the registered paging zones are displayed in the list.
-
2 Press to select the target zone (so that it is highlighted).
- * You can select up to 5 zones. (→P. 29)
- 3 Start paging by following the procedure for paging. (→P. 35)
E Searching for a remote site as the target of calling or paging from the list [REMOTE SITE]
1 Select [REMOTE SITE] from the SEARCH LIST. (→P. 28)
All the registered remote sites are displayed in the list.
-
2 Press to select the target site (so that it is highlighted).
- * After this step, you can call the target site with the "Normal" priority by pressing TALK. For other calling operations such as selecting the priority, refer to P. 33.
- 3 After pressing ZOOM/WIDE, select the performance you want to do from [CALL] and [PAGING] from the list (so that it is highlighted).
- 4 Start calling or paging by following the procedure for the corresponding performance. (→P. 33, 35)
NOTES:
- Before you perform calling or paging to a remote site, confirm what unit(s) in the site will receive and/or respond to your performance.
- You cannot select two or more remote sites.
Searching for a station or zone by number using the dial keys
1 Enter the number of the station or zone in your site you want to search for by using the dial keys in the standby mode.
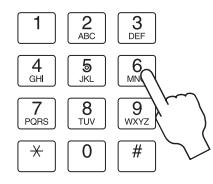
The entered numbers are displayed, and all the stations and/or zones that include the entered number are displayed in the list.
- * The search is narrowed down whenever a figure is added.
-
2 Press to select the target station and/or zone (so that it is highlighted).
- * You can select up to 5 stations and/or zones. (→P. 29)
- 3 Start calling (talking), monitoring or paging by following the procedure for the corresponding performance. (→P. 33-35)
Searching for a station, zone or remote site from the placed call or received call list
You can search for a station, zone or remote site from the most recent 20 items of the call and/or paging record or reception record.
* The items are displayed in the list in chronological order.
F Searching for a station, zone or remote site from the call and/or paging record list [PLACED CALLS]
1 Press to select [PLACED CALLS] in the standby mode. (→P. 27)
Up to 20 items (target stations, zones or remote sites) of the most recent call and/or paging you performed are displayed in the list.
- 2 Press to select the target station, zone or remote site (so that it is highlighted).
- Start calling (talking), monitoring or paging by 3 following the procedure for the corresponding performance. (→P. 33-35)
G Searching for a station or remote site from the reception record list [RECEIVED CALLS]
1 Press to select [RECEIVED CALLS] in the standby mode. (→P. 27)
Up to 20 items (stations or remote sites) of the most recent call and/or paging you received are displayed in the list.
- 2 Press to select the target station or remote site (so that it is highlighted).
- Start calling (talking) or monitoring by following the 3 procedure for the corresponding performance. (→P. 33, 34)
Selecting a station, zone or remote site by using the speed dial buttons
Select a station, zone or remote site registered to one of the speed dials (1 to 6) simply by pressing the corresponding speed dial button.
Press the speed dial button to which the target 1 station, zone or remote site is registered (highlighted).
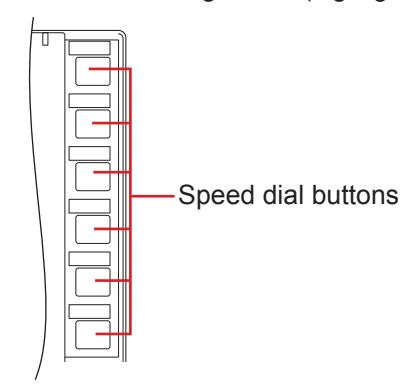
Start calling (talking), monitoring or paging by 2 following the procedure for the corresponding performance. (→P. 33-35)
Calling another station (direct voice call)
Follow the steps below to call a desired door station or master station in your site, or a remote site.
Search for and select the station or remote site you want to call (so that it is highlighted) in one of the search methods.
(→P. 27-32)
If you call (the pilot station in) a remote site by searching for it from [REMOTE SITE] of SEARCH LIST, select the target site, and then select [CALL] (so that it is highlighted). ( P. 31)
Refer to the on-screen instructions:
Be sure to make operations by checking the information on the upper part of the monitor. The next operations you can perform are displayed.
e.g.)
[分制] TALK ... You can start talking by pressing TALK or lifting the handset.
* If you will not set the priority, it is set to "Normal".
[ ] MONI ... You can start monitoring by pressing MONITOR .
[Q] PR (or PRIORITY)
...... You can proceed to the priority setting mode by pressing ZOOM/WIDE.
-
7
To set the priority, press
ZOOM/WIDE
, and then to select the target priority (so that it is highlighted).
- * If you will not set the priority, skip this step and press TALK or lift the handset. You can start calling (talking).
3 Press TALK or ZOOM/WIDE or lift the handset to start calling (talking).
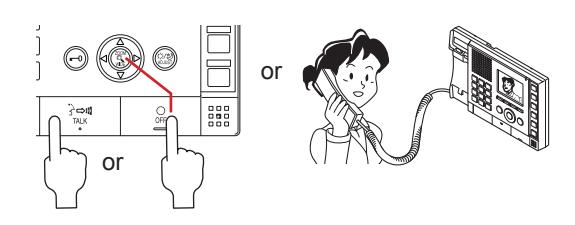
When a tone rings, your voice is heard at the target station and you can also hear sounds at the target station. (Direct voice call)
The receiver can answer the call without pressing any button or lifting the handset. (Talk back)
* If the target station is a master station, the response of it differs from the PRIVACY MODE setting on the target station. (See the table below.)
| PRIVACY MODE setting on the target master station | Response |
|---|---|
| OFF | Your voice is heard at the target station and you can also hear sounds at the target station. |
| 1 | Communication is enabled when the receiver presses TALK or lifts the handset. Otherwise you can hear no sound from the target station. |
| 2 | When the target station receives your call, a tone notifies you that the target station is in the (PRIVACY MODE) 2. Communication is enabled when the receiver presses TALK or lifts the handset. Otherwise you can hear no sound from the target station. * You can adjust the volume of call tone from [RECEIVE VOL] by pressing SETTING]. |
Press OFF or hang up the handset to finish communicating.
Monitoring
You can monitor a door station or multiple door stations in your site sequentially (scan-monitoring) with a master station.
When monitoring, you can view the image at the station and hear the sound.
■ Monitoring
NOTE:
Search for and select the door station in your site that 1 you want to monitor (so that it is highlighted) in one of the search methods. (→P. 27-32)
You cannot monitor a master station and remote site.
- 2 Press MONITOR (when "[ ] MONI" is displayed).
- 3 Press OFF to fi nish monitoring.
NOTES:
- If the selected station is being used (calling, communicating, being monitored, etc.), you cannot monitor the station.
- If you press TALK or lift the handset while monitoring, the communication mode starts with the station after a tone.
- During video monitoring, you can switch Zoom/Wide, make Pan & Tilt control and adjust images on the monitor. (→P. 23-24)
To shift to scan-monitoring
Press MONITOR during monitoring.
- * If the station being monitored is a preset one for scanmonitoring, the scan-monitoring starts from the subsequent station in the scan-monitoring order.
- * If the station being monitored is not a preset one for scanmonitoring, the scan-monitoring starts from the fi rst station in the scan-monitoring order.
■ Scan-monitoring
You can monitor the preset stations in your site (up to 20 door stations) sequentially, each for the set duration.
- * The stations should be preset in the System setting on a PC.
-
1
Press MONITOR in the standby mode. The stations set for scan-monitoring are monitored sequentially, each for the set duration.
- * If the scan-monitoring lasts 10 minutes, the backlight of the master station monitor will be turned off. Pressing any key will turn on the backlight again.
- * If the scan-monitoring target station is only one, the scanmonitoring ends after a lapse of approx. 11 minutes.
- 2 Press OFF to stop scan-monitoring.
To monitor only the desired station continuously:
Press MONITOR when the target station is being monitored during scan-monitoring.
* Press MONITOR again to restart the scan-monitoring.
NOTES:
- Pressing TALK is invalid during scan-monitoring.
- If the handset is lifted during scan-monitoring, the scan-monitoring is continued and sounds at the target station can be heard from the handset, and when the handset is hung up or OFF is pressed, the scan-monitoring ends.
- If the master station receives a call during scan-monitoring, the scan-monitoring ends automatically.
- If one of the preset stations is being used (calling, communicating, being monitored, etc.) during the scan-monitoring, it will be skipped.
- During the scan-monitoring, the Zoom/Wide, Pan & Tilt, door release and image adjusting functions are disabled. (The camera is fi xed in the Wide mode.)
Viewing video images at the target station
When you are receiving a call from, communicating with a door station, or monitoring a door station in your site, you can view video images at the target station.
Use the following functions on the master station to control video images as you prefer. ( P. 23-24)
- · Switching Zoom/Wide
- · Pan & Tilt
- · Adjusting images
NOTE:
Video images cannot be controlled during scan-monitoring.
Paging
The system allows you to page (transmit an announcement) the selected zone(s) and/or station(s) simultaneously.
For paging a remote site, you can page the zone registered as the target in the site.
NOTE:
If you use zones, register zones in the System setting on a PC in advance.
-
1 Search for and select the zone or remote site you want to page (so that it is highlighted) in one of the search methods. (→P. 27-32)
- You can select up to 5 zones and/or stations in your site for paging. (→P. 29)
- * For paging a zone in a remote site, you cannot select a zone. If you page (the pilot zone in) a remote site by searching for it from [REMOTE SITE] of SEARCH LIST, select the target site, and then select [PAGING] (so that it is highlighted). (→P. 31)
-
2
To set the priority (when "[Q] PRIORITY" is displayed), press ZOOM/WIDE, and then press to select the target priority (so that it is highlighted).
- * If you will not set the priority, skip this step and press TALK or lift the handset. You can start paging after a tone.
- 3 Press TALK or ZOOM/WIDE, or lift the handset (when "[分] [久] PAGE" is displayed).
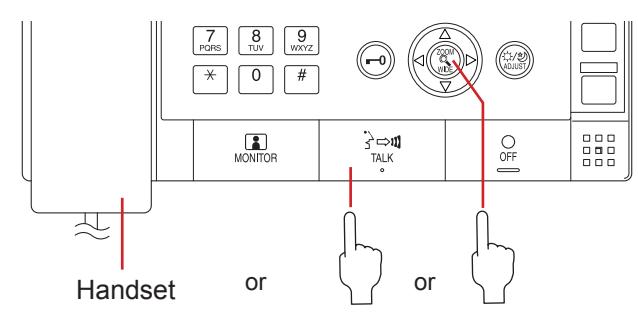
- ▲ After a tone rings, start paging.
-
A receiver can answer it and communicate with you by pressing TALK or lifting the handset.
- When the priority is set to "BROADCAST", no receiver can answer the paging. The paging will be heard in priority to any other performances (of lower priority) including ongoing communications between stations. (→P. 22)
- 6 When you have finished paging, press OFF or hang up the handset.
OTHER FUNCTIONS
Sending e-mails
You can send e-mails to the designated mail addresses in the following events.
- When calling
- When a error occurs among units
- When the system starts up
Each of these events that has occurred in the previous 60 seconds is summarized and sent in an e-mail.
* To use this function, you need to register mail addresses in the System settings on a PC in advance.
An example of e-mail contents
[Title]: System name
[Body]:
Call: Call <Priority>, <Station number>, <Station name>
Error: Error <Station number>, <Station name>
Start-up: System start <System name>
NOTES:
- The mail title and texts cannot be changed.
- When there is a door call at a door station, an e-mail will be sent with a snapshot (QVGA JPEG) at the station attached.
- An e-mail will not be sent for paging.
TECHNICAL PRECAUTIONS
· Cleaning:
Clean all the units with a soft cloth dampened with a neutral household cleanser. Do not use an abrasive cleaner or cloth.
Door stations are water resistant, however clean all the units with a soft cloth dampened with a neutral household cleanser. Do not use an abrasive cleaner or cloth.
• If you are experiencing difficulties in the use of the system, please check our web site at http://www.aiphone.net/.
AVAILABLE CHARACTER LIST
The following are the characters that can be entered with each of the dial keys on the master station for station or zone names and numbers.
Some characters are available with a key and they are switched whenever the key is pressed.
| Dial key | Characters and number that can be entered with a key | |||||||||
|---|---|---|---|---|---|---|---|---|---|---|
| , | Number | Characters | ||||||||
| 1 | 1 | - | ? | ! | ' | @ | _ | 1 | 1 | |
| 2 (ABC) | 2 | Α | В | С | 2 | |||||
| 3 (DEF) | 3 | D | Е | F | 3 | |||||
| 4 (GHI) | 4 | G | Н | I | 4 | |||||
| 5 (JKL) | 5 | J | K | L | 5 | |||||
| 6 (MNO) | 6 | М | N | 0 | 6 | |||||
| 7 (PQRS) | 7 | Р | Q | R | S | 7 | ||||
| 8 (TUV) | 8 | Т | U | V | 8 | |||||
| 9 (WXYZ) | 9 | W | Х | Υ | Z | 9 | ||||
| * | ||||||||||
| 0 | 0 | + | $ | % | & | ( | ) | ; | 0 | |
| # | ||||||||||
SPECIFICATIONS
Color monitor IP master station (IS-IPMV)
| Power source |
48V DC (PoE)
24V DC (supplied from the power supply unit) |
| Current consumption |
Max. 65mA (PoE)
Max. 130mA (when power supply unit is used) |
| Communication |
Handset: Simultaneous communication
(When press-to-talk (PTT) is not set) |
|
Hands-free: Auto-voice actuation
or Press-to-talk (PTT) |
|
| Ambient temperature | 0 - 40°C (+32°F - +104°F) |
| Monitor | 3.5 inch color LCD monitor |
| Call history |
Call record: 20
Reception record: 20 |
| Paging capacity |
Simultaneous paging to max. 5 zones and/or
stations |
| Mounting |
Desktop use (with or without desktop stand)
or wall-mount |
| Electrical box | 1 or 3-gang box* |
| Material | Flame resisting ABS resin |
| Color | Black |
| Weight | Approx. 820g (1.81 lbs.) |
*: 1- gang box…..For wiring only (Fix the unit to the wall directly) 3-gang box…..For wiring and fi xing the unit
IP vandal-resistant video door station (surfacemount) (IS-IPDV)
| Power source |
48V DC (PoE)
24V DC (supplied from the power supply unit) |
|---|---|
| Consumption |
Max. 85mA (PoE)
Max. 160mA (when power supply unit is used) |
| Communication | Open voice hands-free communication |
| Ambient temperature | -10 - 60°C (+14°F - +140°F) |
| Camera | 1/4-inch color CMOS |
| Minimum illumination | 5 Lux |
| Camera angle | Wide: Approx. 170° (horizontal) |
| Mounting | Surface-wall mount (directly to wall) |
| Material |
Front panel: Aluminum die-cast
Main unit: Flame resisting PC+ABS resin |
| Color | Front panel: Dull-gray silver |
| Weight | Approx. 540g (1.19 lbs.) |
| Remarks | Weather-resistant |
IP vandal-resistant video door station (fl ush-mount) (IS-IPDVF)
| Power source |
48V DC (PoE)
24V DC (supplied from the power supply unit) |
|---|---|
| Consumption |
Max. 85mA (PoE)
Max. 160mA (when power supply unit is used) |
| Communication | Open voice hands-free communication |
| Ambient temperature | -10 - 60° C (+14°F - +140°F) |
| Camera | 1/4-inch color CMOS |
| Minimum illumination | 5 Lux |
| Camera angle | Wide: Approx.170° (horizontal) |
| Mounting | Flush-mount |
| Electrical box | Not used (mounts on built-in back box.) |
| Material |
Front panel: Stainless steel
Main unit: Flame resisting PC+ABS resin |
| Color |
Front panel: Stainless steel, vertical hair-line
processed Back box: Black |
| Weight |
Approx. 860g (1.90 lbs.)
Back box: Approx. 600g (1.32 lbs.) |
| Remarks | Weather-resistant |
WARRANTY
Aiphone warrants its products to be free from defects of material and workmanship under normal use and service for a period of two years after delivery to the ultimate user and will repair free of charge or replace at no charge, should it become defective upon which examination shall disclose to be defective and under warranty. Aiphone reserves unto itself the sole right to make the final decision whether there is a defect in materials and/or workmanship; and whether or not the product is within the warranty. This warranty shall not apply to any Aiphone product which has been subject to misuse, neglect, accident, power surge, or to use in violation of instructions furnished, nor extended to units which have been repaired or altered outside of the factory. This warranty does not cover batteries or damage caused by batteries used in connection with the unit. This warranty covers bench repairs only, and any repairs must be made at the shop or place designated in writing by Aiphone. Aiphone will not be responsible for any costs incurred involving on site service calls. Aiphone will not provide compensation for any loss or damage incurred by the breakdown or malfunction of its products during use, or for any consequent inconvenience or losses that may result.
The object area of 🔀 is the EU.
FCC
This device complies with Part 15 of the FCC Rules. Operation is subject to the following two conditions: (1) this device may not cause harmful interference, and (2) this device must accept any interference received, including interference that may cause undesired operation.
This equipment has been tested and found to comply with the limits for a Class B digital device, pursuant to Part 15 of the FCC Rules. These limits are designed to provide reasonable protection against harmful interference in a residential installation. This equipment generates, uses, and can radiate radio frequency energy, and if not installed and used in accordance with the instructions, may cause harmful interference to radio communications. However, there is no guarantee that interference will not occur in a particular installation. If this equipment does cause harmful interference to radio or television reception, which can be determined by turning the equipment off and on, the user is encouraged to try to correct the interference by one or more of the following measures:
- · Reorient or relocate the receiving antenna
- Connect the equipment to an outlet on a circuit different from that to which the receiver is connected. Increase the separation between the equipment and receiver.
- Consult the dealer or an experienced radio/TV technician for help.