ASSA ABLOY ACCENTRA nexTouch Mortise Keypad Locks NTM610, NTM620, NTM630, NTM640 Installation_80-9086-0030-010
Open the original PDF document
View PDF

nex Touch ™ Keypad Access Sectional Mortise Lock Touchscreen and Push Button Installation and Programming Instructions

WARNING
This product can expose you to lead which is known to the state of California to cause cancer and birth defects or other reproductiveharm.For more information go to www.P65warnings.ca.gov.
08/2018
Retrofitting or modifying this product may impact fire rating, safety features and warranty. Consult with code specifications to ensure compliance with all codes and ratings.
Part of ASSA ABLOY 80-9086-0030-010 09-23
Determine Handing

The hand of a door is determined from the secure side of the door. The term "secure" means the side from which you unlock and enter.
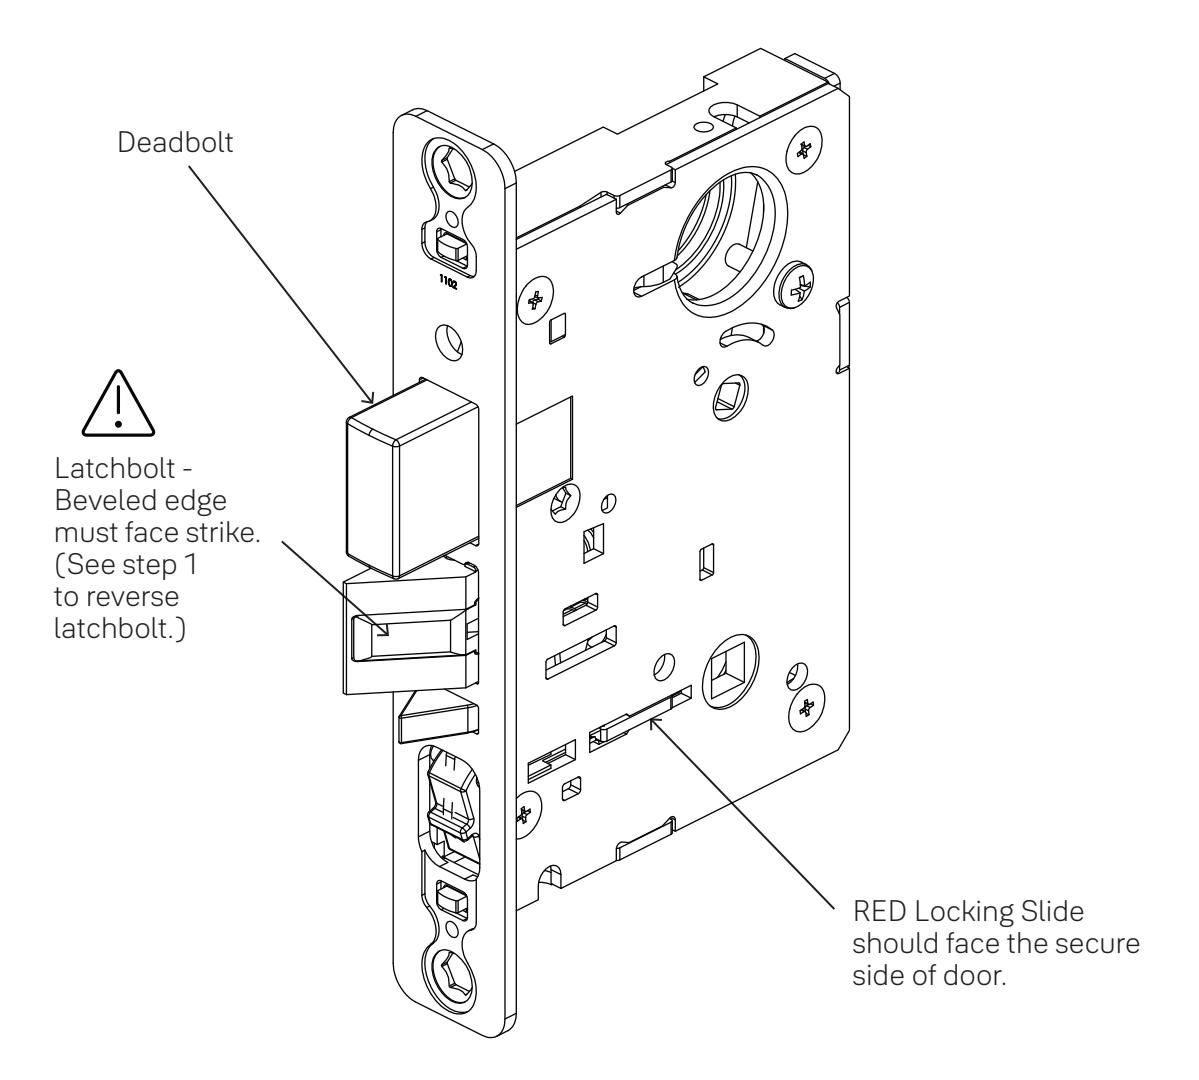
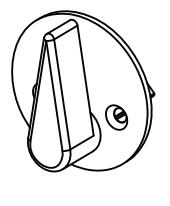
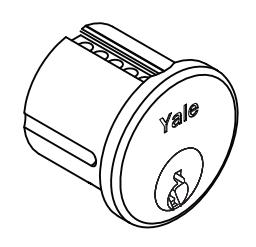
Key cylinder used for cylinder option installation. Thumbturn used when mortise lock is equipped with deadbolt.
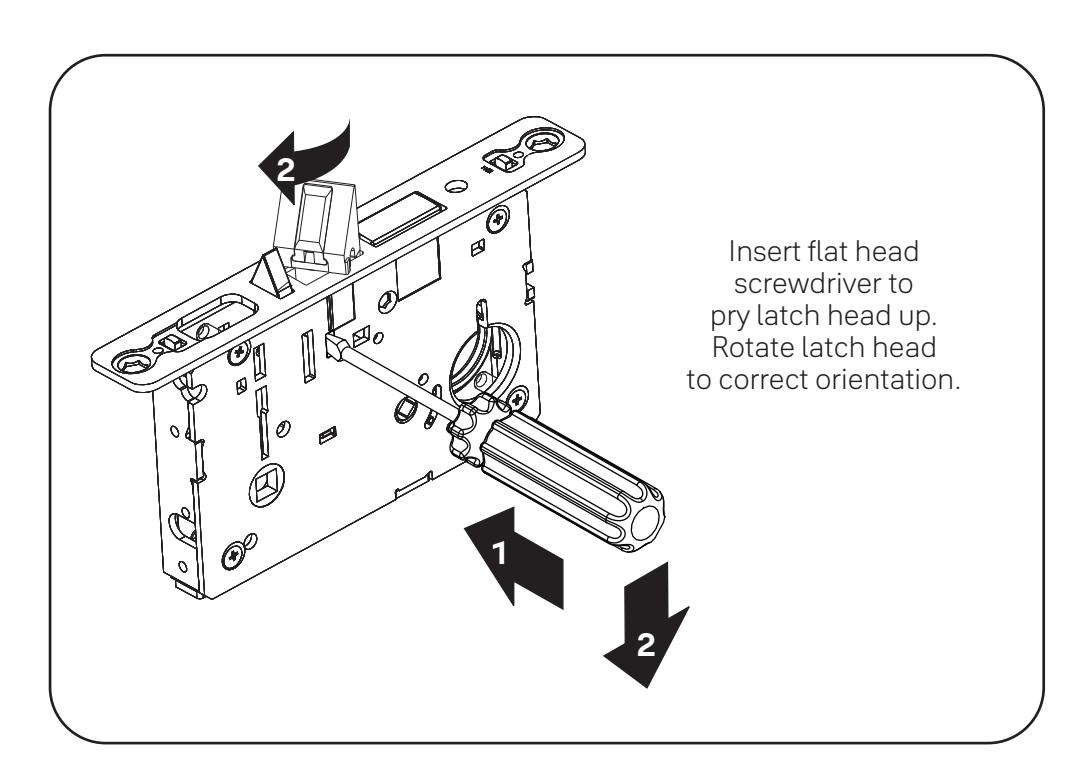
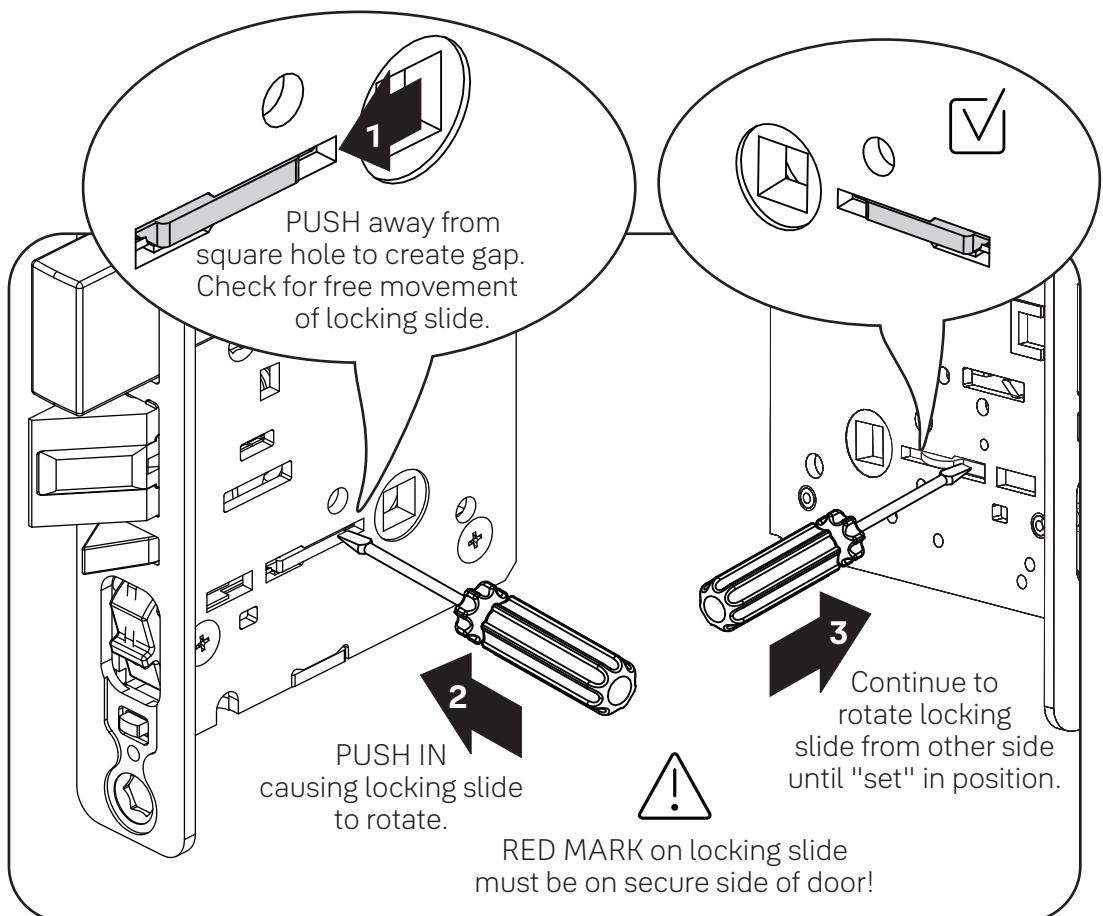
Hand Latchbolt & Hubs (If Necessary)
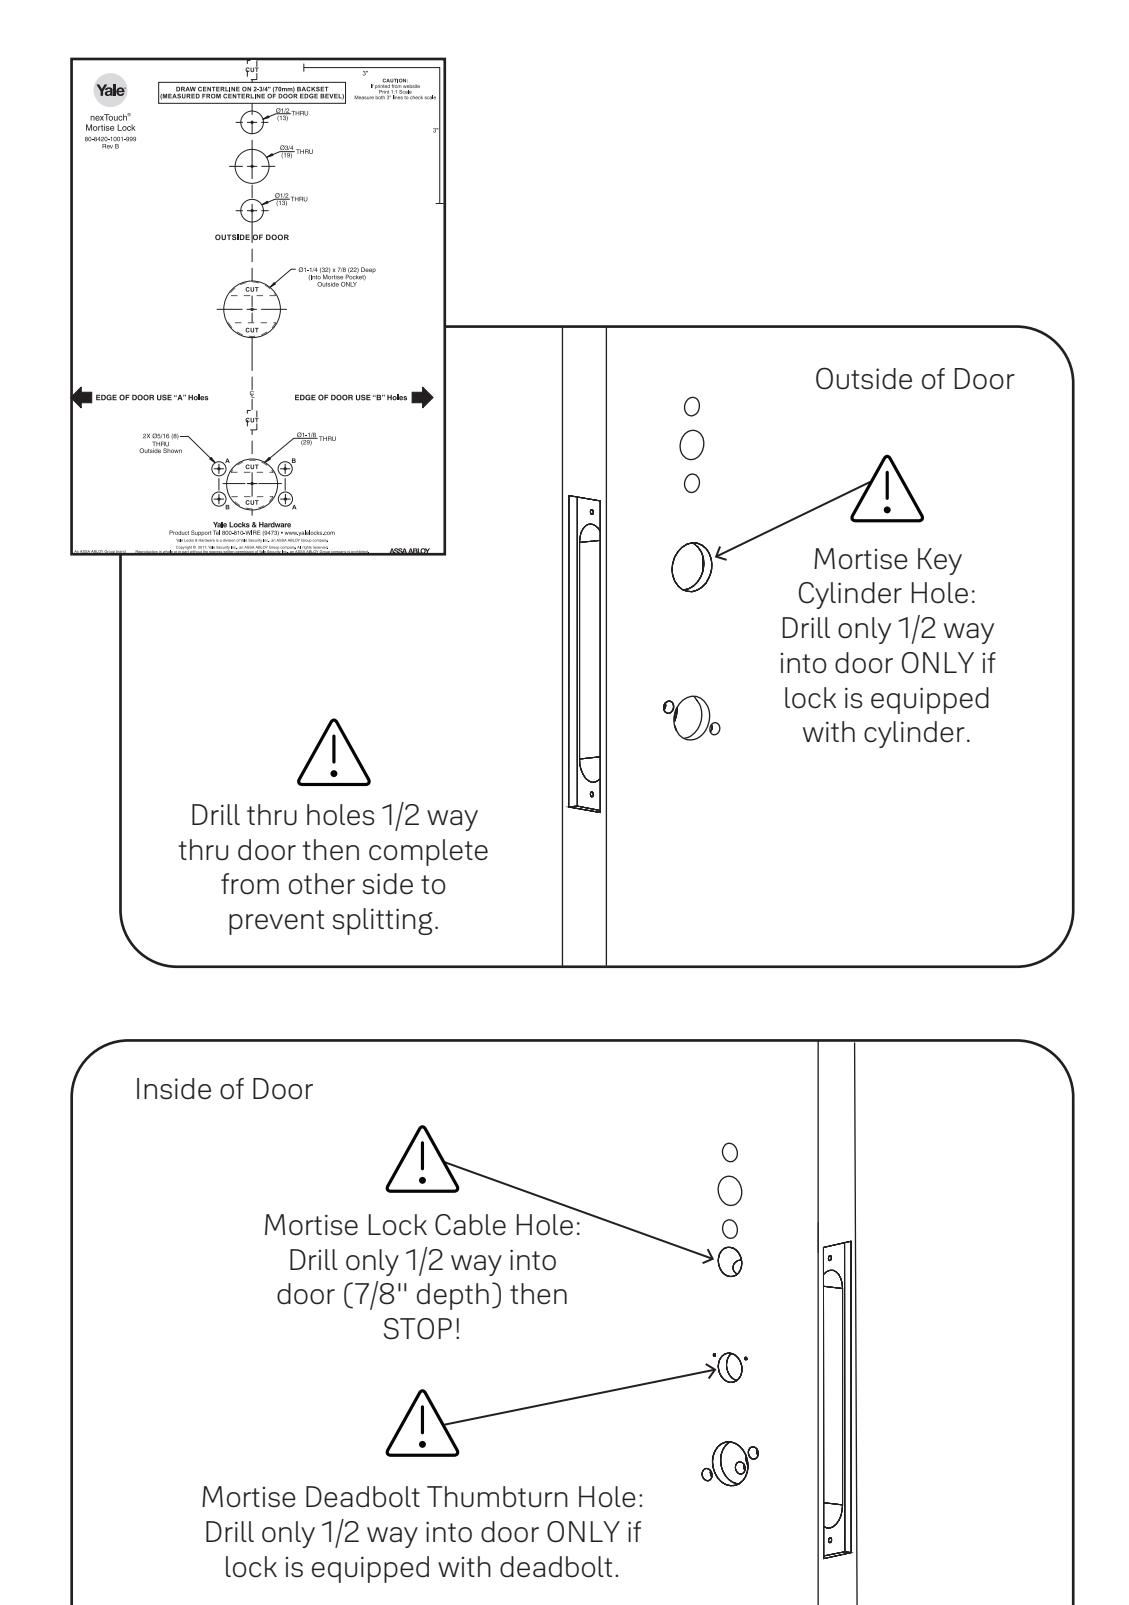
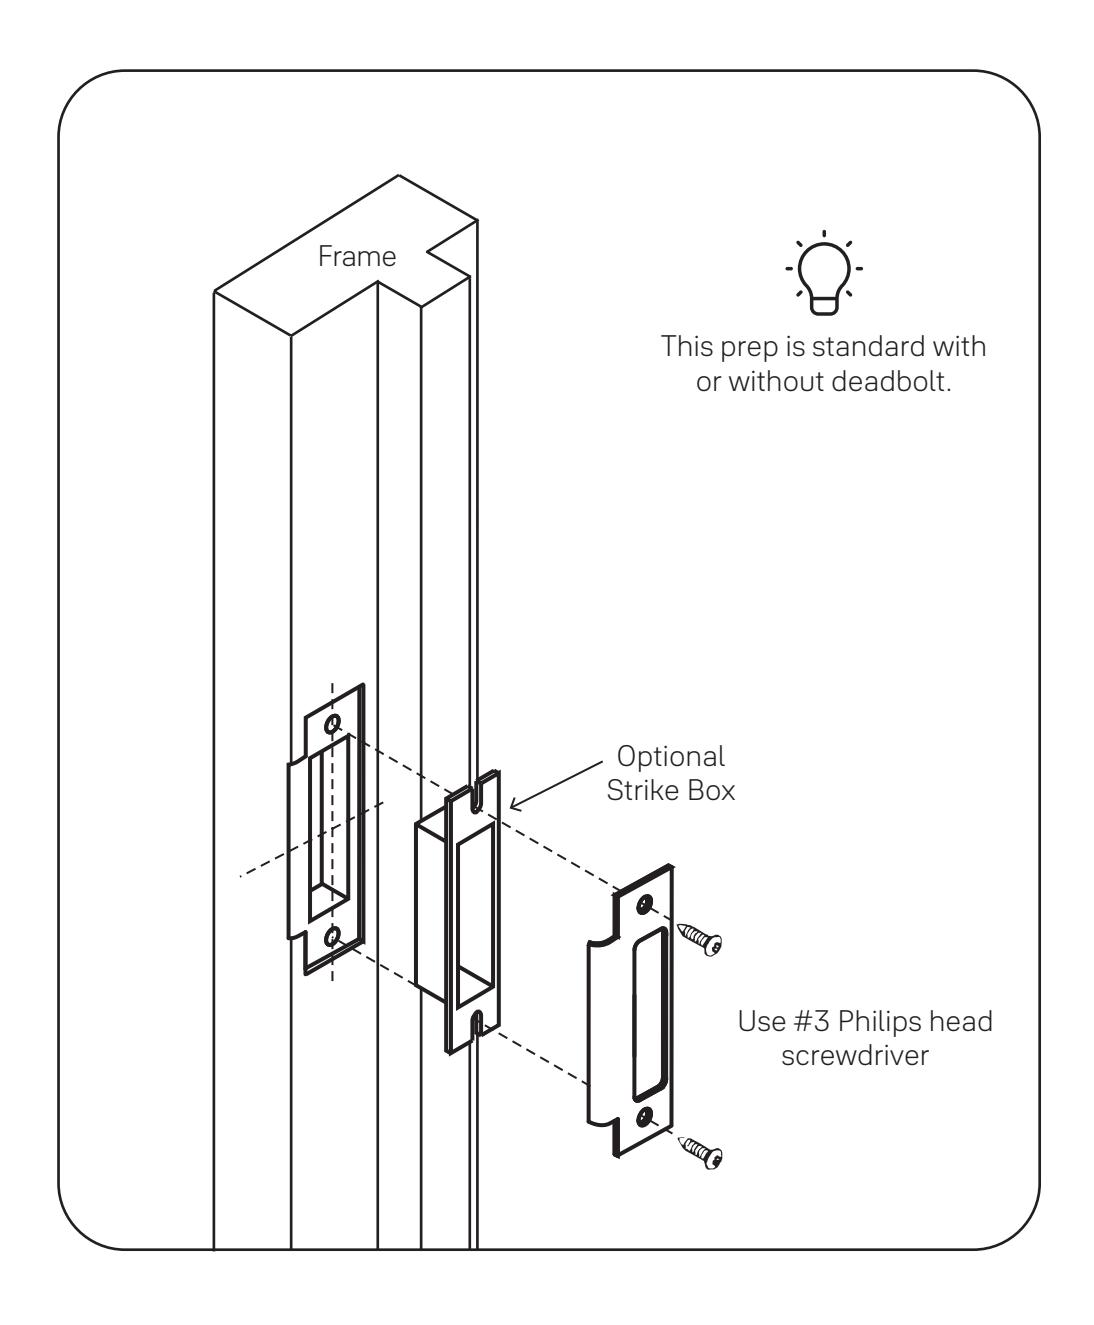
Prepare Frame & Install Strike

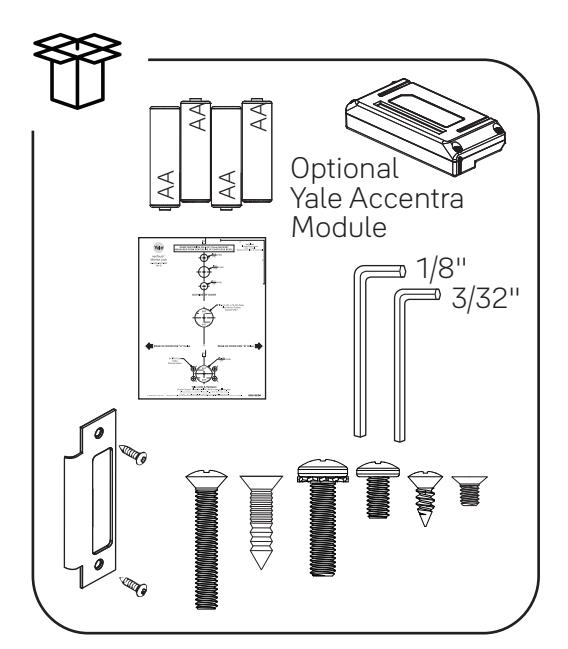
#12-24x1" Flat Head Combo Screw

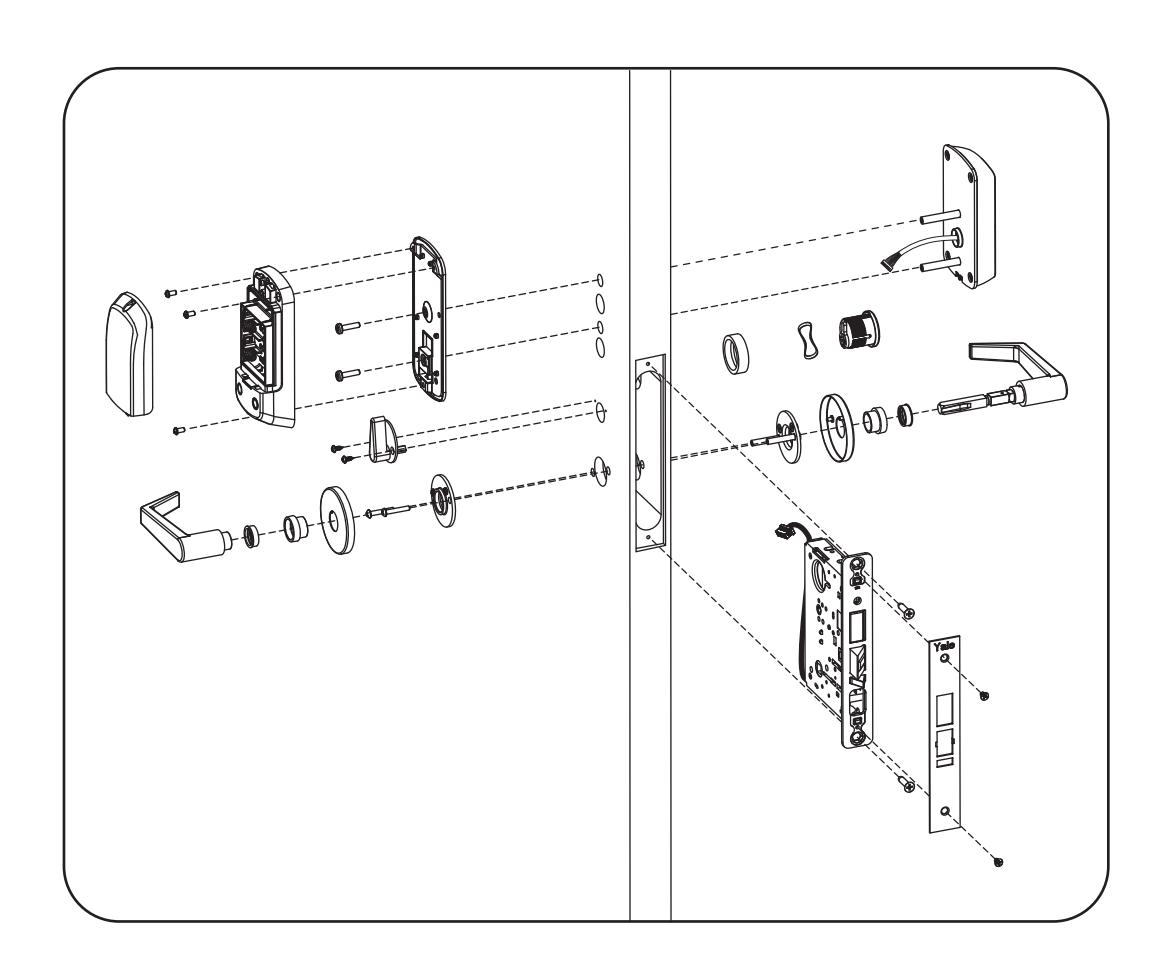
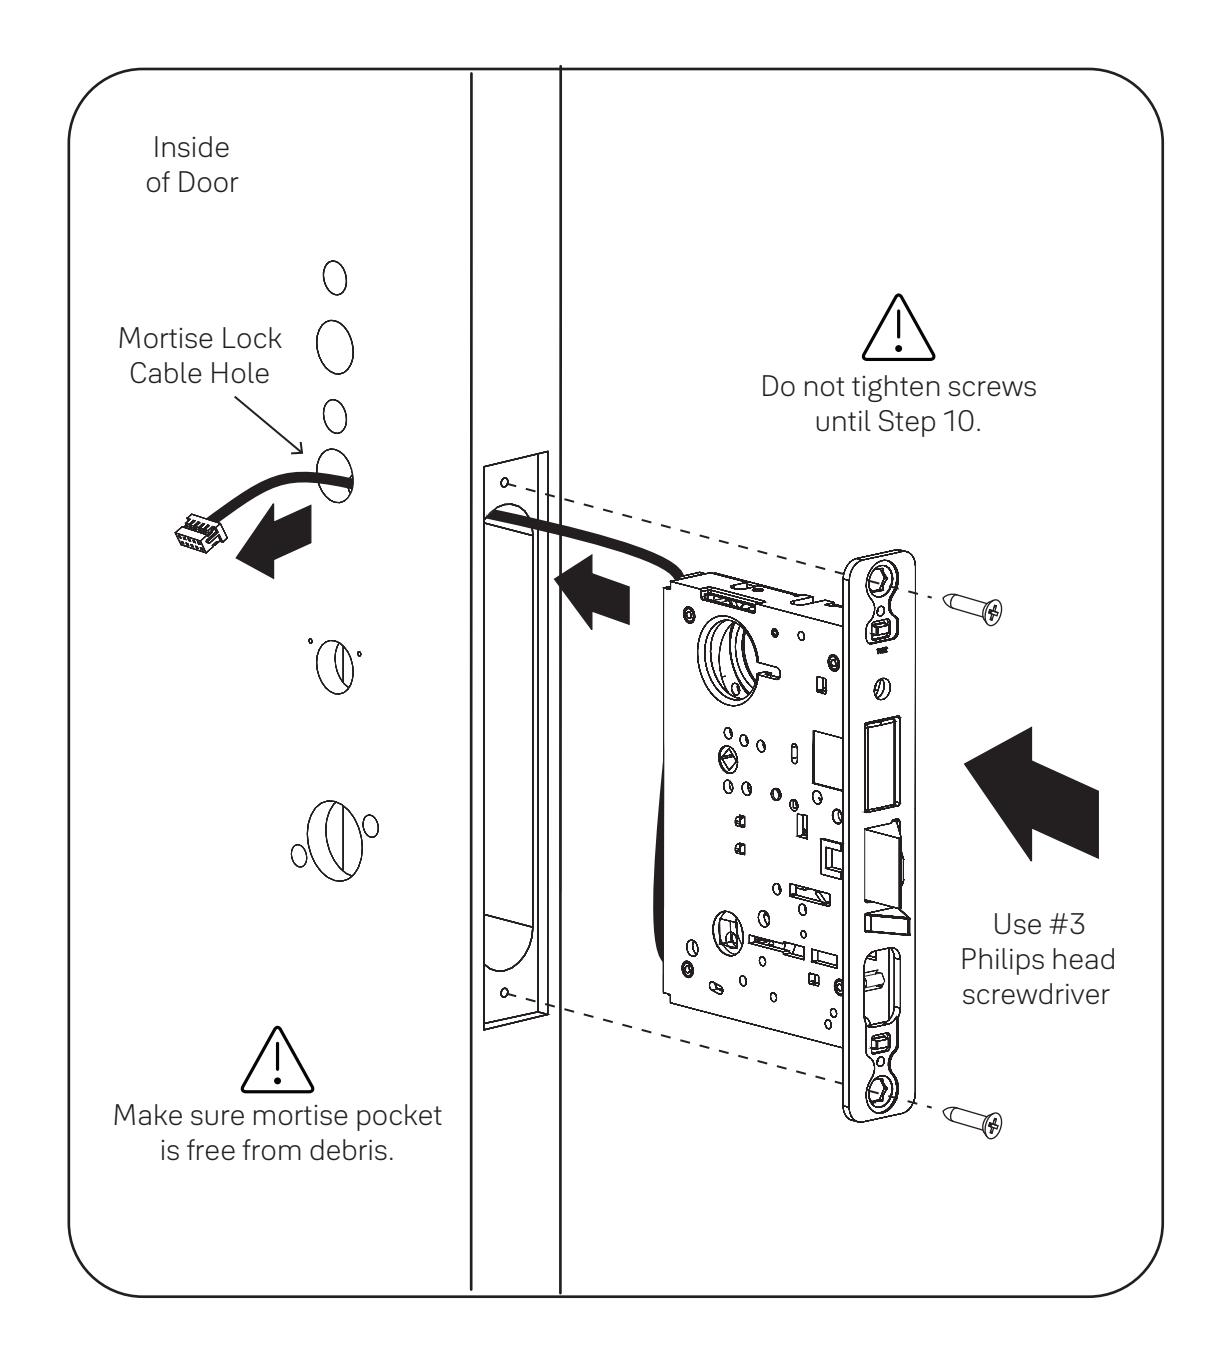
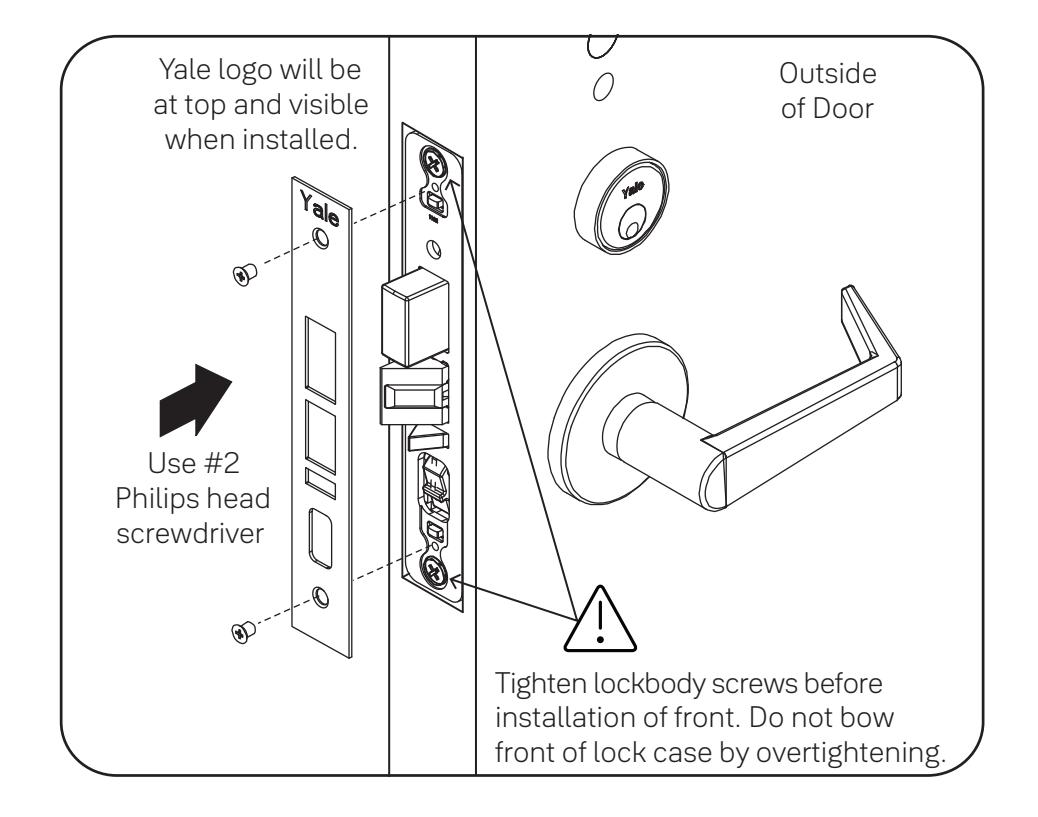
Install Mortise Lock

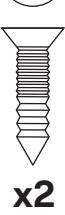
#12-24x1" Flat Head Combo Screw
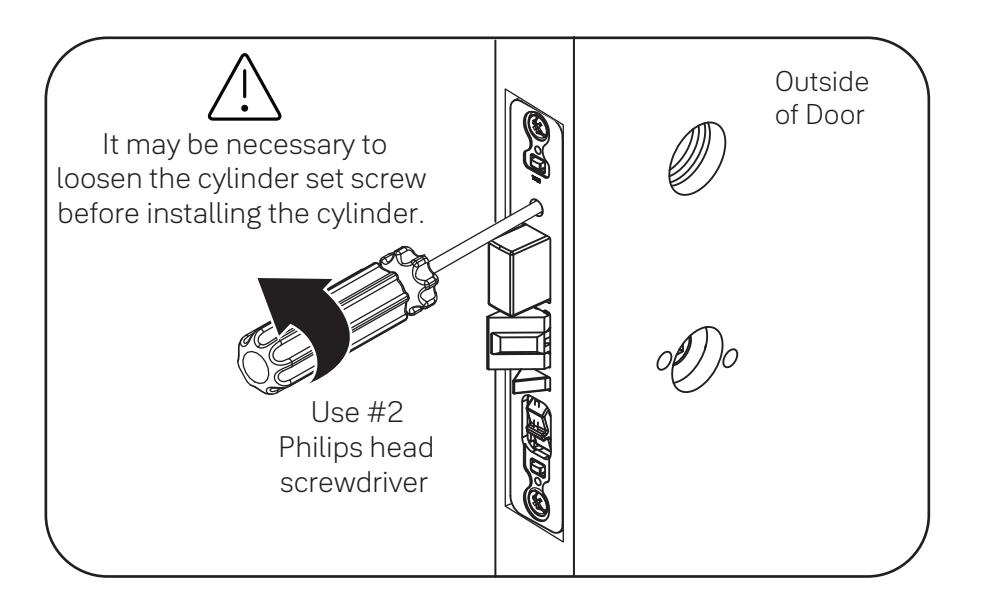
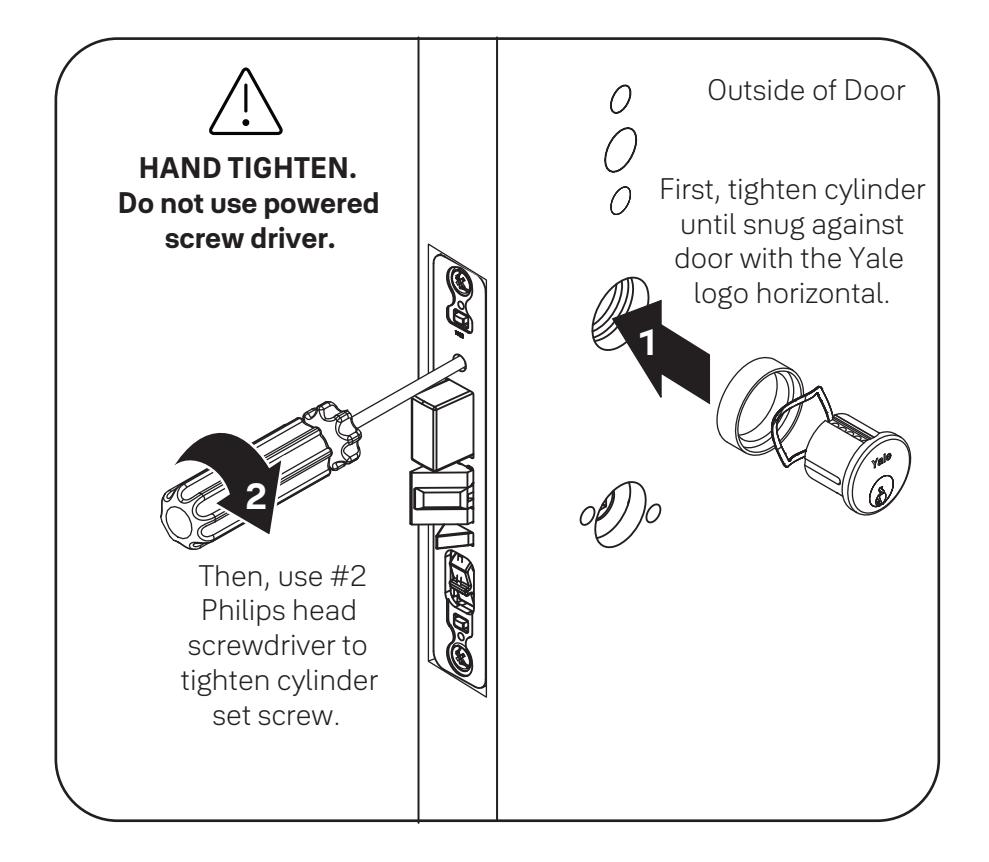
Install Key Cylinder (if applicable) For Cylinder Option ONLY

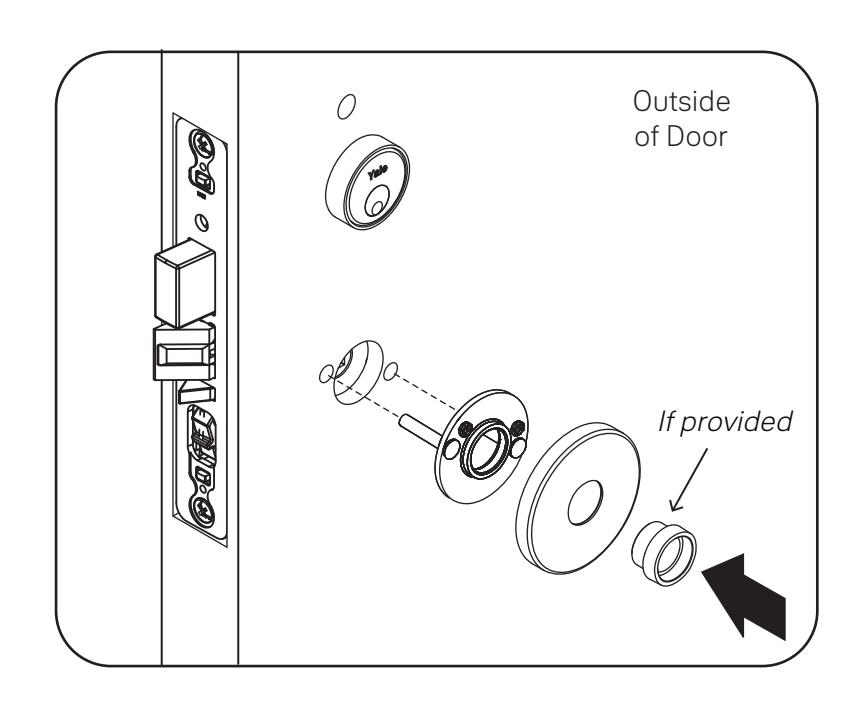
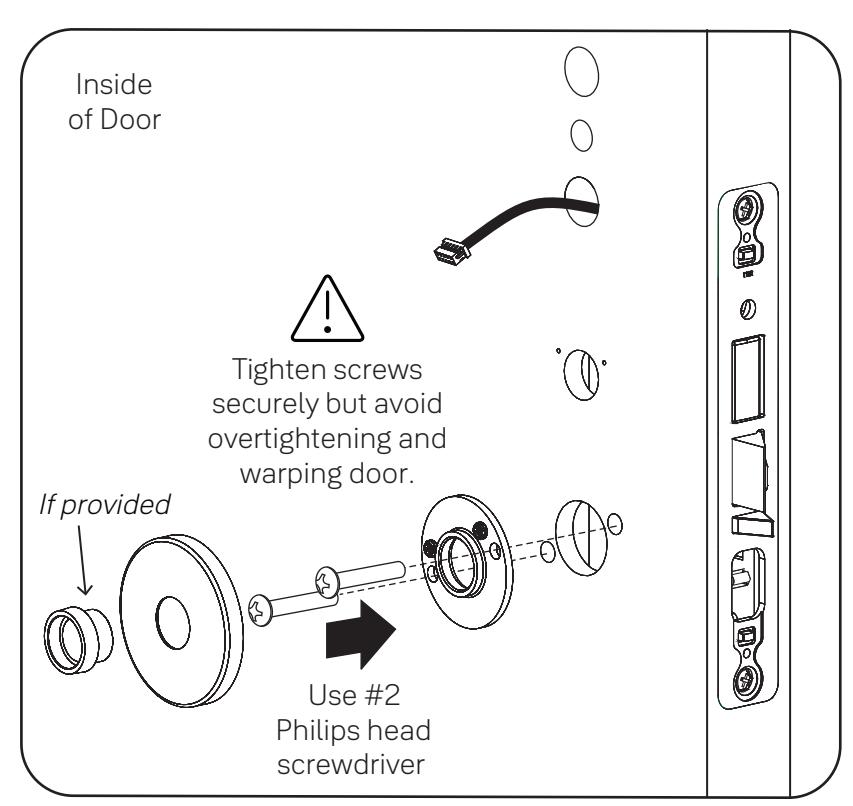
Install Rose Trim - all types

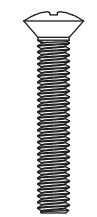
#8-32x1" Pan Head Screw with Thread Locker (For 1-3/4" Door)
x2
Adjusting for 1-3/4" to 2-1/4" Door (if necessary)

Use screw pack for thicker door at this step. Use appropriate fastener lengths to ensure proper installation.
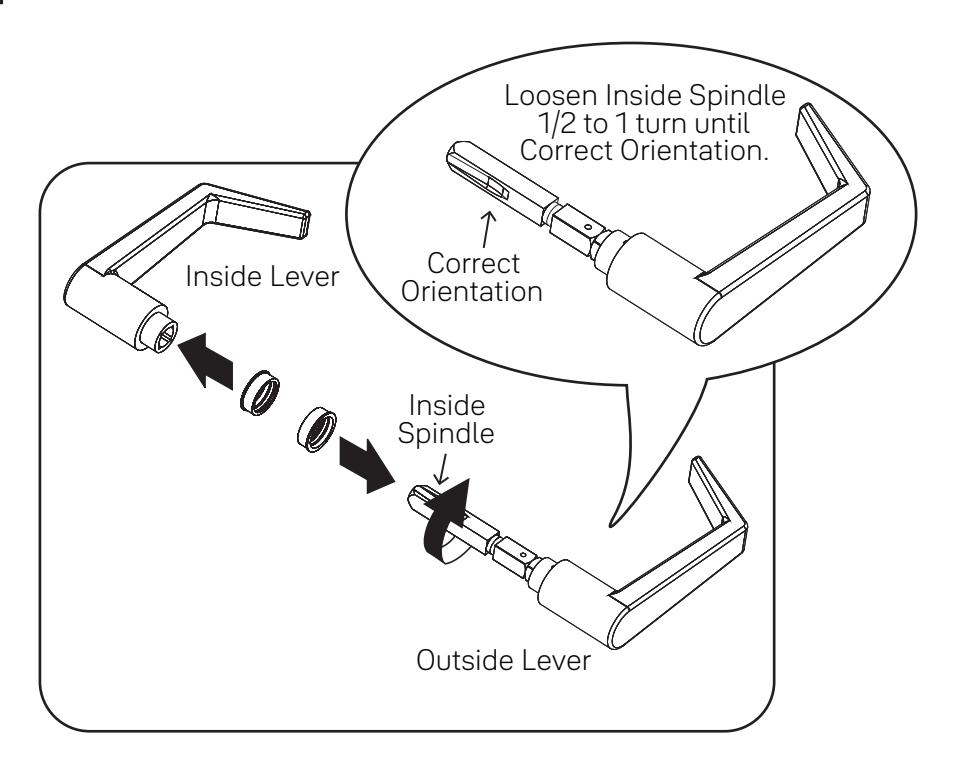
Prepare Levers
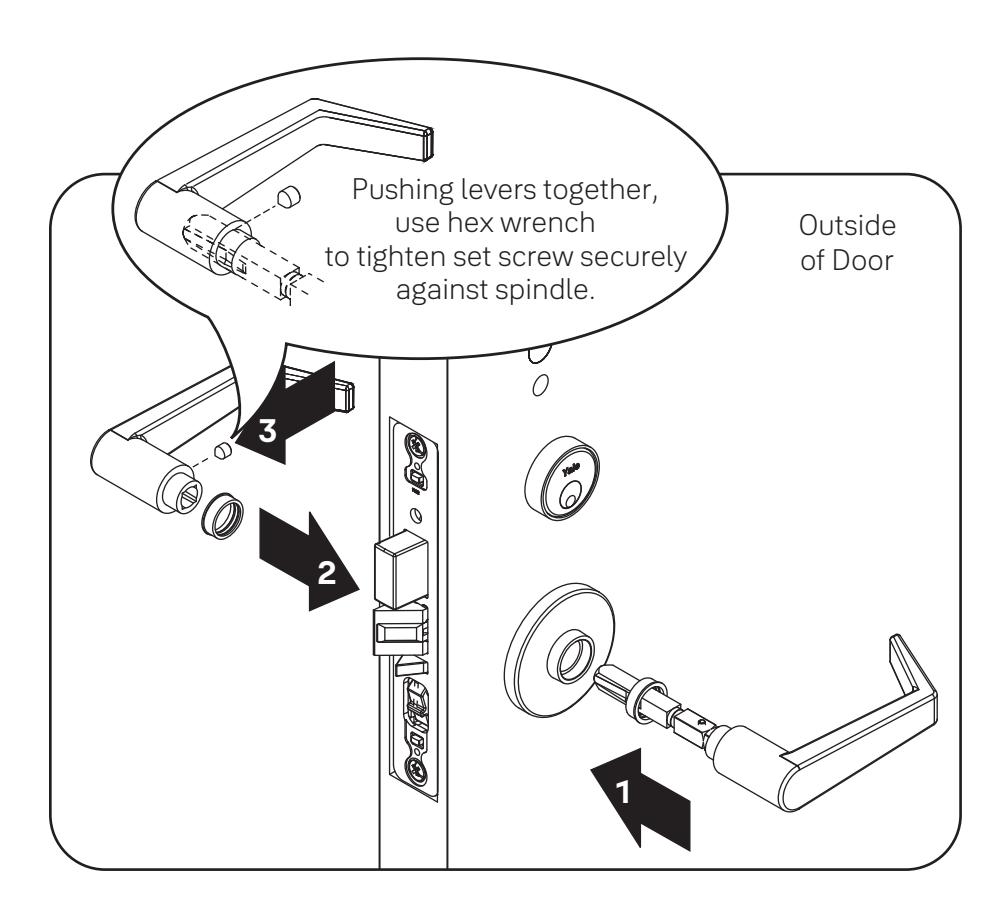
Install Levers
Install Thumbturn (if applicable) For Deadbolt Option ONLY

#6x3/8" Oval Head Screw


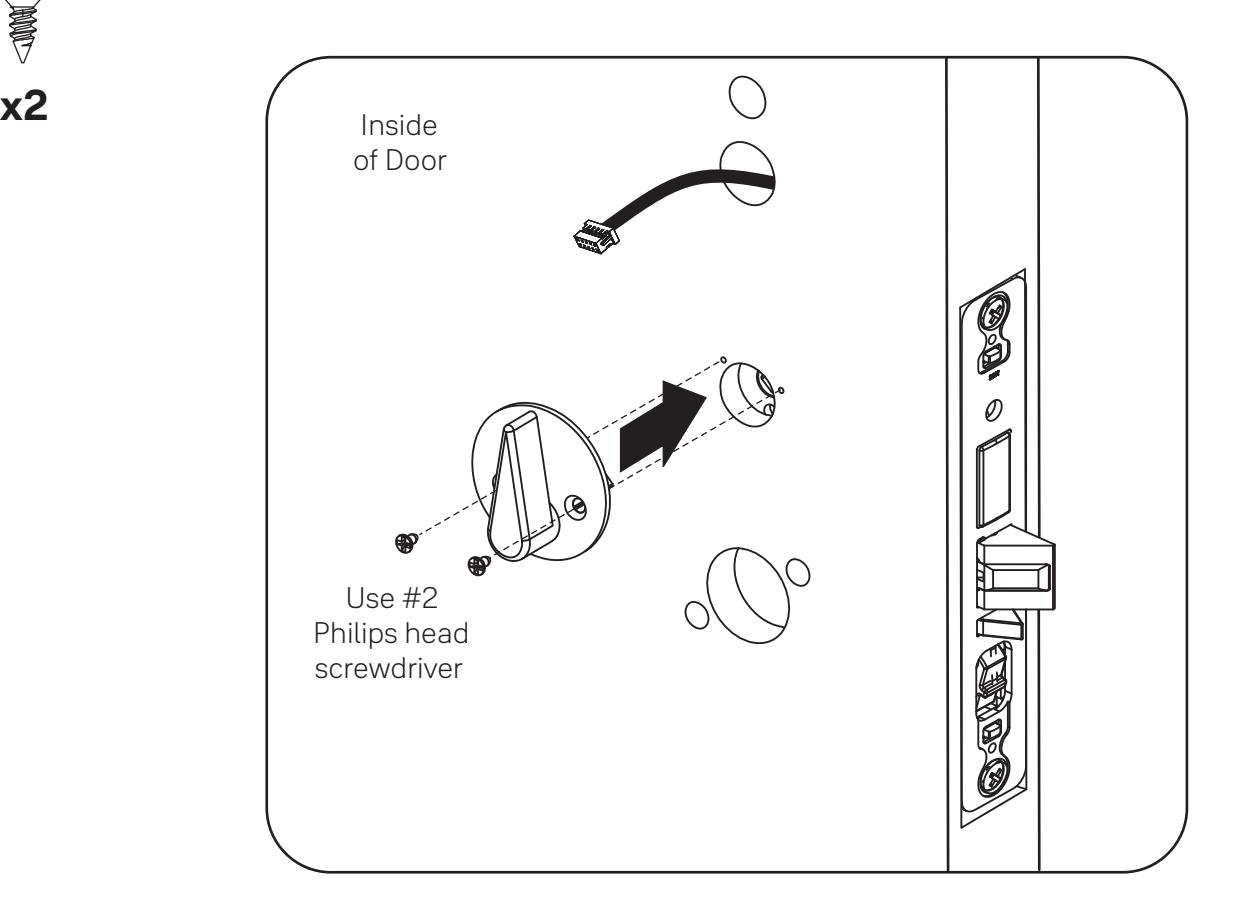
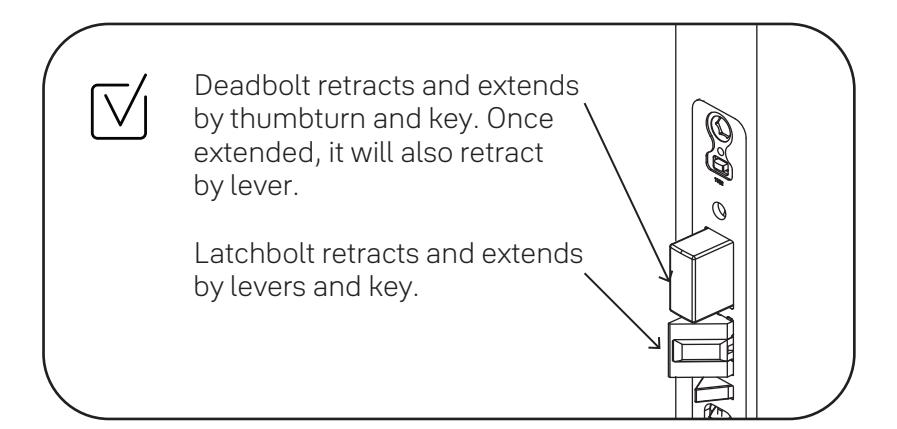
Test Operation


8x32-1/4" Flat Head Screw




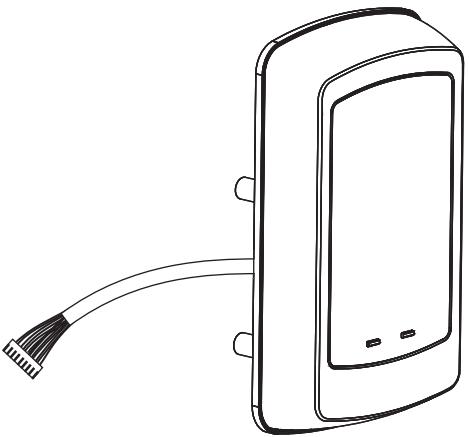
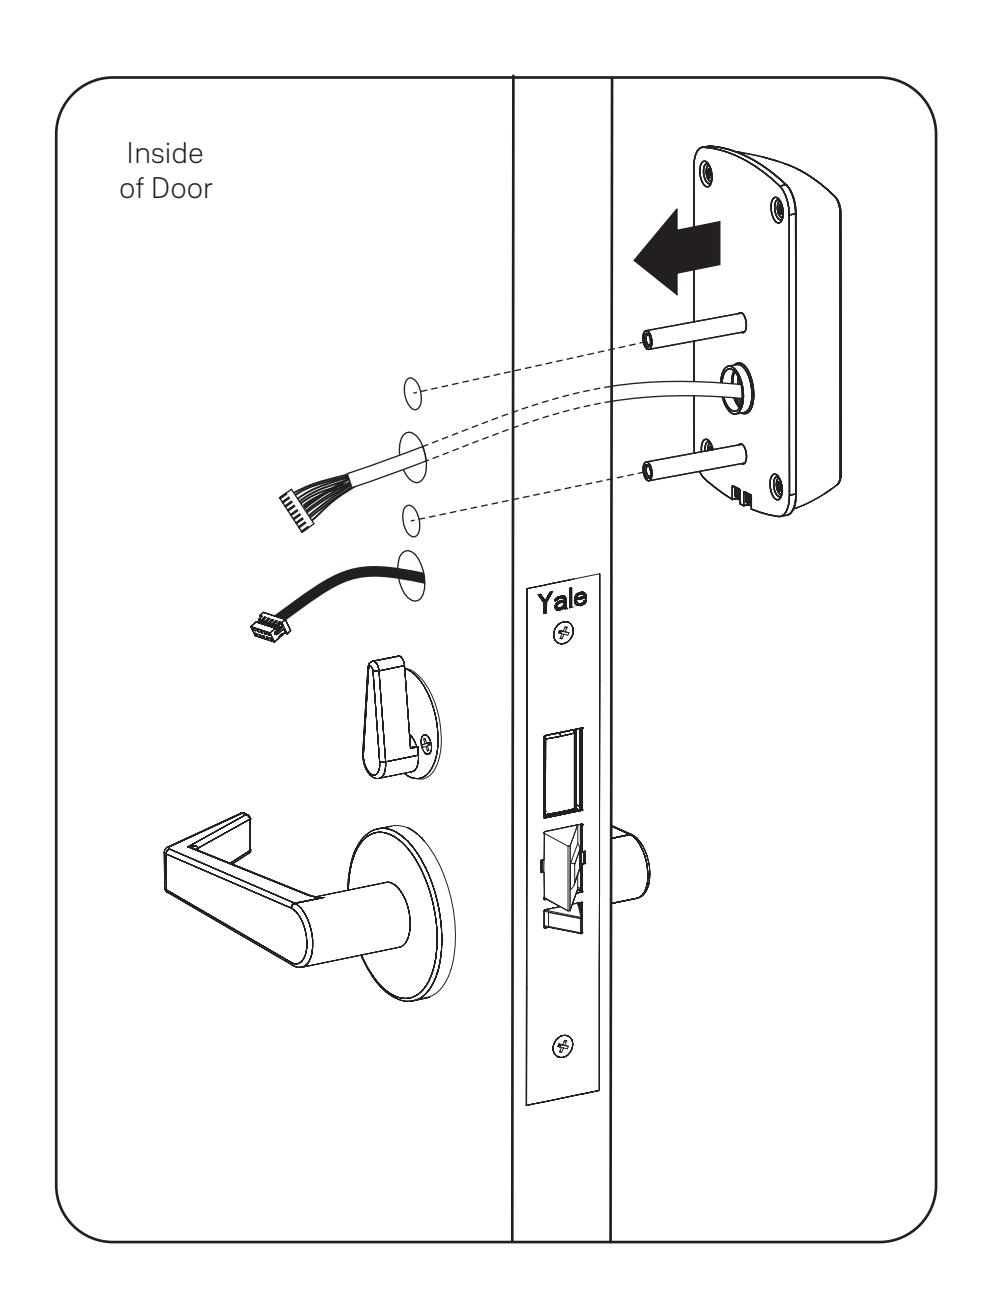
Install Inside Mounting Plate

#10-32x3/4" Pan Head Screw with Washer (For 1-3/4" Door)
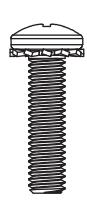


Choose fasteners appropriate for your door thickness.
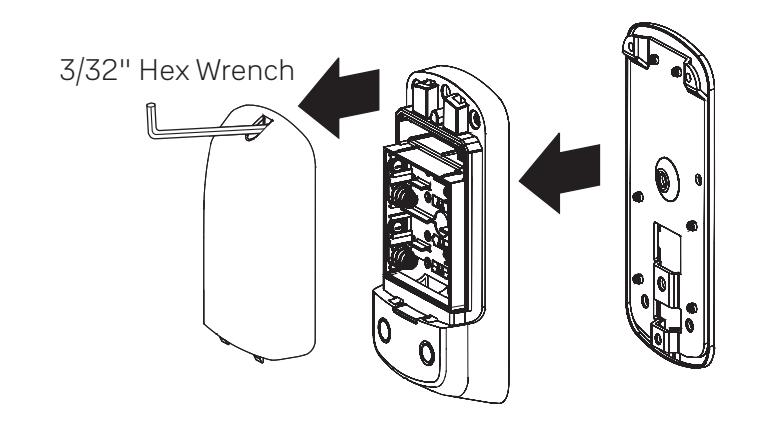
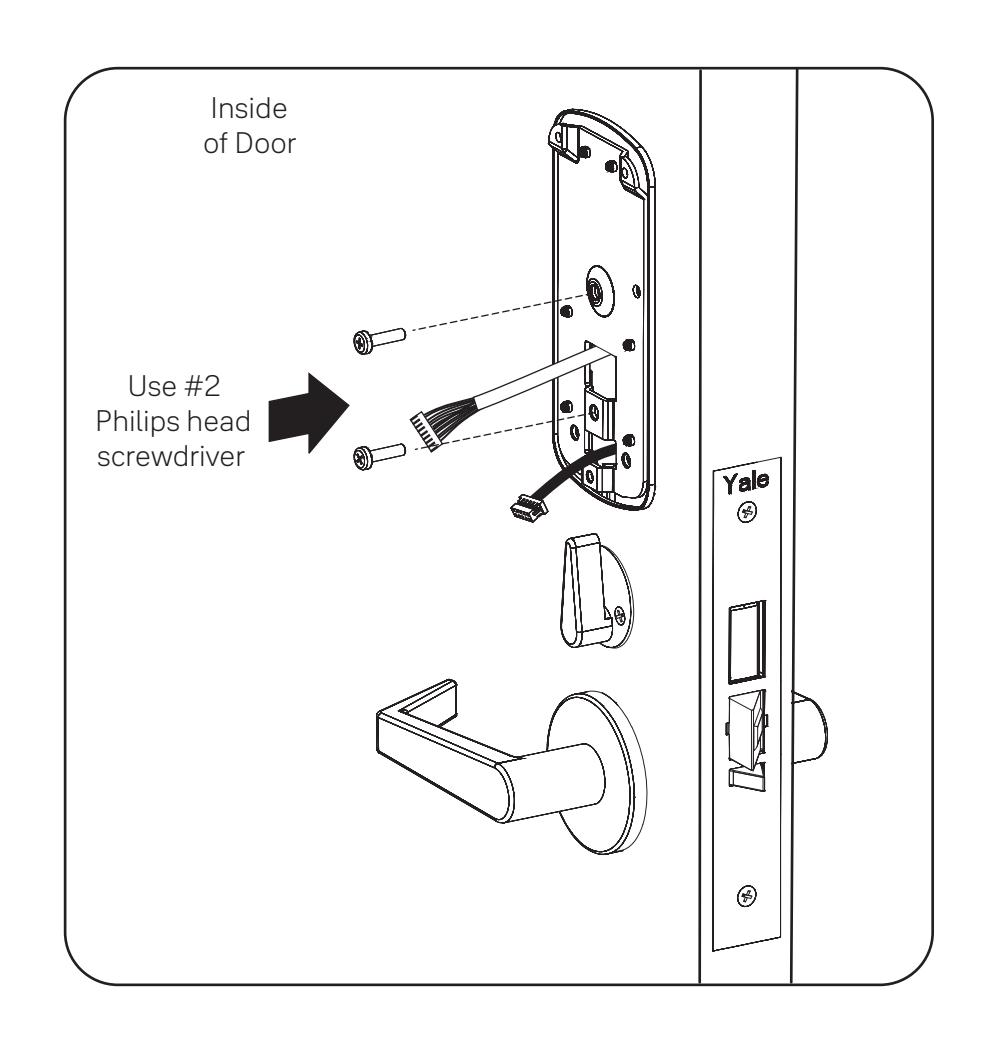
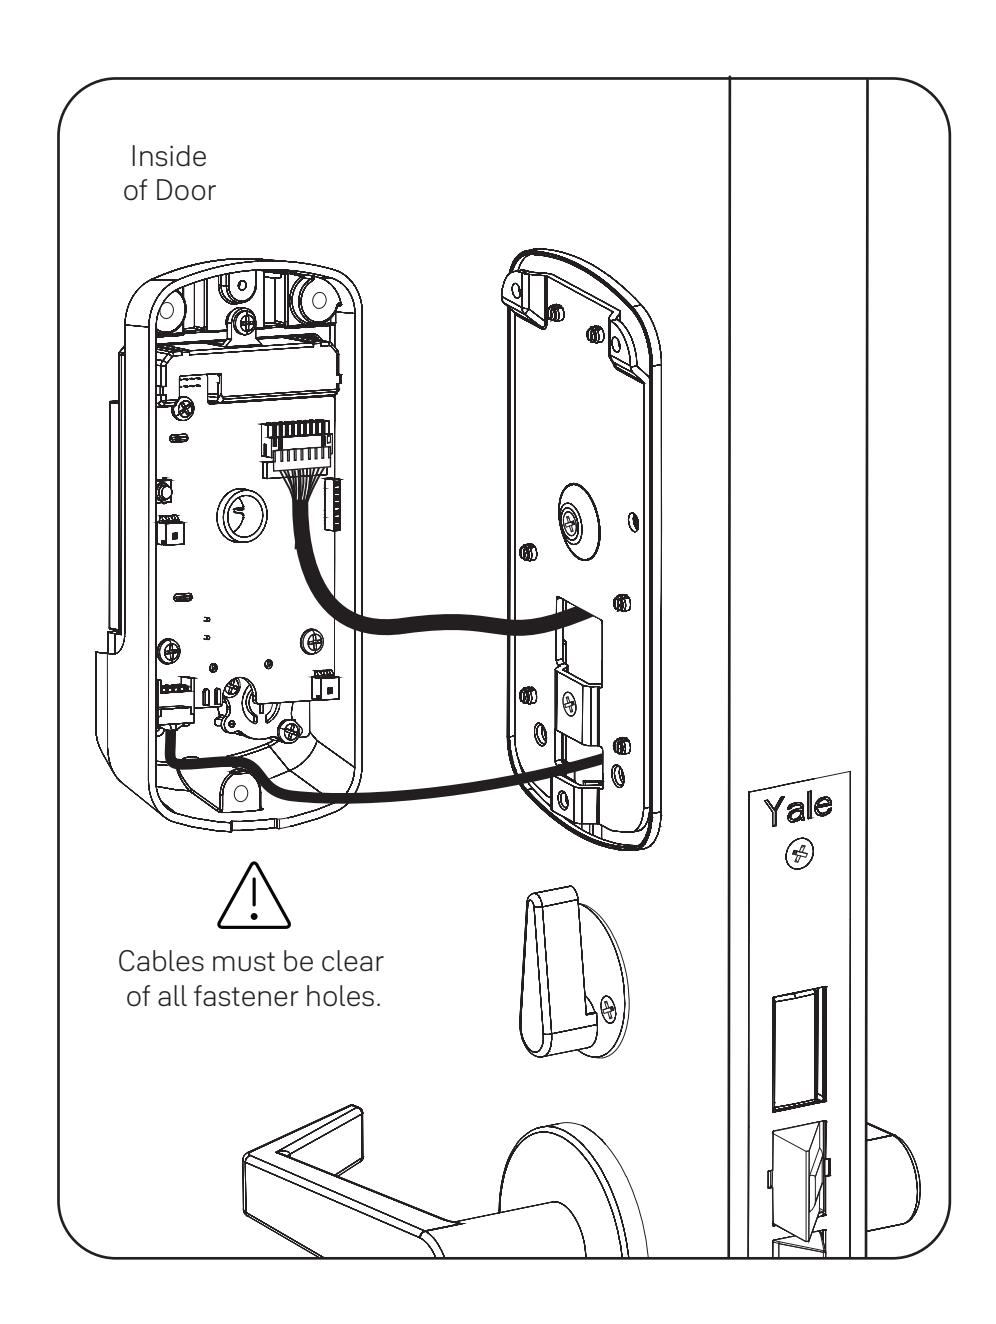
Attach Cables to Inside Lock

#8-32x3/8" Pan Head Screw (Black)
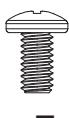
x3

Congratulations, you've installed the Yale nex Touch ™ Keypad Access Sectional Mortise Lock! Continue to customize your product.

Programming Instructions

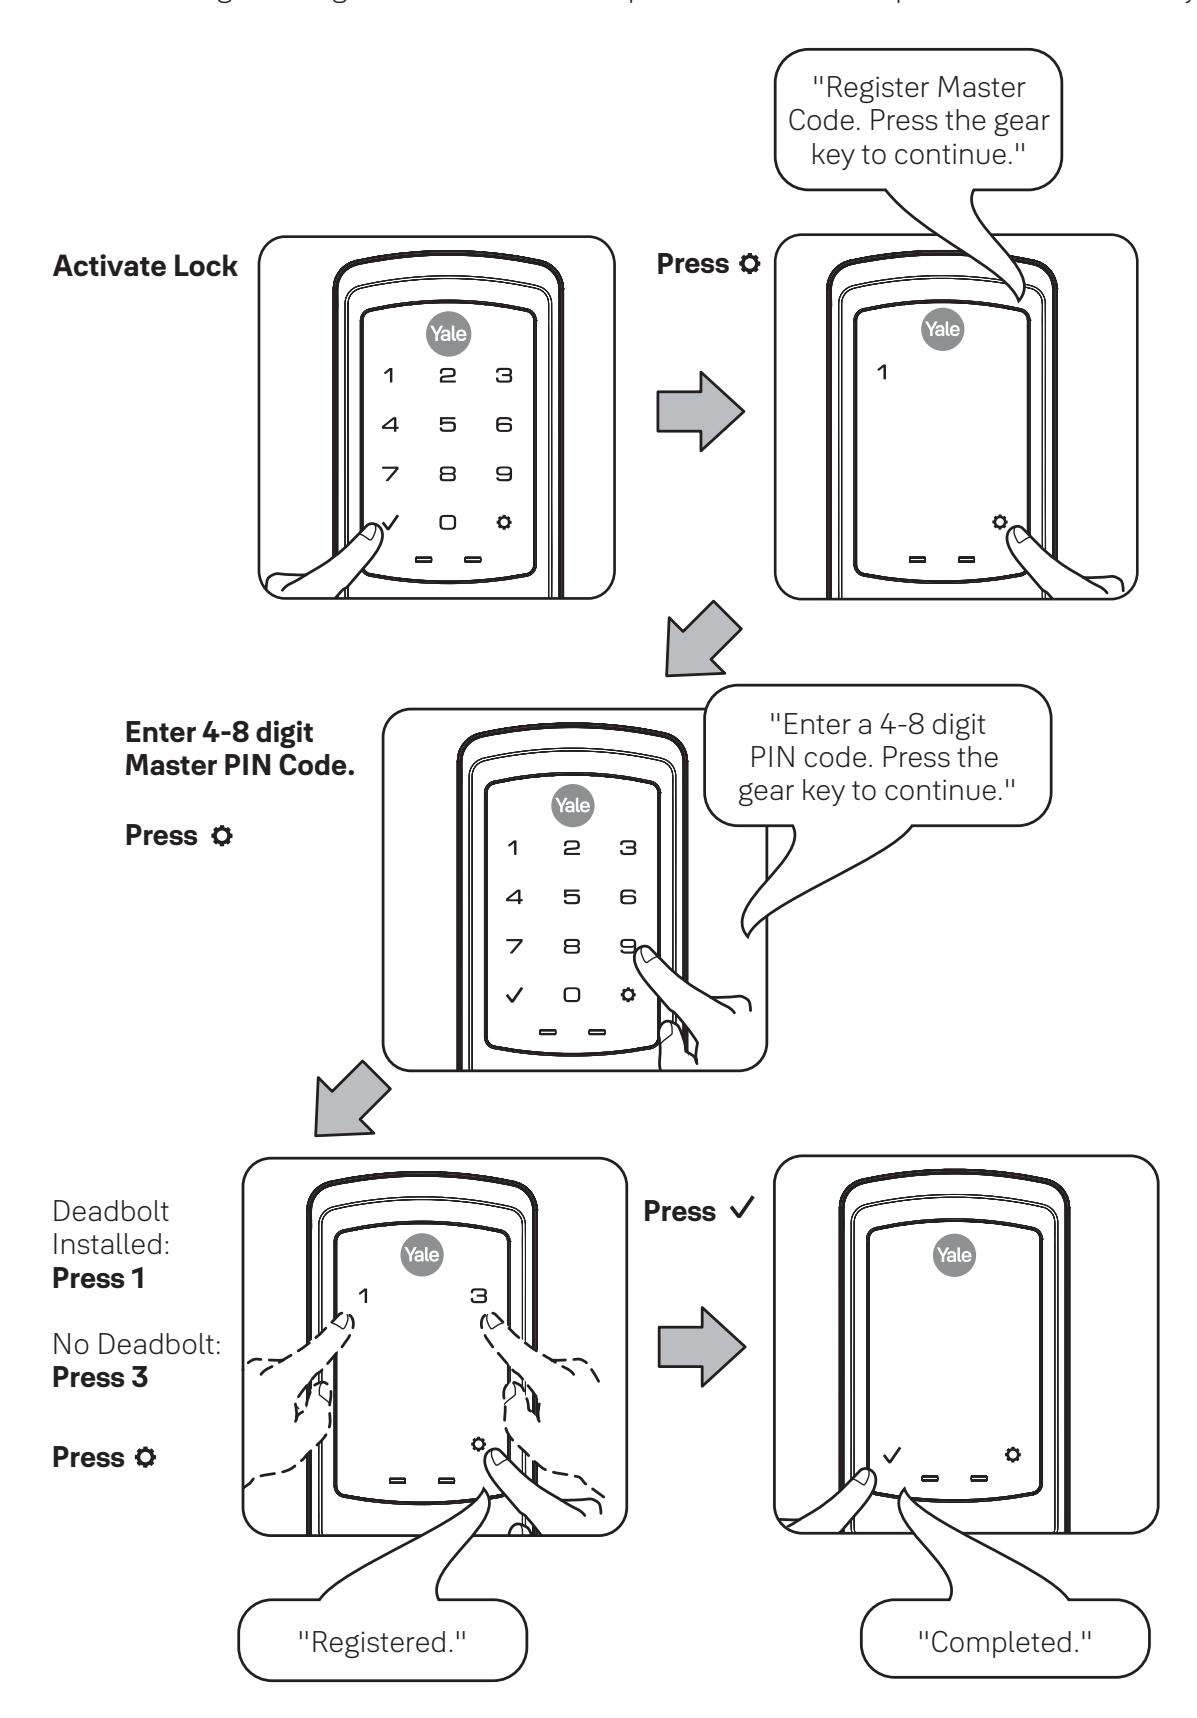
1 Creating Master PIN Code
Creating a Master PIN Code must be performed upon installation or after resetting the lock to factory default. Programming and use of lock is not possible until this step has been successfully completed.
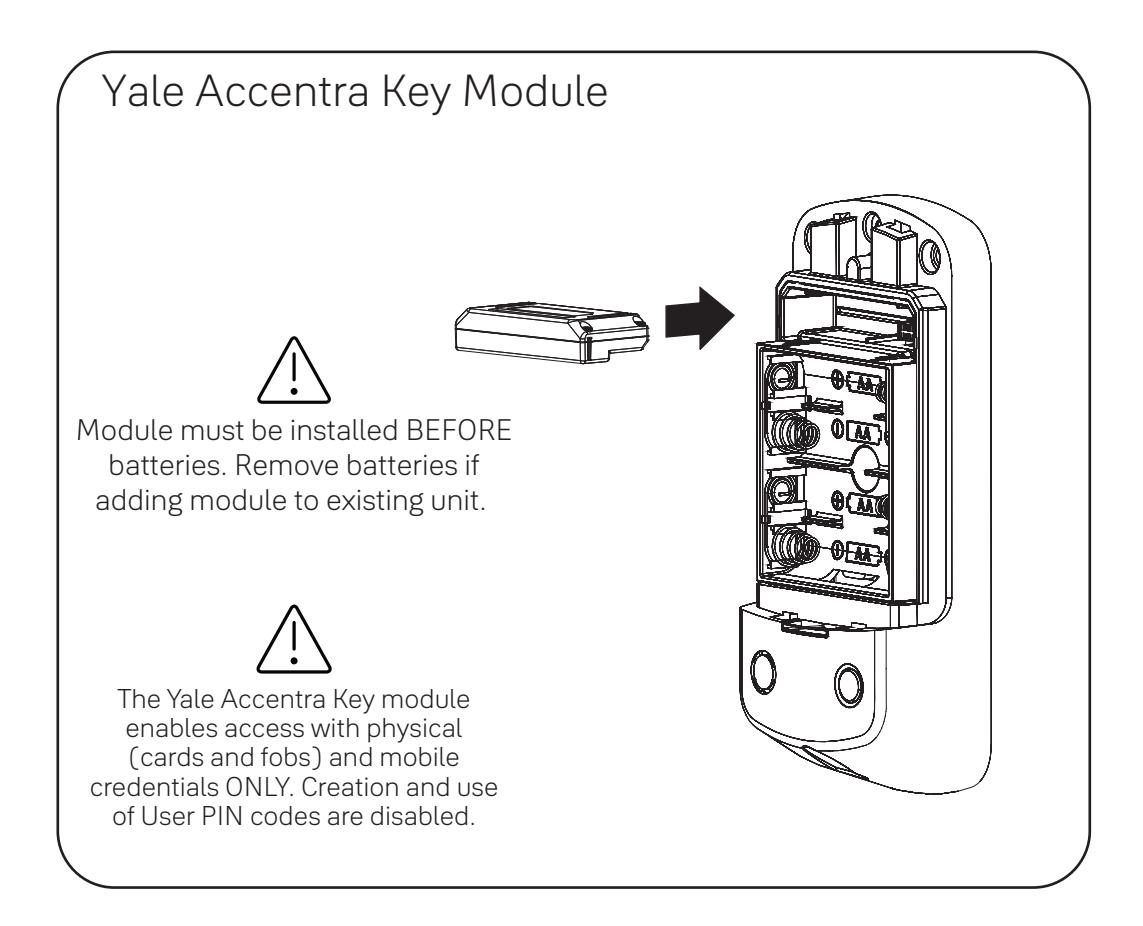
The Yale Accentra Key module enables access with physical (cards and fobs) and mobile credentials ONLY. Creation and use of User PIN codes are disabled.
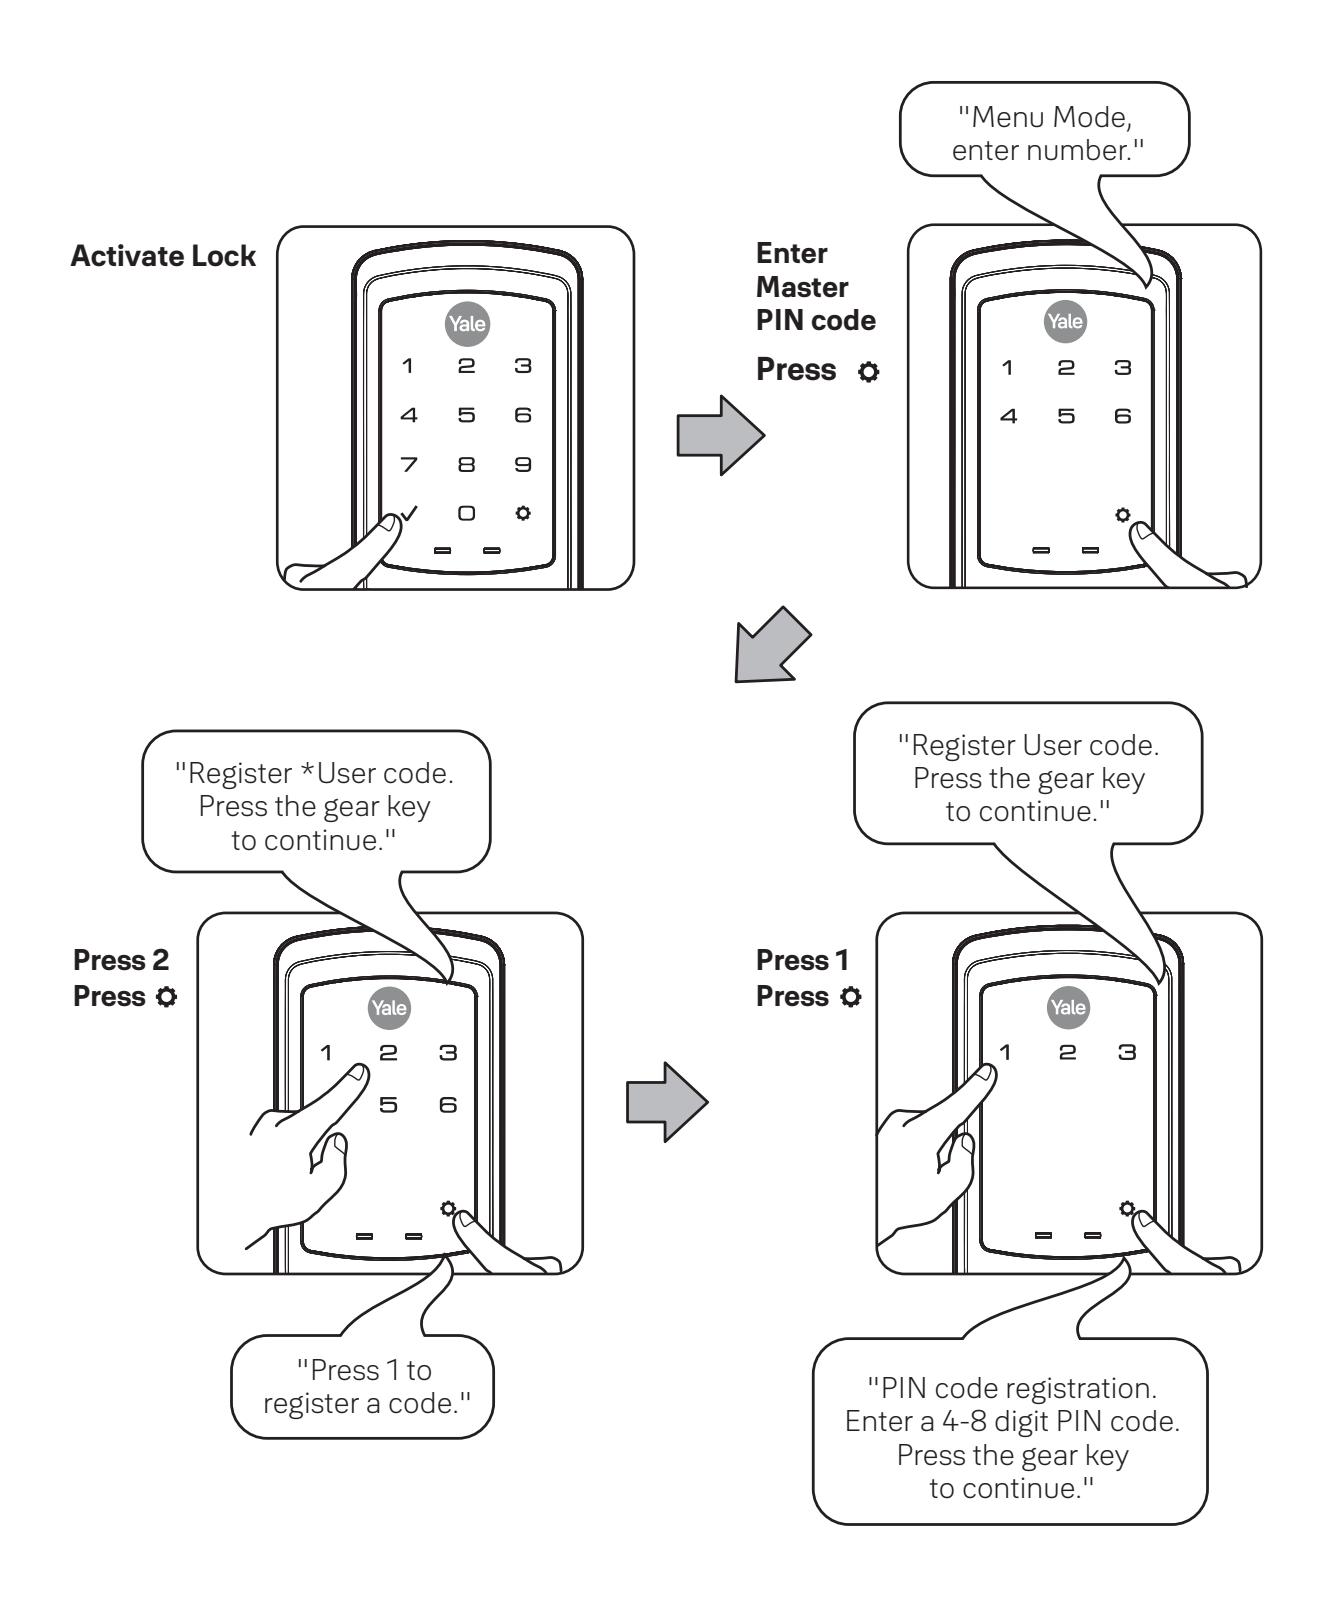
2b Creating User PIN Codes con't
Enter 4-8 digit PIN code followed by
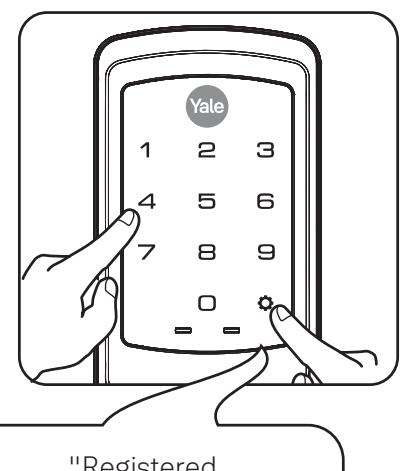
"Registered. Press the check key to complete. Press the gear key to continue."


Adding more User Codes:
Press Enter 4-8 digit PIN code
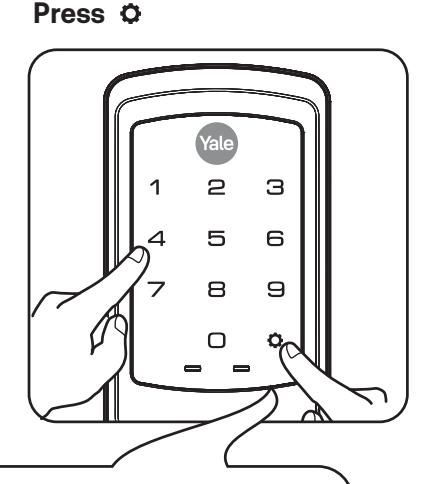
"Registered. Press the check key to complete. Press the gear key to continue."
To end programming:
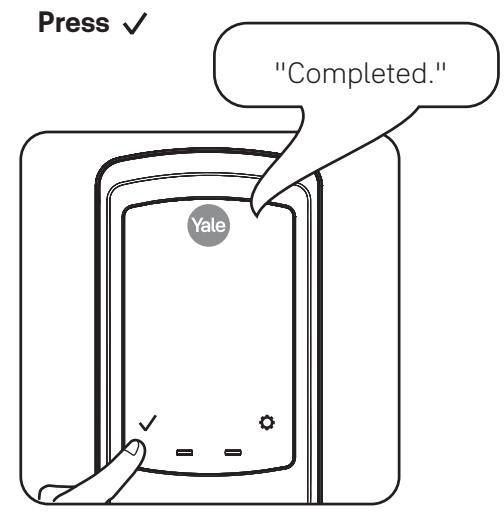

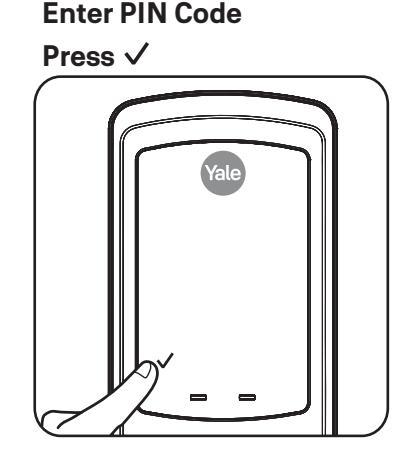
3 Locking & Unlocking Door with Registered Master or User PIN Code
The Yale Accentra Key module enables access with physical (cards and fobs) and mobile credentials ONLY. Creation and use of User PIN codes are disabled. Master PIN code is only used for programming and configuring lock with Yale Accentra Multi-Family configuration app and will not unlock door. When lock is configured into Accentra, "#2" and "#6" will no longer be visible when in "menu" mode.
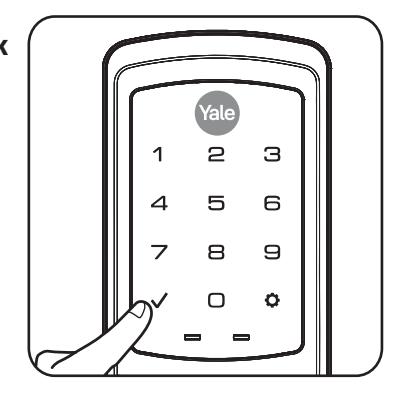
With One Touch Locking Enabled:
Activate Lock


4 Locking Door with Privacy Button

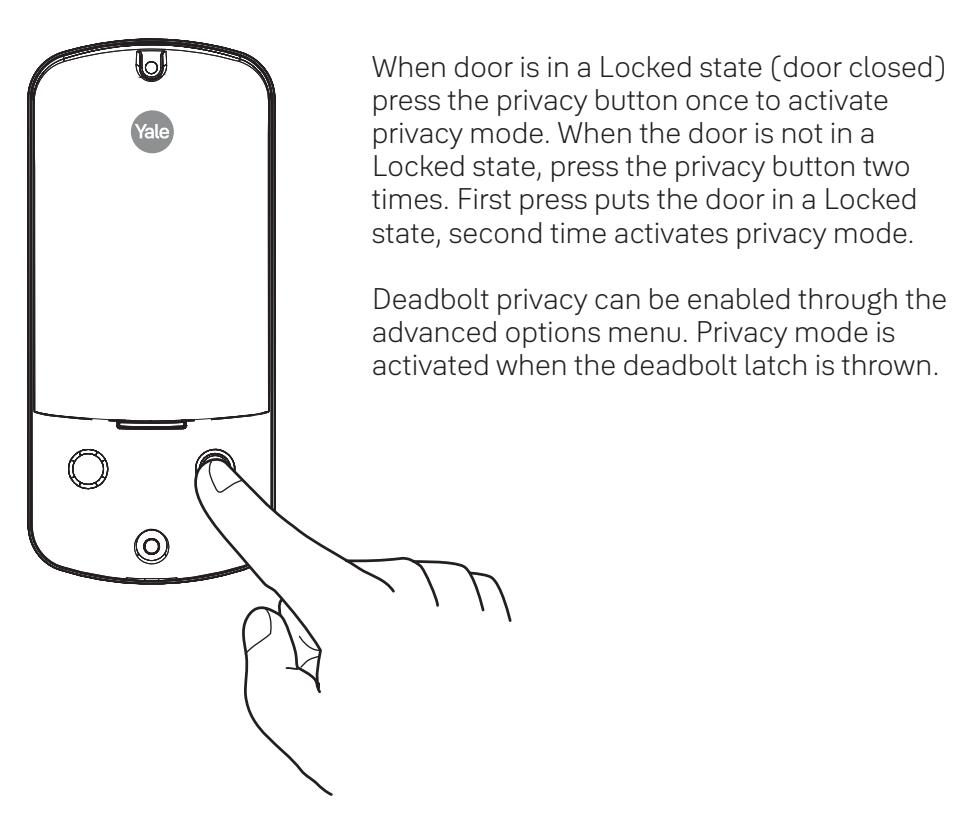
Privacy must be 'Enabled' from advanced options menu.
Resetting Lock to Factory Default
When lock is reset to factory defaults all user codes (including the Master PIN code*) are deleted and all programming features are reset to original default settings (see Factory Settings).

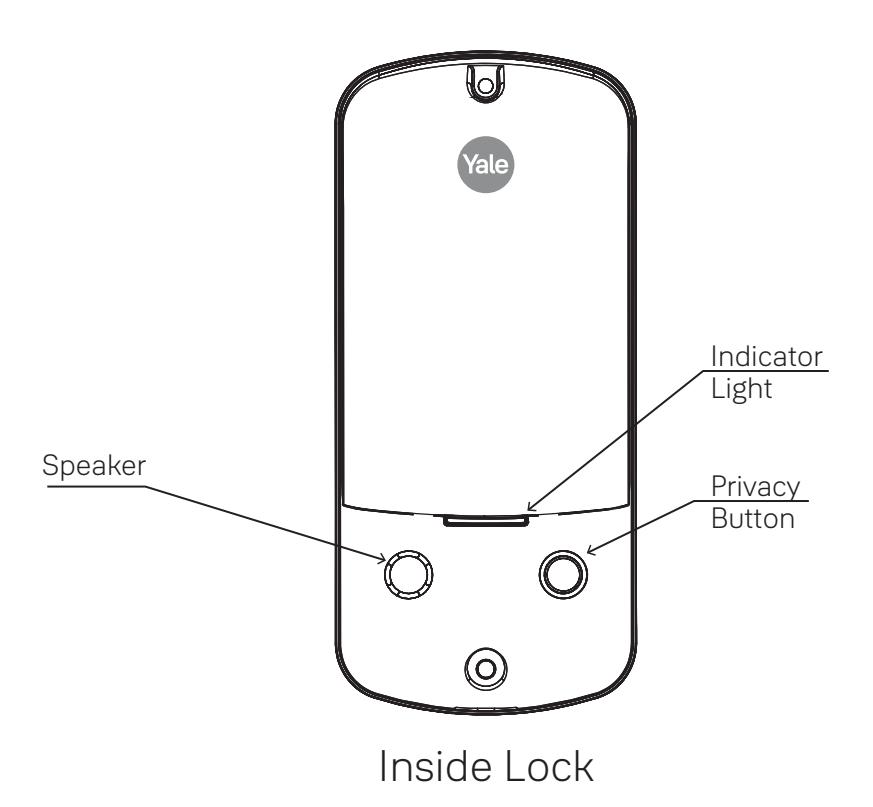
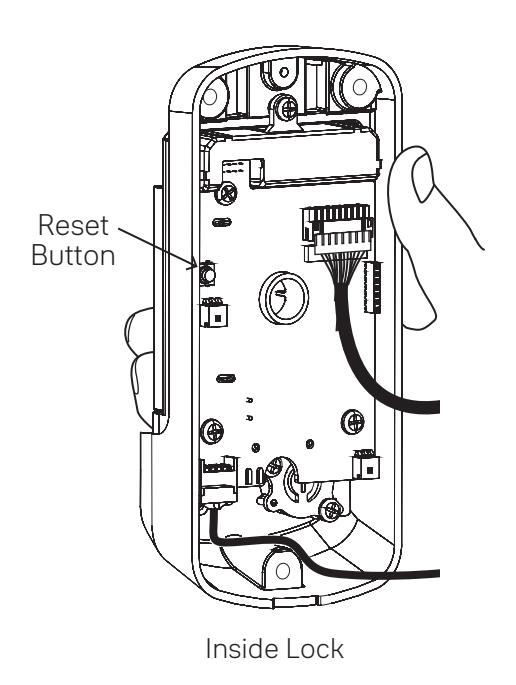
IMPORTANT: The Reset Button is on the Inside Lock. The keypad remains assembled.
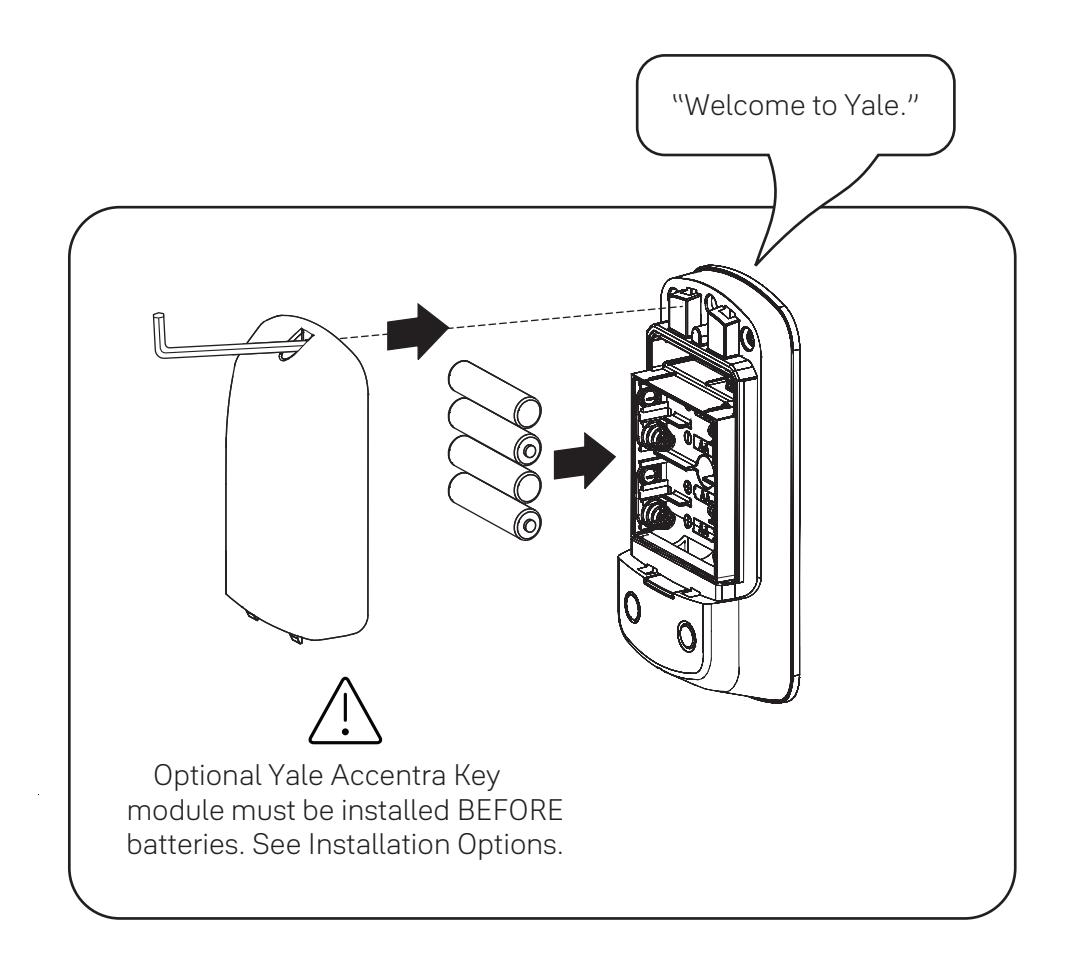
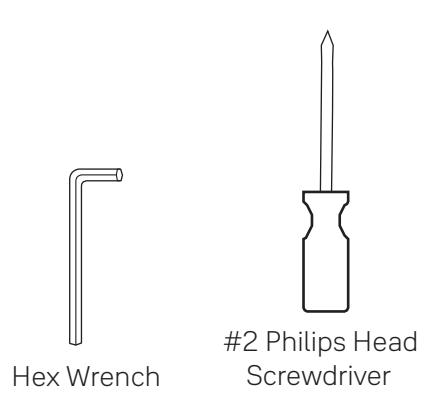
- 1. Remove the battery cover with supplied hex wrench and then remove batteries.
- 2. Remove Yale Accentra module if installed.
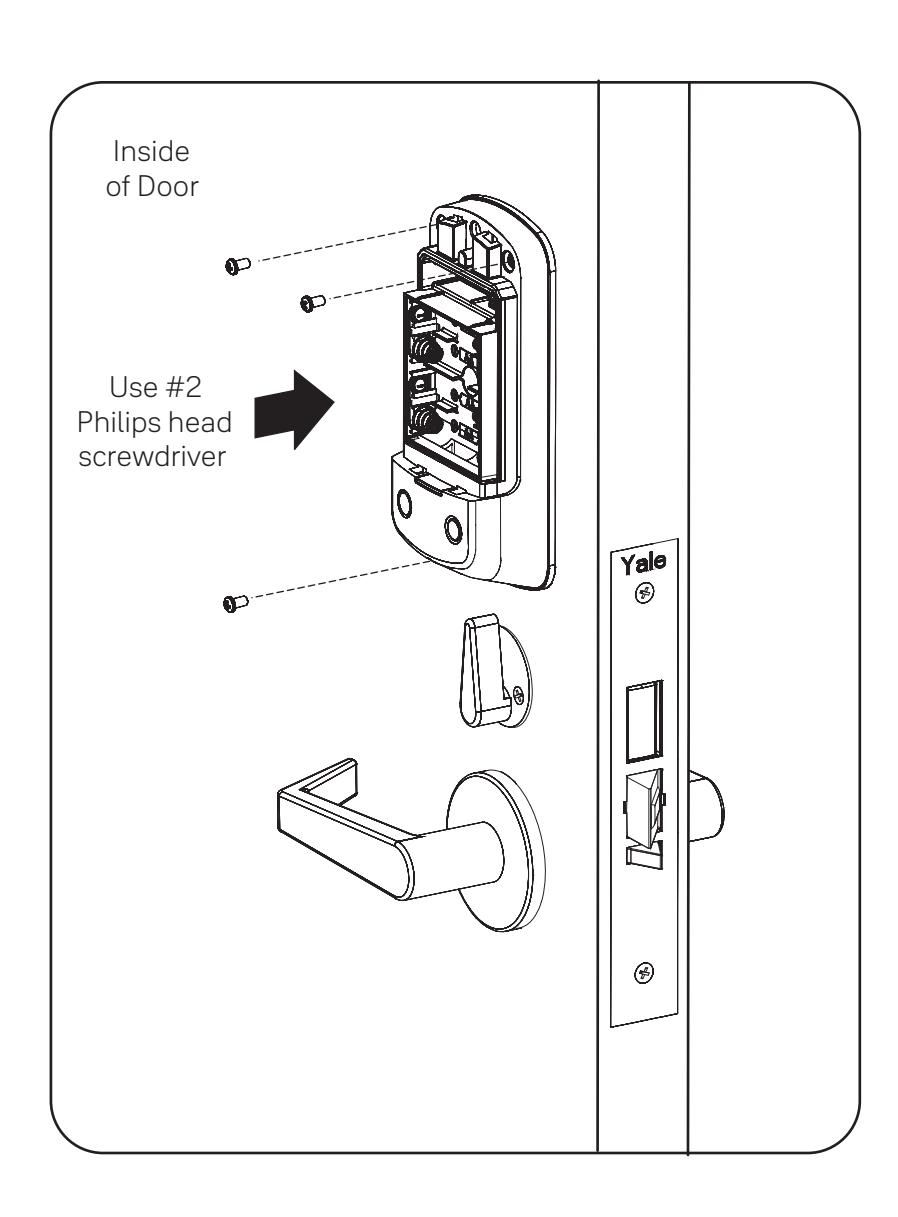
- 3. Using a #2 Philips head screwdriver, remove the inside lock from the door to access the reset button on back of lock. Cables may stay connected. (See illustration at above for location of the reset button.)
- 4. Reinstall four (4) AA batteries.
- 5. Press and hold the reset button for 3 seconds.
- 6. While continuing to press the reset button, temporarily remove one (1) AA battery.
- 7. Reinstall the battery.
- 8. Release reset button and wait approximately 15 seconds. Speaker will announce "Welcome to Yale."
- 9. Reassemble inside lock.
- 10. If utilizing a Yale Accentra module, remove batteries. Insert Module. Reinstall batteries.
Upon reset, Master PIN Code creation is the only option available and must be performed prior to any other programming of the lock.
Definitions
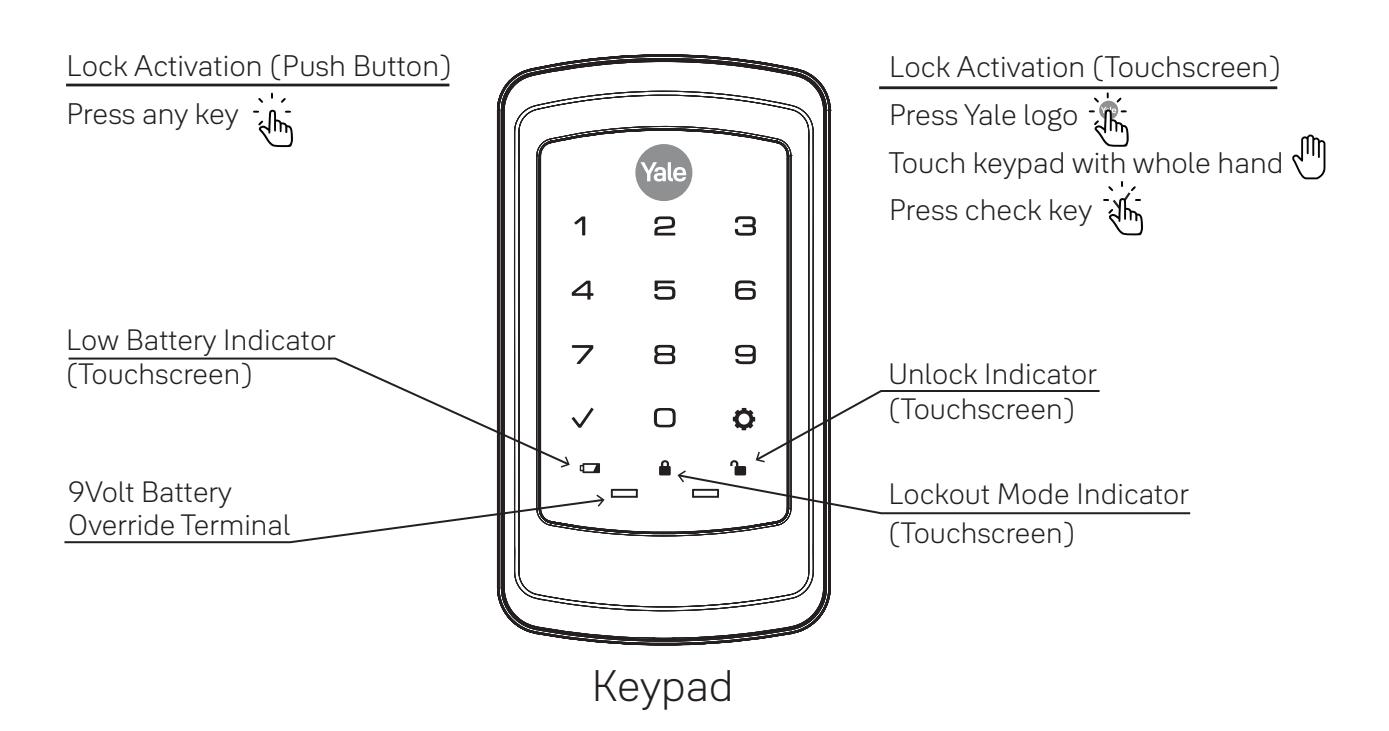
All Code Lockout Mode: This feature is enabled by the Master PIN code. When enabled, it restricts all user (except Master) PIN code access. When attempting to enter a code while unit is in Lockout, there will be an audible lock response. The touchscreen keypad will display a RED locked padlock. (Main Menu selection #6.)
Automatic Re-lock Time: After a successful unlock, the unit will re-lock automatically after 3 seconds or for a duration selected in the Advanced Lock Settings (Main Menu selection #3 then #1).
Eco Mode: When enabled, Eco Mode puts unit in low power mode extending life of battery.
Escape Return: Enabling this function allows the door to remain unlocked in the case of an emergency. Escape Return will cause the door to automatically unlock upon opening and remain unlocked even if the door swings closed. The locking action requires at least one intentional user interaction to return to the locked state. Auto Re-lock cannot be enabled when Escape Return is enabled.
Inside Indicator Light: This light will blink red when door is locked.
Language Setting Mode: Choose English (1), Spanish (2) or French (3) for the lock's voice prompts. (Main Menu selection #5.)
Low Battery: When the battery power is low, the Low Battery Warning indicator is a flashing red battery icon on the touchscreen keypad and the Yale logo will flash red on the push button keypad. If battery power is completely lost, use the 9Volt battery override. To use the 9V battery override apply 9V battery, in either direction, to terminals on the keypad for backup power option. Activate the keypad and enter your pin code to unlock the door.
Master PIN Code: The Master PIN code is used for programming and for feature settings. It must be created prior to programming the lock. The Master code will also operate (unlock/lock) the lock except when configured to Accentra system.
Network Module Setting: With the optional Yale Accentra Module installed, this setting becomes available (Main Menu selection #0) and allows the lock to to be configured into the Yale Accentra system.
One Touch Locking: When the unit is unlocked, activating the keypad will lock the unit (during Automatic Re-lock duration or when Automatic Re-lock is disabled). When One-Touch Re-lock is not in use (disabled), any valid PIN code will re-lock the lock. (Main Menu selection #3 then #3.)
Passage PIN Code: When used to unlock, lock will remain unlocked/open. Lock cannot be locked/secured until Passage code is entered again.
Privacy Button to Lock Door: A press of this button will lock the door if the door is not locked.
Privacy Mode: All keypad functions can be disabled with a press of the Privacy Button. Privacy Mode is disabled by default. Enable Privacy Mode thru Main Menu selection #3 then #4. With Privacy Mode enabled thru Menu Mode and door closed, extend deadbolt to engage Privacy Mode. If there is no deadbolt, press and hold the privacy button until voice prompt indicates Privacy Mode is engaged. Privacy Mode duration ends when door is opened and voice prompt indicates Privacy Mode is disabled.
Shut Down Time: The unit will shut down for sixty (60) seconds and not allow operation after the wrong code entry limit (5 attempts) has been met. When the unit is in Shut down, the keypad will be flashing.
Tamper Alert: Audible alarm sounds if attempting to forcibly remove outside lock from door.
User PIN Code: The User PIN code operates the lock when the Yale Accentra Key module is not installed. Maximum number of user codes is 500.
Volume Setting Mode: The volume setting for PIN code verification is set to HIGH (1) by default; otherwise it can be set to Low (2) or Silent (3) for quiet areas. (Main Menu selection #4.)
Wrong Code Entry Limit: After five (5) unsuccessful attempts at entering a valid PIN code, the lock will not accept a PIN code for the duration of the shut down time. The touchscreen keypad will flash, and a red lock symbol will be at the bottom of the keypad. The push button keypad will flash and the Yale icon will flash blue for the shut down period. The keypad will be available after the shut down time is complete.
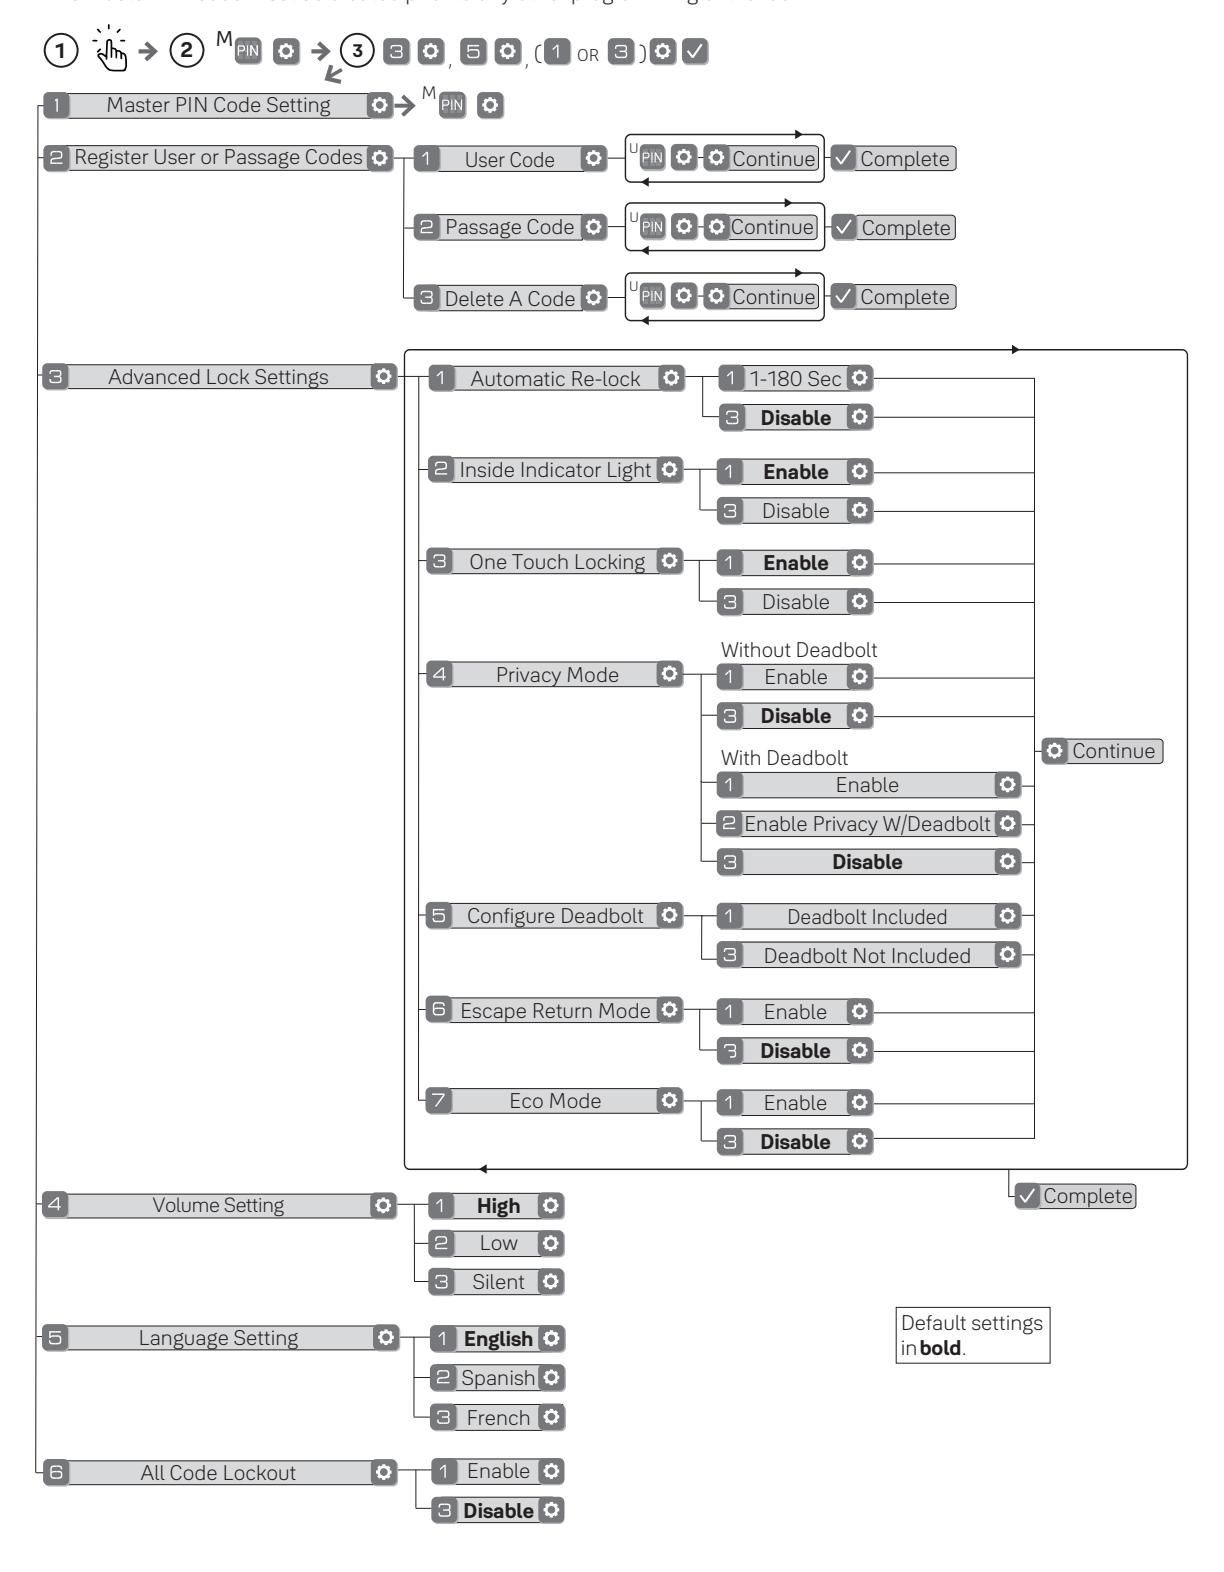
Feature Programming Through Menu Mode Using Master PIN code*
- 1. Activate the lock.
- 2. Enter 4-8 digit master PIN code* followed by key. Lock Response: "Menu mode, enter number (Enter digit corresponding to the function to be performed), press the key to continue."
- 3. Follow the voice commands.
- 4. Press key to complete the process and conclude the programming session.
- *The Master PIN code must be created prior to any other programming of the lock.
Programming Troubleshooting
| Symptom | Suggested Action |
|---|---|
| Lock does not respond. There are no lights or chimes and there is no mechanical sound indicating latchbolt movement. | Touchscreen models become active by pressing Yale logo or ✓ key or by touching keypad with whole hand. Push Button models become active when any key is pressed. • Check batteries are installed and oriented correctly (polarity). • Replace batteries. • Check that cables are fully connected on inside lock and not crimped. • Apply 9V battery to terminals on the keypad for emergency power jump option. |
| Lock wakes but does not respond. Lights dim. | Batteries do not have enough power. Replace batteries. |
| Lock chimes to indicate code acceptance, but door will not open. |
|
| Lock operates to allow access, but will not automatically re-lock. |
|
|
User/Passage PIN codes
will not register. |
|
| Upon entering a User/Passage PIN code and pressing the key, the lock chimes an error or lock times out without responding. |
|
|
TS lock displays "Low
Battery" on keypad. PB lock Yale logo flashes red. |
This is the alert to replace the batteries. Replace all four (4) batteries with new AA Alkaline batteries. |
| The lock operates, but it does not chime. | Ensure Volume is set to Low or High by Master user. |
|
Lock will not enter
Privacy Mode. |
|
NOTE: When batteries are replaced, Yale Accentra Module locks have a real time clock that will be set through the User Interface (UI); it is recommended to verify correct date and time particularly for those locks operating under Daylight Saving Time (DST).
Factory Settings
| Settings | Factory Setting |
|---|---|
| Master PIN Code | Creation required* |
| All Code Lockout | Disabled |
| Automatic Relock | Disabled |
| Escape Return Mode | Disabled |
| Inside Indicator Light | Enabled |
| Language Setting | English** |
| One Touch Locking | Enabled |
| Privacy Mode | Disabled |
| Shutdown Time | 60 Seconds |
| Volume Setting | High |
| Wrong Code Entry Limit | 5 Times |
* The Master PIN code must be created prior to any other programming of the lock.
** Language retains chosen setting even when lock is reset to factory default.
FCC:
This device complies with part 15 of the FCC Rules. Operation is subject to the following two conditions: (1) This device may not cause harmful interference, and (2) this device must accept any interference received, including interference that may cause undesired operation.
Any changes or modifications (including the antennas) to this device that are not expressly approved by the manufacturer may void the user's authority to operate the equipment.
Note : This equipment has been tested and found to comply with the limits for a Class B digital device, pursuant to part 15 of the FCC Rules. These limits are designed to provide reasonable protection against harmful interference in a residential installation This equipment generates, uses and can radiate radio frequency energy and, if not installed and used in accordance with the instructions, may cause harmful interference to radio communications, However, there is no guarantee that interference will not occur in a particular installation. If this equipment does cause harmful interference to radio or television reception, which can be determined by turning the equipment off and on, the user is encouraged to try to correct the interference by one or more of the following measures:
- Reorient or relocate the receiving antenna.
- Increase the separation between the equipment and receiver.
- Connect the equipment into an outlet on a circuit different from that to which the receiver is connected.
- Consult the dealer or an experienced radio/TV technician for help.
Modifications not expressly approved by the manufacturer could void your authority to operate the equipment under FCC rules.
Industry Canada:
This device contains licence-exempt transmitter(s)/receiver(s) that comply with Innovation, Science and Economic Development Canada's licence-exempt RSS(s). Operation is subject to the following two conditions:
- (1) This device may not cause interference.
- (2) This device must accept any interference, including interference that may cause undesired operation of the device.
L'émetteur/récepteur exempt de licence contenu dans le présent appareil est conforme aux CNR d'Innovation, Sciences et Développement économique Canada applicables aux appareils radio exempts de licence. L'exploitation est autorisée aux deux conditions suivantes :
- (1) L'appareil ne doit pas produire de brouillage;
- (2) L'appareil doit accepter tout brouillage radioélectrique subi, même si le brouillage est susceptible d'en compromettre le fonctionnement.
FCC and IC RF Radiation Exposure Statement:
This equipment complies with FCC and IC RF Radiation exposure limits set forth for an uncontrolled environment.
This device and its antenna must not be co-located or operating in conjunction with any other antenna or transmitter.
RF du FCC et IC d'exposition aux radiations: Cet équipement est conforme à l'exposition de FCC et IC rayonnements RF limites é-tablies pour un environnement non contrôlé.
L'antenne pour ce transmetteur ne doit pas être même endroit avec d'autres émetteur sauf conformément à FCC et IC procédures de produits Multi-émetteur.
Support Contacts:
Customer Service Phone: 1-800-438-1951 Customer Service Fax: 1-800-338-0965
24/7 Support Phone: 1-855-213-5841
24/7 Support Email: Support@YaleLock.com
Website:
US.YaleHome.com
Email for orders:
orders.yaleres@assaabloy.com
THE YALE BRAND, with its unparalleled global reach and range of products, reassures more people in more countries than any other consumer locking solution.
THE ASSA ABLOY GROUP is the world´s leading manufacturer and supplier of locking solutions, dedicated to satisfying end-user needs for security, safety and convenience.
Yale Commercial is a business associated with ASSA ABLOY Access and Egress Hardware Group, Inc., an ASSA ABLOY Group company. Copyright © 2018 - 2021, ASSA ABLOY Access and Egress Hardware Group, Inc. All rights reserved. Reproduction in whole or in part without the express written permission of ASSA ABLOY Access and Egress Hardware Group, Inc. is prohibited.
Part of ASSA ABLOY 80-9086-0030-010 09-23