ASSA ABLOY ACCENTRA 7100(F), 7150(F)(WS) Rim and SquareBolt Installation Instructions (Single Doors_80-9470-0000-000
Open the original PDF document
View PDF7100(F), 7150(F)(WS) Rim and SquareBolt®
End Cap
(2) 1/4-20 x 1" PPHMS
(3) 8-32 x 5/16" PFHUMS
End Clamp
Single Doors or Pairs with Mullion
Installation Instructions
Note: These installation instructions cover standard product only. To install options, such as shim kits or interlock brackets, refer to the instructions packed with the optional component.
Packed For Reinforced Metal Doors.
Optional Sex Nuts Required For Unreinforced Metal, Composite and Wood Doors.
Outside Trim: Device is packed ready for any applicable ASSA ABLOY Trim.
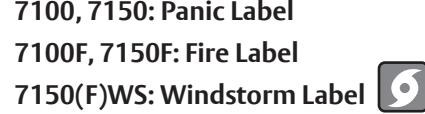
| FASTENER DECRIPTION |
| PHILLIPS PAN HEAD TYPE F THREAD CUTTING SCREW |
| PHILLIPS ROUND HEAD MACHINE SCREW |
| PHILLIPS FLAT HEAD MACHINE SCREW |
| PHILLIPS FLAT HEAD UNDER CUT MACHINE SCREW |
Dogging
Feature to hold bolts retracted and touchpad depressed, for push-pull door operation.
To Dog Device
- 1. Insert dogging key.
- 2. Hold touchbar depressed.
- 3. Turn key 1/4 turn clockwise.
(Not a feature of fire labeled devices.)
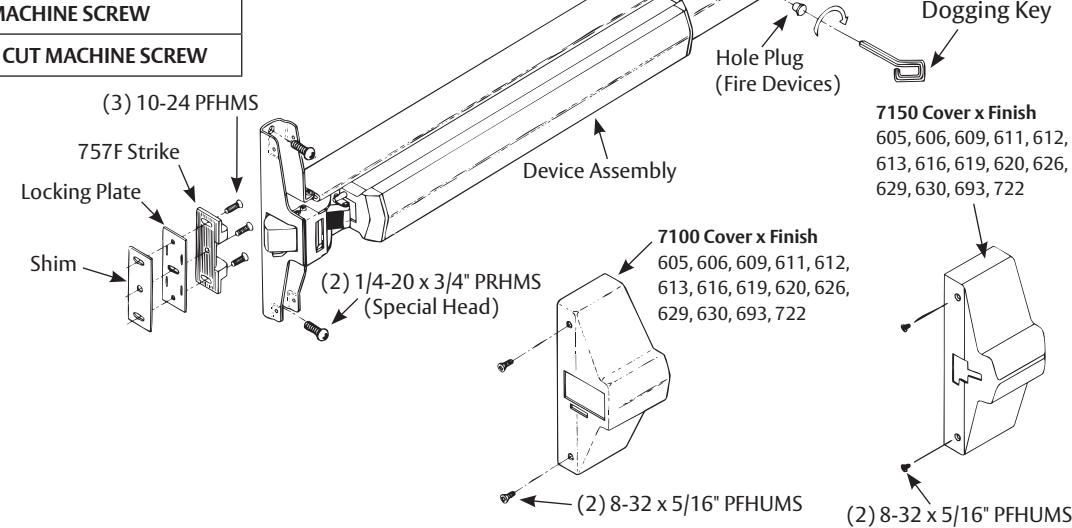
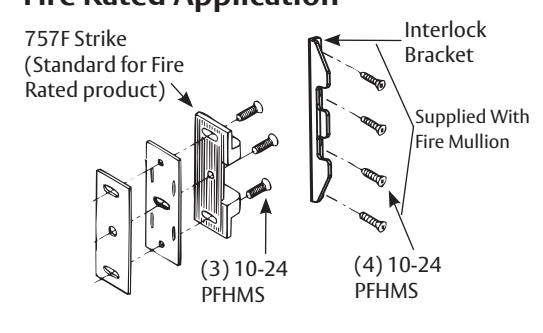
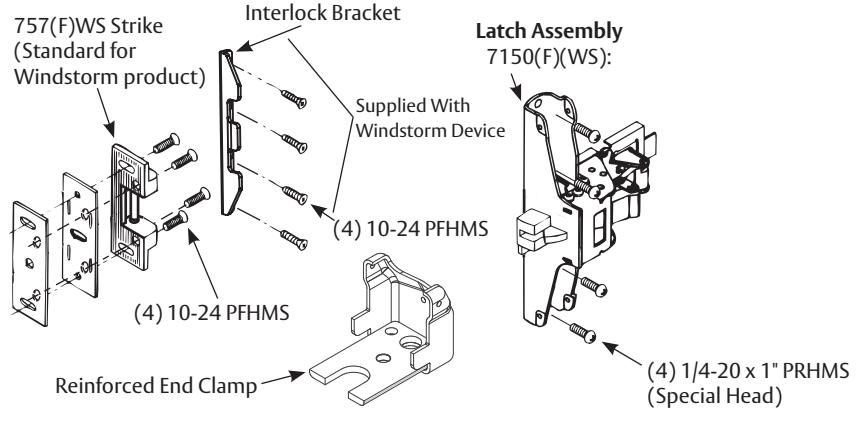
Fire Rated Application Windstorm Application

WARNING
This product can expose you to lead which is known to the state of California to cause cancer and birth defects or other reproductive harm. For more information go to www.P65warnings.ca.gov.

WARNING
Attention Installer: Any retrofit or other field modification to a fire rated opening can potentially impact the fire rating of the opening, and ASSA ABLOY makes no representations or warranties concerning what such impact may be in any specific situation. When retrofitting any portion of an existing fire-rated opening, or specifying and installing a new fire-rated opening, please consult with a code specialist or local code official (Authority Having Jurisdiction) to ensure compliance with all applicable codes and ratings.
80-9470-0000-000 10/23
ASSA ABLOY
7100(F), 7150(F)(WS) Rim and SquareBolt®
Single Doors or Pairs with Mullion Installation Instructions
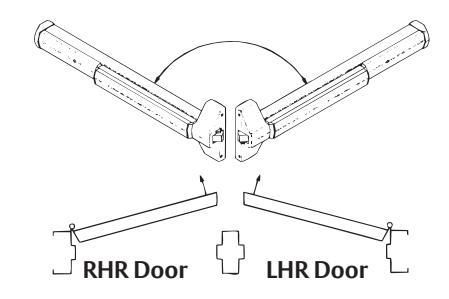
For Doors of Either Hand
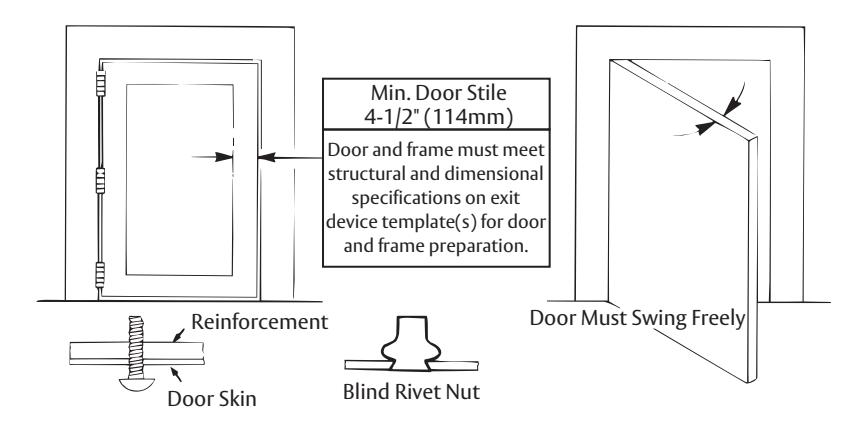
Check Before Starting Unreinforced Doors or Frames
Doors and Frames with walls having a structural thickness (metal skin plus reinforcement or solid hardwood) to engage less than (3) full screw threads are considered unreinforced.
Unreinforced Doors: Use SNB (sex nuts and bolts).
Unreinforced Frames: Use Blind Rivet Nuts.
Recommended fasteners for unreinforced openings are not necessarily supplied by ASSA ABLOY Security, Inc.
Maintenance
- 1. Periodically remove covers and coat mechanisms with a silicone base lubricant. This is particularly required in corrosive environments for proper product function.
- 2. Check mounting fasteners periodically. Retighten if found loose. Apply screw locking compound (available at automotive part stores) or change part fasteners if screws continue to back up.
- Periodic checks (and adjustments) of strikes are required to compensate for changes in the opening (e.g. door sagging).
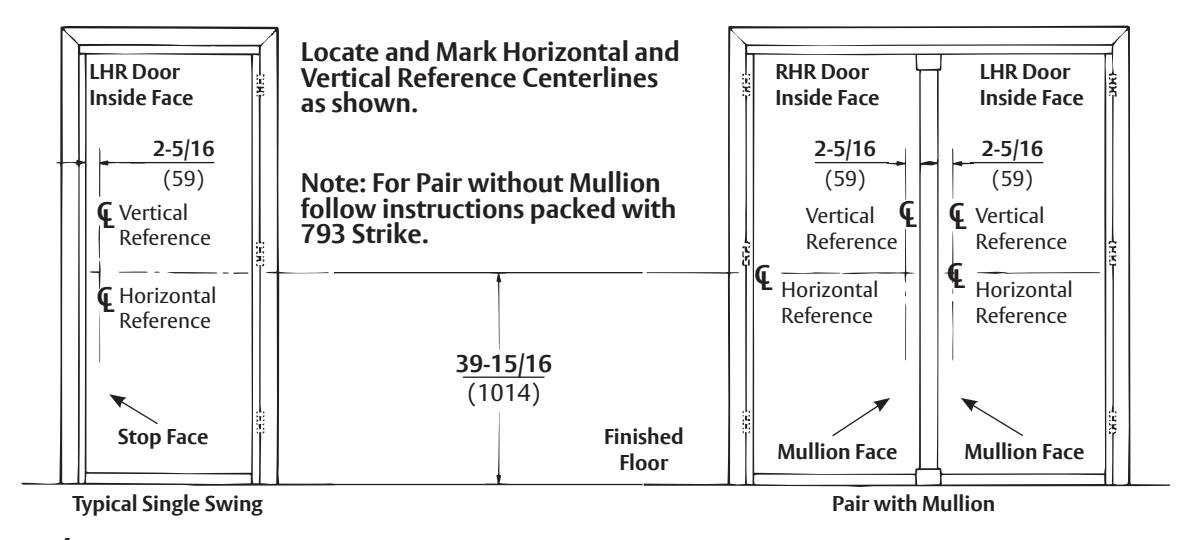
1. Mark Door
2. Prepare Door and Frame
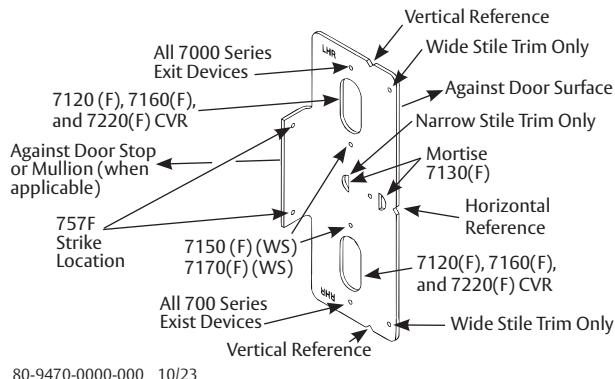
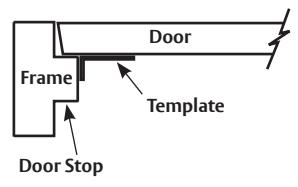
- A. Seat plastic template on door and stop faces.
- B. Align horizontal and vertical centerlines.
- C. Locate and tape Trim Template on door. (See instructions packed with Trim).
D. Spot and prepare holes.
Device: Each (2) 1/4-20 Machine Screws* OR (2) 3/8" (10) Dia. Optional Sex Nuts & Bolts.
(*) Metal reinforced door only.
Strike: (2) 10-24 Machine Screws OR (2) #10 Wood Screws
Experience a safer and more open world
1-800-438-1951 • www.assaabloy.com
7100(F), 7150(F)(WS) Rim and SquareBolt®
Single Doors or Pairs with Mullion
Installation Instructions
3. Size Device
Device must be field cut to size, unless standard opening and device are 36" (0.91m).
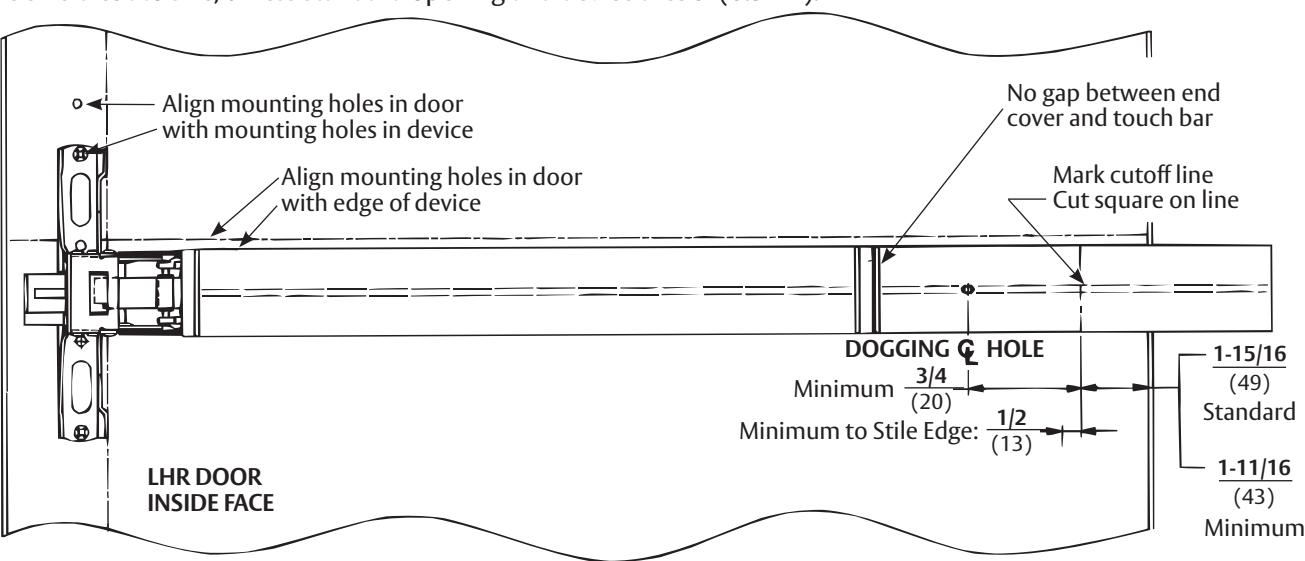
4. Clear Raised Door Molding
Device (head bar and end cap) must seat flush on door surface or on shims that keep it parallel to door face.
(1) Shim Kit #723 needed to clear each 1/8" (3mm) of raised molding. Longer mounting screws needed when more than two (2) Shim Kits are used. See instructions provided with shim kits for installation.
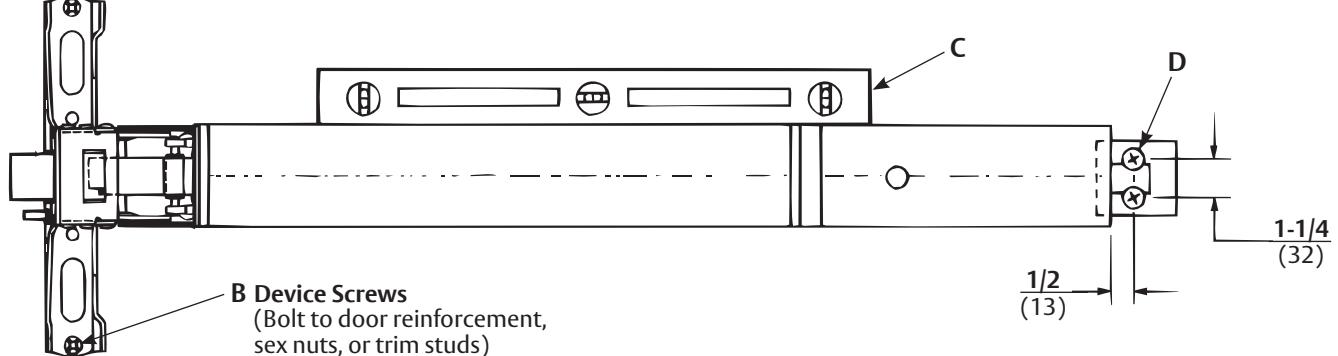
5. Mount Components
- A. Mount Trim (Follow instructions packed with trim).
- B. Seat Bar in place. Fasten Device Head (2 PRHMS or SNB).
- C. Set Bar level. Locate End Clamp holes.
- D. Prepare End Clamp Mounting holes. Mount End Clamp. (2 #1/4-20 PRHMS or 3/8" (10) dia. SNB)
-
E. Check Bolt Retraction.
- 1. Depress bar (bolts must retract). Release bar (bolts must extend).
- 2. Actuate trim (bolts must retract). Release trim actuator (bolts must extend).
- 3. Depress touchbar, turn dogging key clockwise (bar must remain depressed, bolts must remain retracted). Turn dogging key counterclockwise (bar and bolts must return to extended position).
F. Tighten all mounting screws.
Note: When resulting operation is faulty, check first for visible binding or interference. If there is no apparent reason for the fault, remove item from the door and recheck its operation before assuming that it is defective.
80-9470-0000-000 10/23
ASSA ABIO
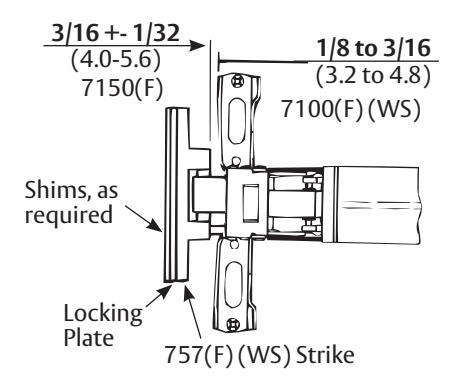
6. Install Strike
Detail A
Detail B
Detail B1
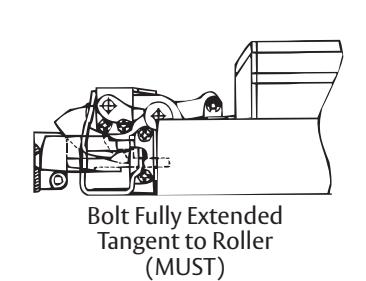
- A. Position Strike Projection (Strike + Locking Plate + Shims, if needed). See Detail A.
-
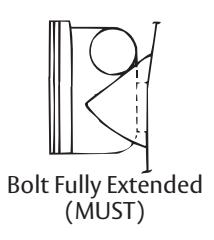
B. Position Strike Depth
- 7100(F) (WS), See Detail B.
- 7150(F) (WS), see Detail B1
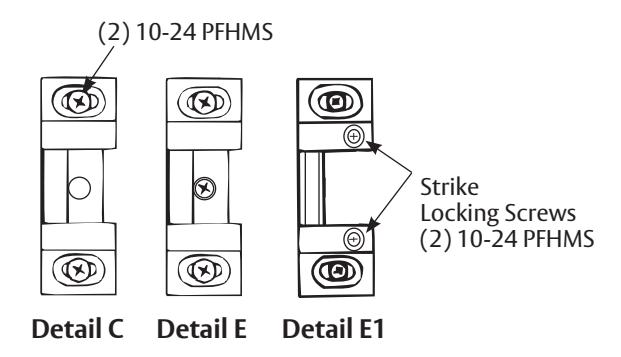
- C. Fasten Strike Securely, as shown on Detail C.
-
D. Check Bolt Engagement.
- 1. Bolt should retract to clear the strike, when actuated by bar, trim, or dogging action. Bolt should consistently reengage the strike, when actuators are released and the door shuts.
- 2. Door should remain latched and not rattle when pushed, pulled, or shaken in/out.
-
E. (Fire Devices only) Lock strike in place. See Detail E.
- 1. Prepare for and install strike center screw (1 #10-24 PFHMS). See E.
- 2. Windstorm Strike Application: Prepare for and install strike locking screws (2 #10-24 PFHMS). See E1.
-
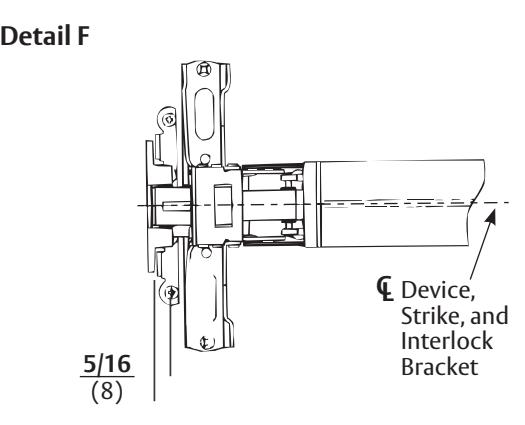
F. (Fire Mullion & Windstorm Installations Only) Stabilize strike. See Detail F.
- 1. Position strike interlock bracket in place as shown. Locate bracket holes.
- 2. Prepare interlock bracket mounting holes. Mount interlock bracket (4 #10-24 PFHMS or SNB).
Note: Interlock bracket and screws supplied with Fire Mullion and Windstorm products. Windstorm interlock bracket supercedes interlock bracket supplied with Fire Mullion. If using Windstorm product, remove and discard Fire Mullion interlock bracket.
Interlock Bracket Required for Fire Rated Rim Exit Device with Mullion. Interlock Bracket Supplied With Fire Mullion
(4) 10-24 PFHMS
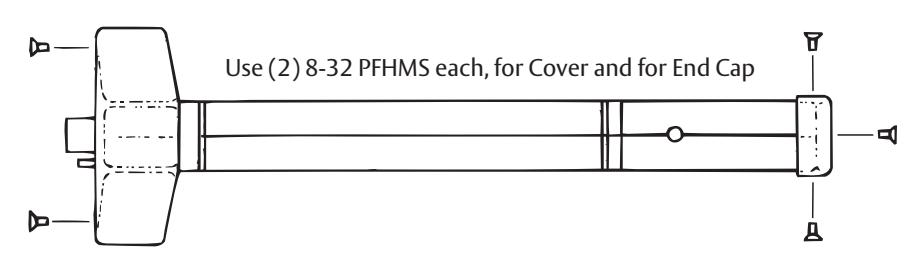
7. Install Head Cover and End Cap Top
80-9470-0000-000 10/23