ASSA ABLOY ACCENTRA 1530(F) Mortise Exit Devices Installation Instructions_80-9415-0030-000
Open the original PDF document
View PDF1530(F)
Mortise Exit Devices
Installation Instructions
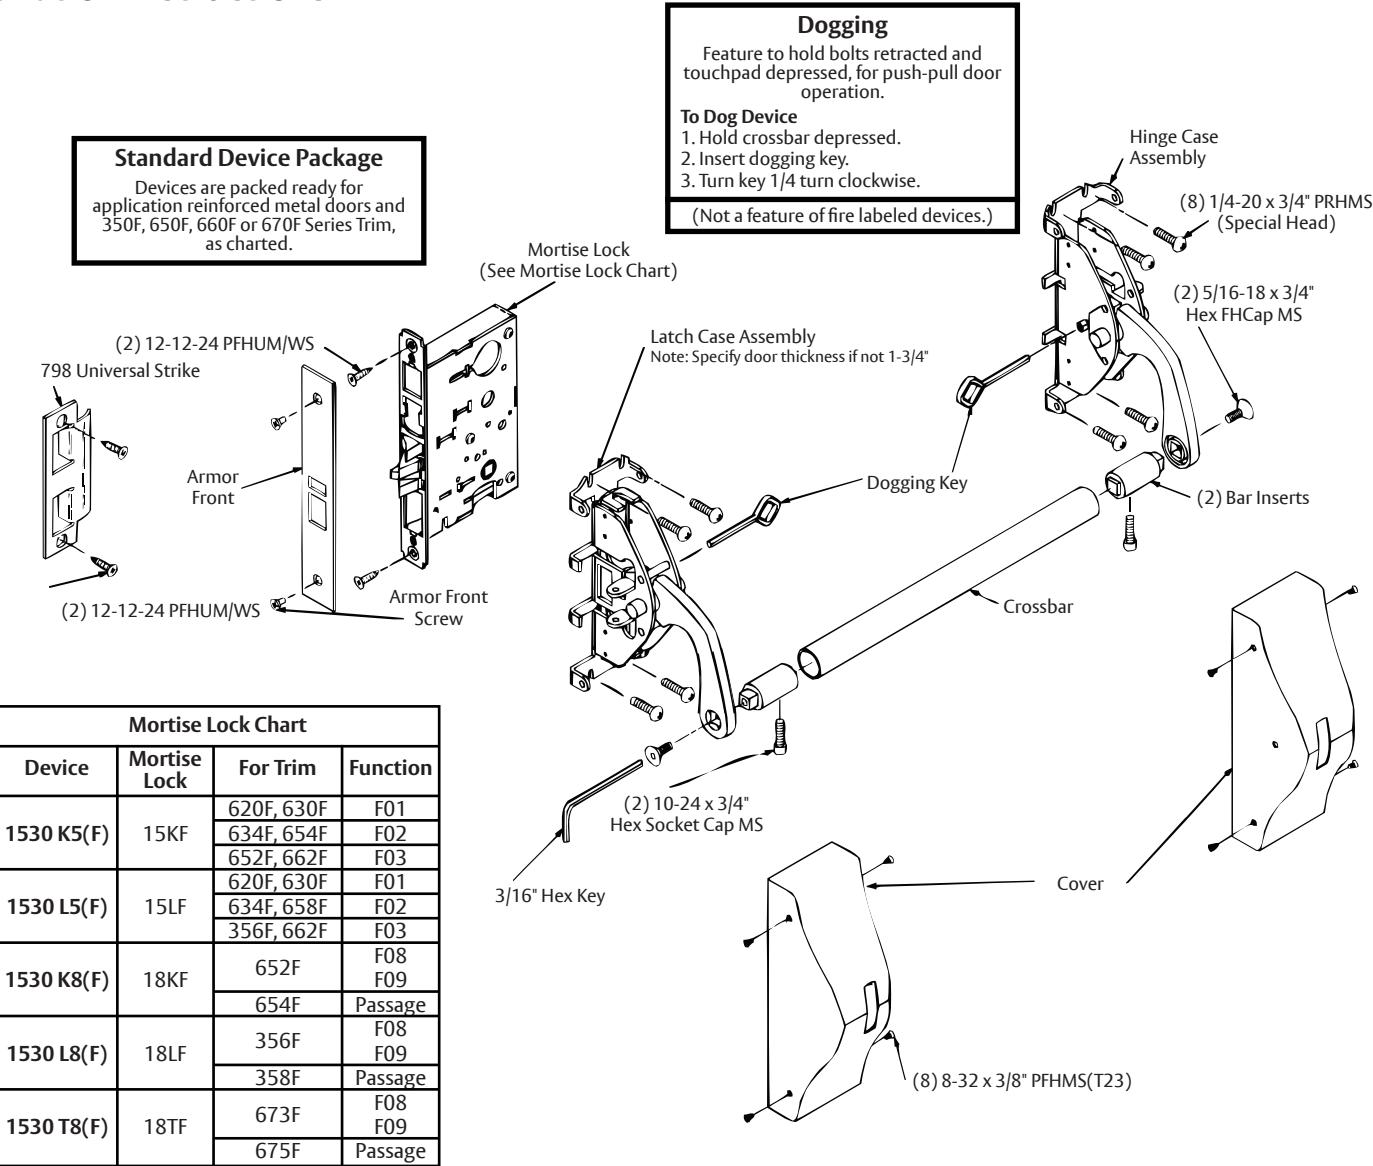
| ABBREVIATION | FASTENER DESCRIPTION |
|---|---|
| PRHMS | PHILLIPS ROUND HEAD MACHINE SCREW |
| PFHUMS/WS | PHILLIPS FLAT HEAD UNDER CUT MACHINE/WOOD SCREW |
| PFHMS | PHILLIPS FLAT HEAD MACHINE SCREW |
Notes:
- 1. These installation Instructions cover standard products. Options may use installation instructions packed with optional component.
- 2. Sex Nuts required for Composite, Wood, and Unreinforced Metal Doors. (See "Sex Nut Option".)
- 3. All dimensions are in inches (mm).
WARNING
This product can expose you to lead which is known to the state of California to cause cancer and birth defects or other reproductive harm. For more information go to www.P65warnings.ca.gov.

Attention Installer: Any retrofit or other field modification to a fire rated opening can potentially impact the fire rating of the opening, and ASSA ABLOY makes no representations or warranties concerning what such impact may be in any specific situation. When retrofitting any portion of an existing fire-rated opening, or specifying and installing a new fire-rated opening, please consult with a code specialist or local code official (Authority Having Jurisdiction) to ensure compliance with all applicable codes and ratings.
80-9415-0030-000 01/24
1530(F) Mortise Exit Devices Installation Instructions
To Change Hands
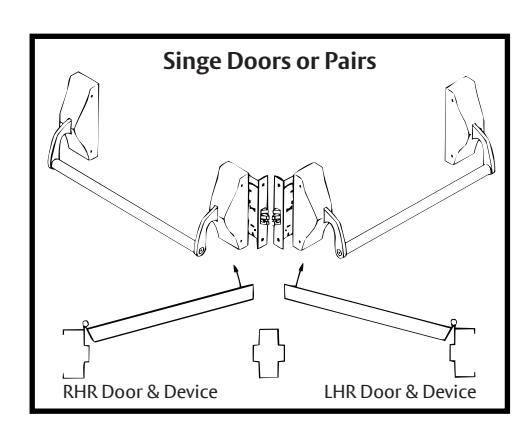
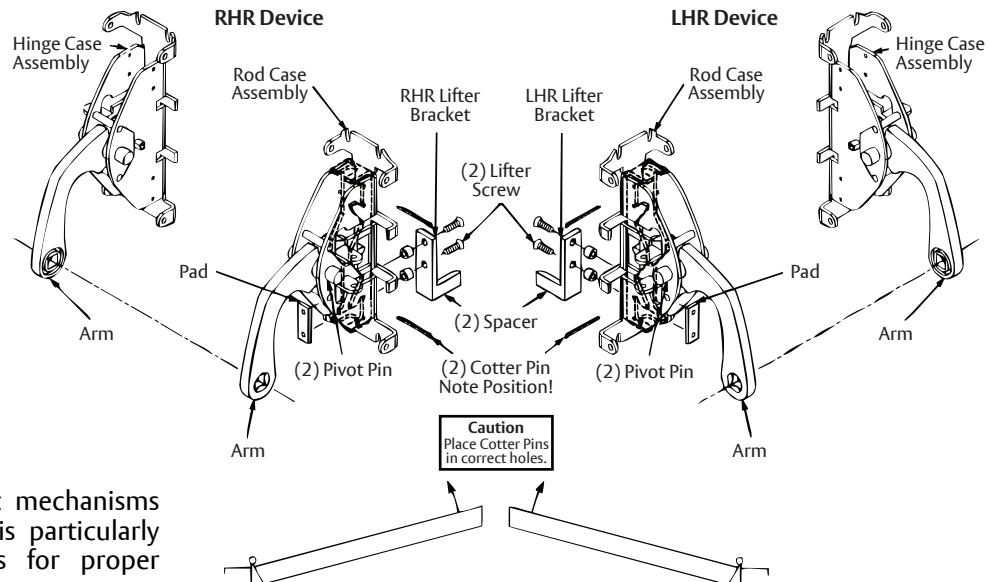
RHR Door
Maintenance
- Periodically remove covers and coat mechanisms with a silicone base lubricant. This is particularly required in corrosive environments for proper product function.
- 2. Check mounting fasteners periodically. Retighten if found loose. Apply screw locking compound (available at automotive part stores) or change part fasteners if screws continue to back out.
- 3. Periodic checks (and adjustments) of strikes are required to compensate for changes in the opening (e.g. door sagging).
Notes: Complete device required to swap arms between cases. Lifters shown are only for 1-3/4" doors.
LHR Door
Only essential parts are shown or highlighted, for clarity.
Check Before Starting
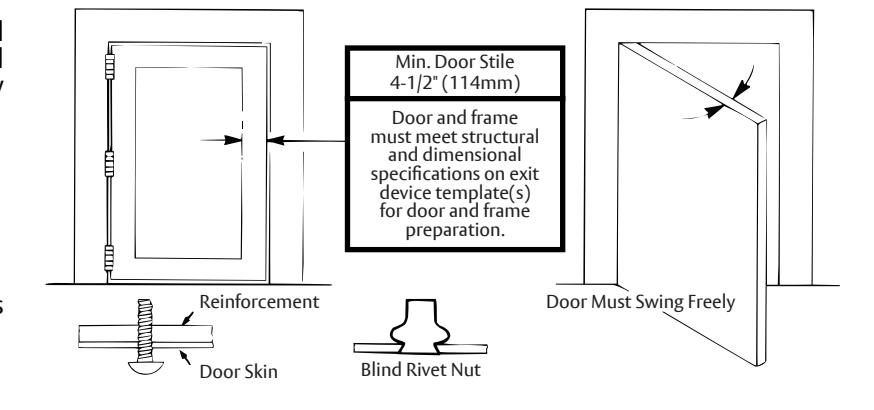
Unreinforced Doors or Frames
Doors and Frames with walls having a structural thickness (metal skin plus reinforcement or solid hardwood) to engage less than (3) full screw threads are considered unreinforced.
Unreinforced Doors: Use SNB (sex nuts and bolts).
Unreinforced Frames: Use Blind Rivet Nuts.
Recommended fasteners for unreinforced openings are not necessarily supplied by ASSA ABLOY.
1. Mark Door
Locate and Mark Horizontal and Vertical Reference Centerlines as shown.
Note: Centerline of Lock (cutout) must match HORIZONTAL REFERENCE centerline.
LHR Door shown, preparation is typical for both door hands.
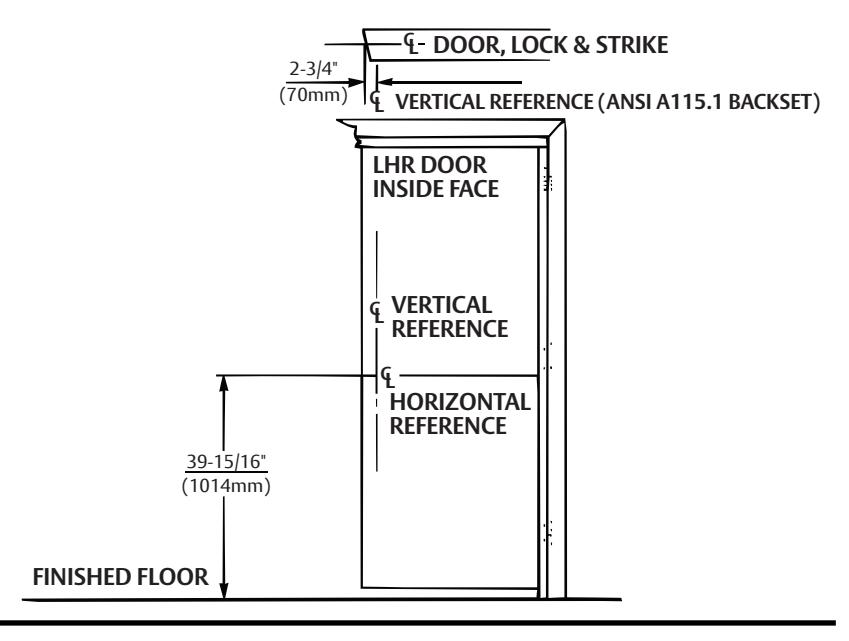
2. Prepare Door and Frame
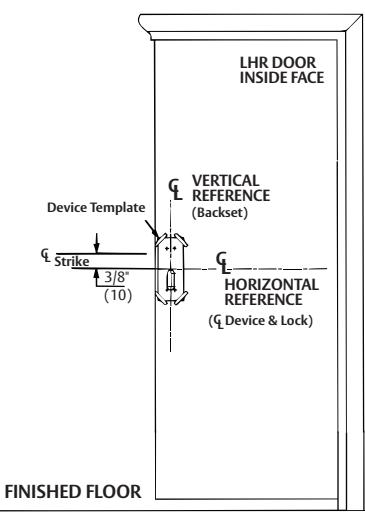
Factory prepared cutouts with field drilled mounting holes are recommended. If door (lock) and frame (strike) have to be mortised in the field, do it before continuing (follow instructions on Installation Template).
A. Locate and tape Trim Template to door. (See instructions packed with Trim)
B. Locate "Device Template" aligning VERTICAL REFERENCE and HORIZONTAL REFERENCE lines on door and template. Tape template to door face.
C. Spot and prepare holes needed. Device mounting holes are as follows:
Metal Reinforced Door: (4) 1/4-20 Machine Screws
All other doors: 3/8" (9.5) dia. SNB
D. Insert lock into mortise, adjust front for door edge (beveled or flat). Spot and prepare mounting holes. (2) lock holes for 12-24 Machine Screws or for #12 Wood Screws. Note: Lock front in position. Tighten (2) lockfront screws as shown in To Change Lock Front Hand".
E. Seat strike in frame cutout. Spot and prepare mounting holes. (2) strike holes for 12-24 Machine Screws or for #12 Wood Screws.
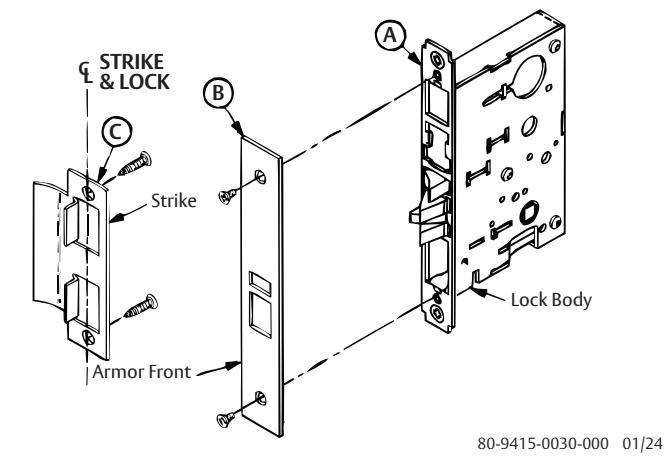
3. Install Lock and Strike
A. Install Lock
Lock in hand, depress guardbolt. Check that latchbolt is deadlocked. Check that latchbolt lever (and cylinder lever, hubs, and thumbpiece lever, if relevant) operate the lock freely.
Insert Lock Body into door cavity. Fasten to door edge (2 PUFHM/WS) NOTE: Make sure that door reinforcing clips or doorwalls support lock immovable (restricting rocking motion).
B. Install Armor Front
Fit over bolts and fasten to lock base front (2 PUFHMS). Check that bolts retract and extend freely.
C. Install Strike
Seat in place (lip bend away from opening). Fasten to frame (2 PUFHM/WS).
Experience a safer and more open world
1-855-557-5078 • www.assaabloy.com
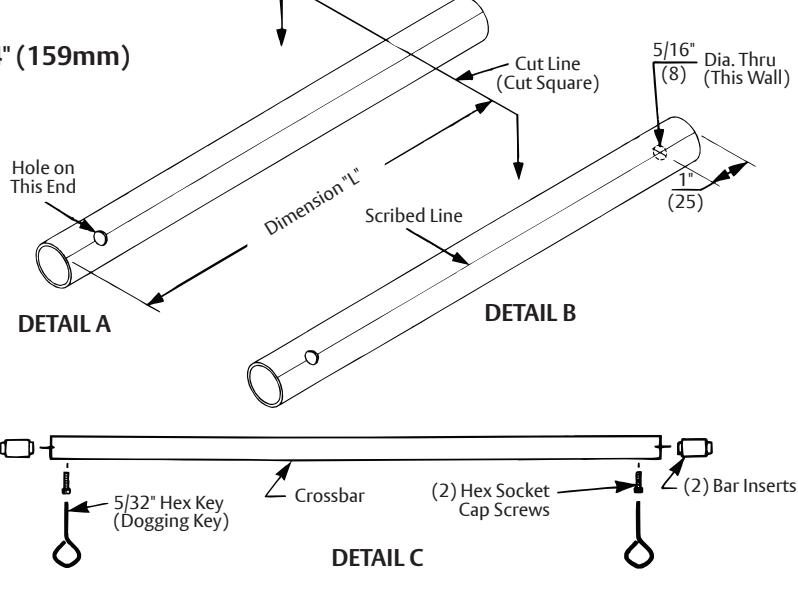
4. Prepare Crossbar
Crossbar length (L) = Door Opening Width - 6-1/4" (159mm)
A. Cut bar to required length (Detail "A").
B. Locate and drill hole (Detail "B").
C. Assemble crossbar (Detail "C").
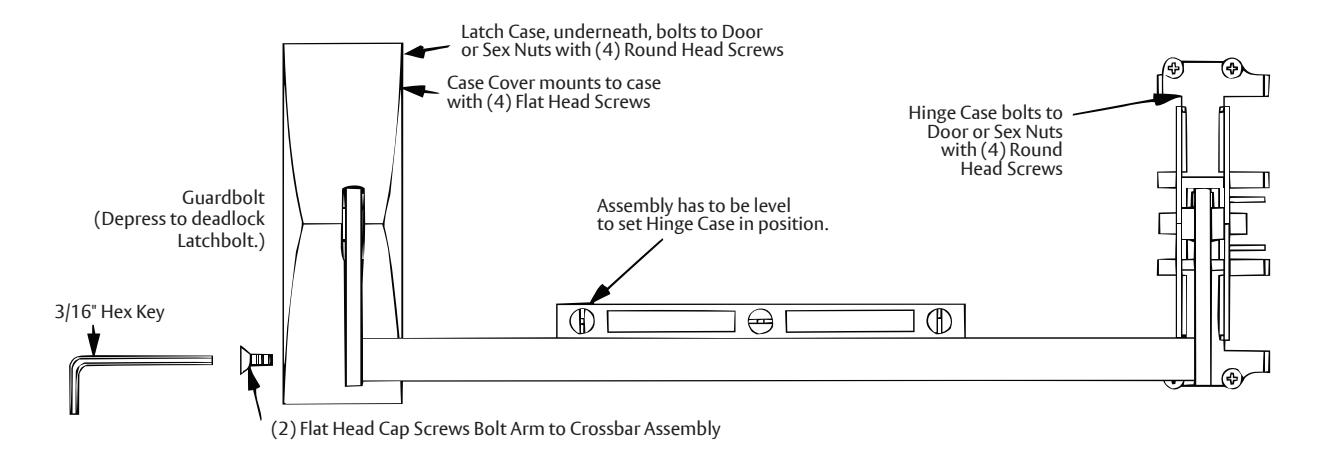
5. Mount Device
A. Install Trim. (Follow instructions packed with trim.)
B. Latch Case Lifter changes with different door thicknesses. When door is not 1-3/4" thick, verify lifter projection from the lifter seat on the back of the device. Correct lifter projection is Door Thickness divided in half + 1/4" (6.4).
C. Mount Latch Case of Device with (4) round head machine screws. Latch Case mounts to tapped door, trim studs, or sex nuts.
D. Check Device Action (Latchbolt should be fully extended and deadlocked when guardbolt is depressed. When device I. Reassemble crossbar. arm is depressed, the latchbolt should be fully retracted.
E. Install Latch Case Cover with (4) flat head screws.
F. Install Crossbar inserted into Latch Case and Hinge Case Arm grooves. Use crossbar and level to position Hinge Case, as a template.
G. Locate and prepare (4) holes for Hinge Case mounting screws, as follows:
Metal Reinforced Door: 1/4-20 machine screws All other doors: 3/8" (9.5) diameter SNB
H. Mount Hinge Case with (4) round head machine screws, and Hinge Case Cover with (4) flat head screws.
I. Check for smooth operation and screw latchbolt engagement. Action by crossbar, by trim, and by dogging should permit door to swing open.
Installation Instructions
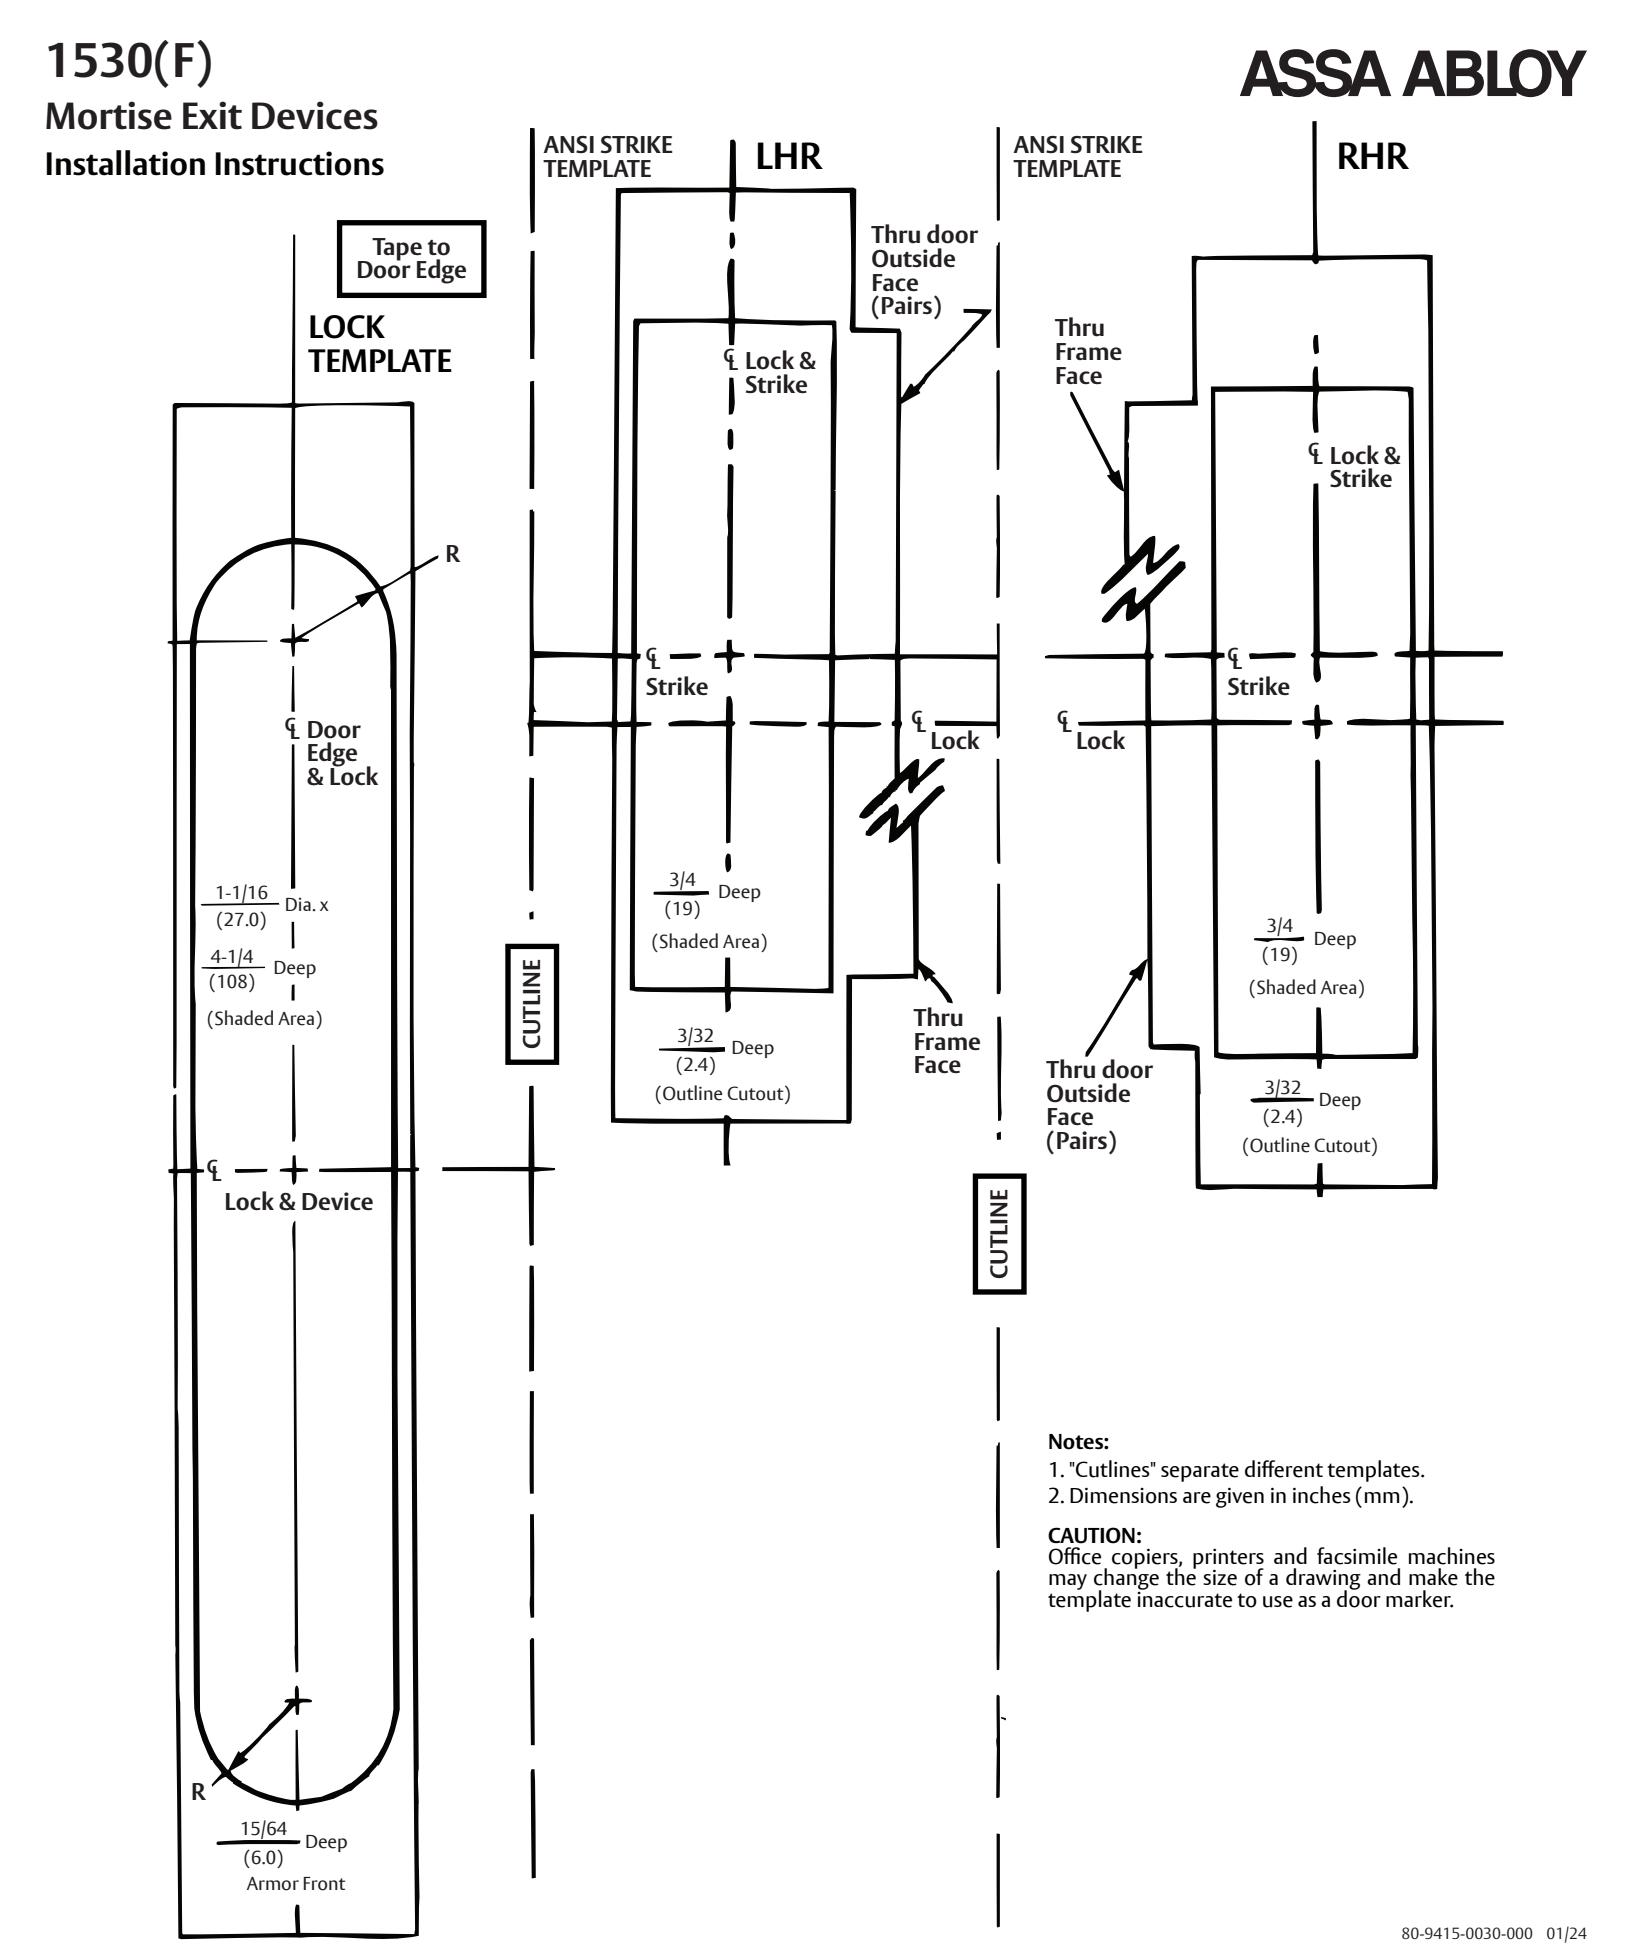
Strike Prep Instructions
- 1. Carry HORIZONTAL LOCK centerline to frame (single opening) or to other door (pair). Locate Horizontal Strike centerline 3/8" (10) above Lock centerline.
- 2. Carry VERTICAL DOOR centerline to single door frame (measure from stop 1/2 door width + height of silencers or weatherstripping), or to other door (pair). This is the Vertical Strike centerline.
- 3. Position and tape STRIKE TEMPLATE on frame rabbet or inactive door edge.
- 4. Cut strike mortise.
Note: For mounting holes, see Step 2, page 3.
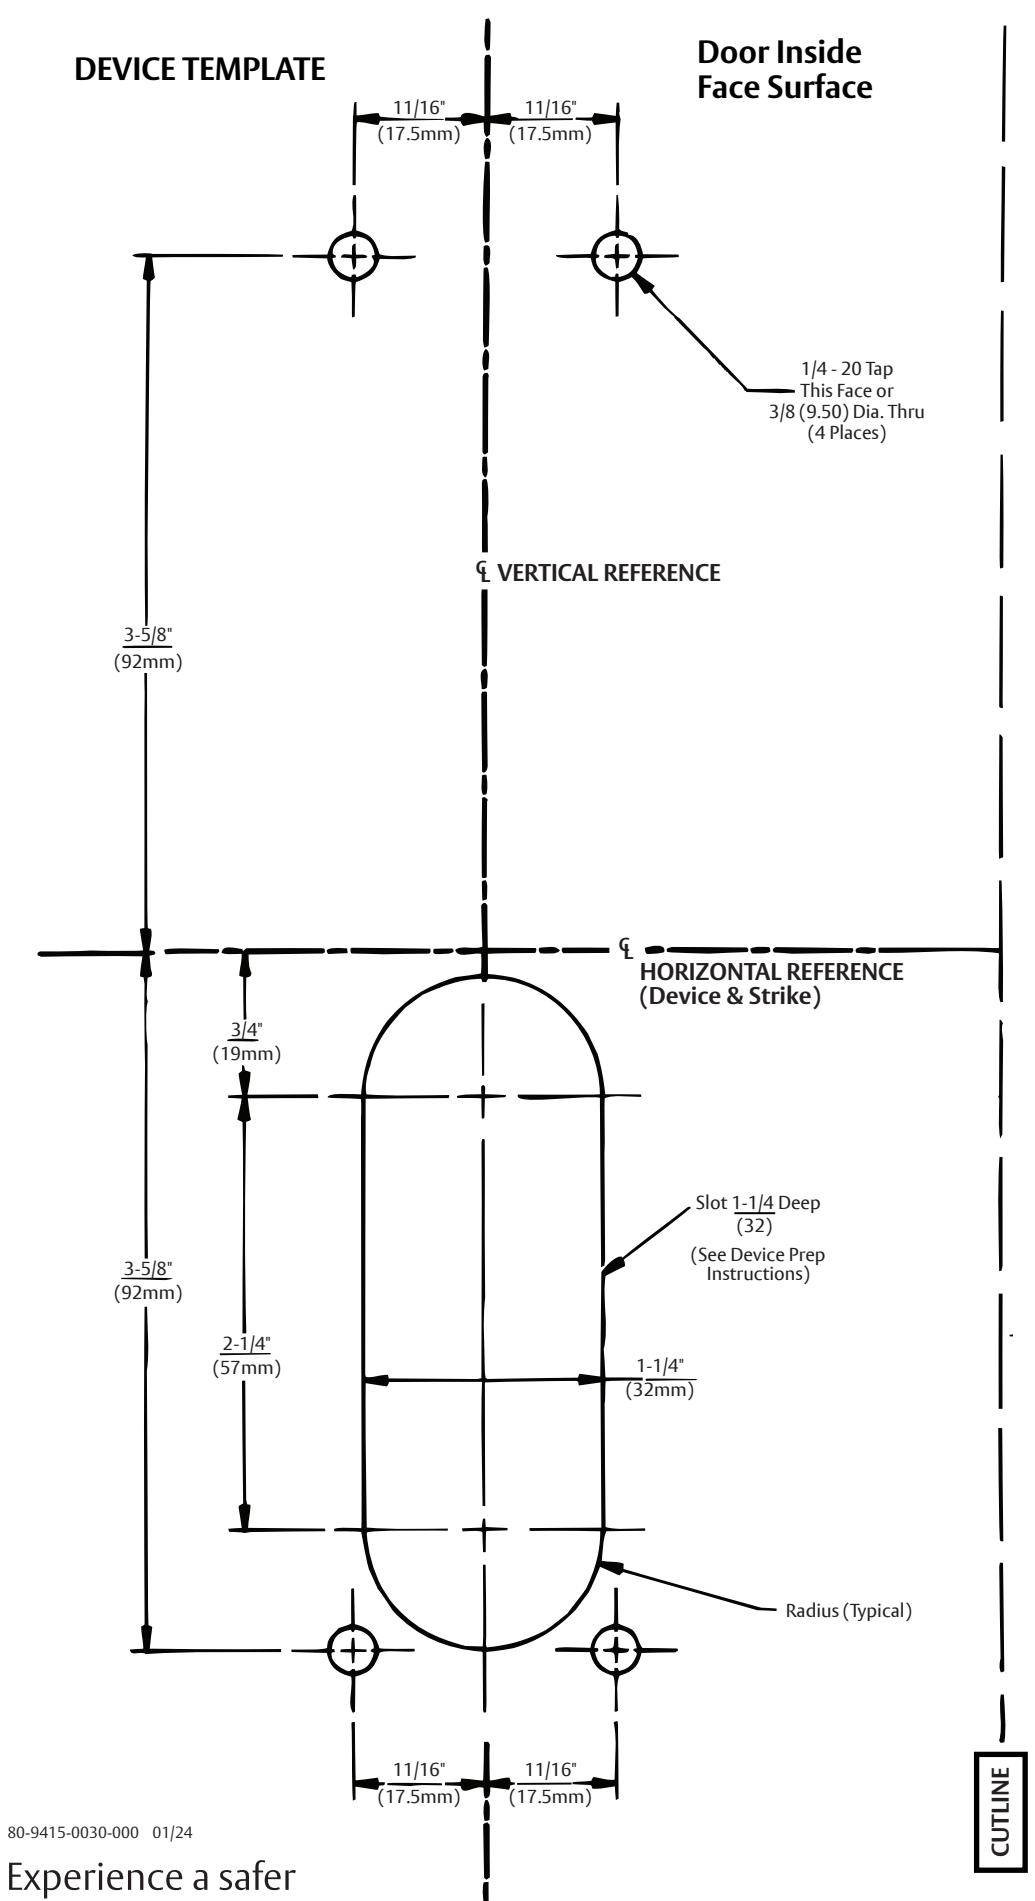
Device Prep Instructions
- 1. Align Device Template horizontal and vertical centerlines, with matching lines on door. Tape template to door.
- 2. Slot depth depends upon door thickness. Dimension "1-1/4" (32) Deep" is for 1-3/4" thick doors. For other door thicknesses:
Slot Depth = (1/2 x Door Thickness) + 3/8" (10)
3. For mounting hole prep, see page 5.
Lock Prep Instructions
- 1. Carry HORIZONTAL REFERENCE centerline to door edge. (This is the Lock centerline, not the Strike centerline.
- 2. Locate and mark VERTICAL centerline of door edge.
- 3. Position and tape LOCK TEMPLATE on door edge.
- 4. Cut mortise for lock body.
- 5. Attach Armor Front to Lock. Slide lock into mortise, with front adjusted to seat flat on door edge.
- 6. Align Armor Front with the top of the template outline. Mark physical front outline.
- 7. Cut door edge for lock front.
Note: For mounting holes, see Step 2, page 3.
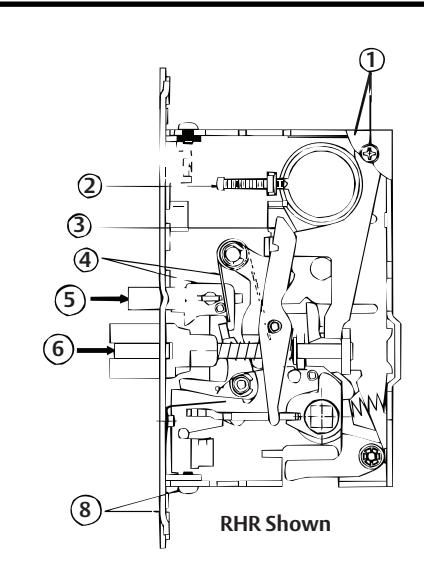
To Change Mortise Lock Hand
Using numbers in drawing as reference, reverse lock hand as follows:
- 1. Remove (3) cover screws and (1) lock cover.
- 2. Flip cylinder set screw assembly 180°.
- 3. Remove tail piece (some models).
- 4. Note spring and guardbolt plate position.
- 5. Holding plate in place, remove guardbolt. Flip guardbolt 180° and reinstall.
- 6. Remove latchbolt from inside the lock case. Flip 180° and reinstall.
- 7. Reinstall tailpiece, lock cover, and (3) cover screws.
- 8. Set lock front to align with flat or beveled door edge. Bevel high side towards cover for RHR, opposite to cover side for LHR. Secure top and bottom front locking screws.
Note: Lock components vary, according to function.
80-9415-0030-000 01/24
ASSA ABLOY
and more open world
1530(F)
Mortise Exit Devices Installation Instructions
CAUTION:
Office copiers, printers and facsimile machines may change the size of a drawing and make the template inaccurate to use as a door marker.
1-855-557-5078 • www.assaabloy.com
1-855-557-5078 • www.assaabloy.com
Experience a safer and more open world